

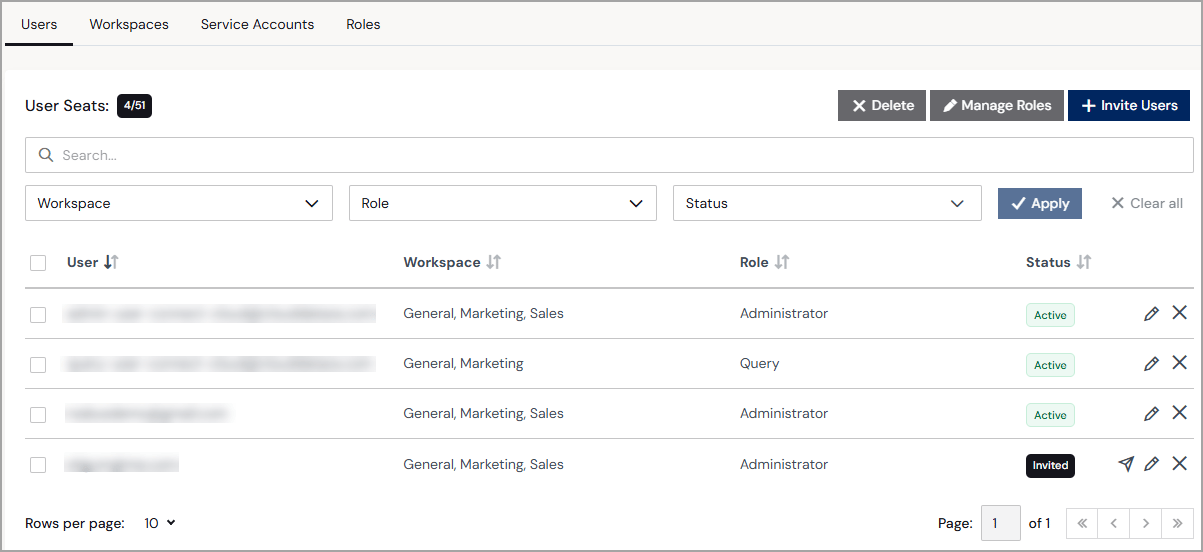
- A search bar for entering a user name.
- Drop-down lists for filtering by workspace name, role, and user status.
- The number of user seats that are available on your account.
- A row for every user on your account:
- User displays the email address that is associated with the user.
- Workspace displays the workspaces the user has access to.
- Role indicates the user’s system role.
- Status shows the state of the user’s account (Active, Inactive, or Invited).
- Edit and delete icons for the user. If the user’s status is Invited, there is also an icon to resend the user’s invitation.
Invite Users
If you have Just-in-Time (JIT) provisioning enabled, you do not need to invite users manually.
1
In the Users tab, click Invite Users to open the user invitation dialog.
2
Enter the email address of the user that you want to invite. To send multiple invitations at the same time, add a space between each email address.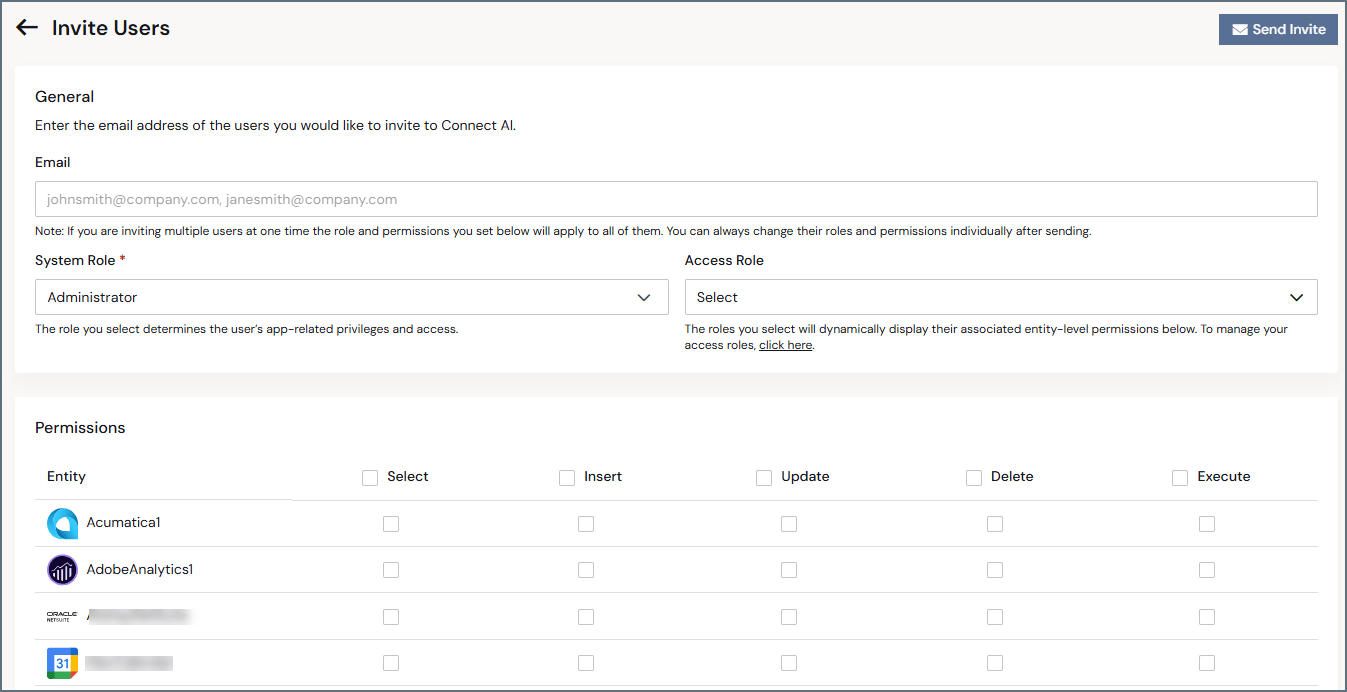
If you invite multiple users at the same time, they have the same roles. You can change their roles individually after sending the invitation.
3
Select the System Role for the new users.
4
(Optional) Select an Access Role for the new users.
5
(Optional) Select Permissions for the new users. Select the allowed permissions for each entity (data connection or virtual schema) in the system. Administrators, Workspace Administrators, and Connection Administrators can edit permissions later.For more information about permissions, see Permissions and Access Control.
6
Click Send Invite. If a user is registered already to an email address that you enter, the dialog prompts you to enter a different email address.
Accept an Invitation
Follow these steps to set up access after receiving an invitation email:1
Click Accept Invite in the invitation email to open the password creation page.
2
Create a password that meets the provided criteria. After you create a password, the login page
appears.
3
Log in with your email address and your new password. After you log in, the sign-up page
appears.
4
Enter your first name and last name.
5
Enter the account name and the invite code from the invitation email. Then, click Complete
Sign Up.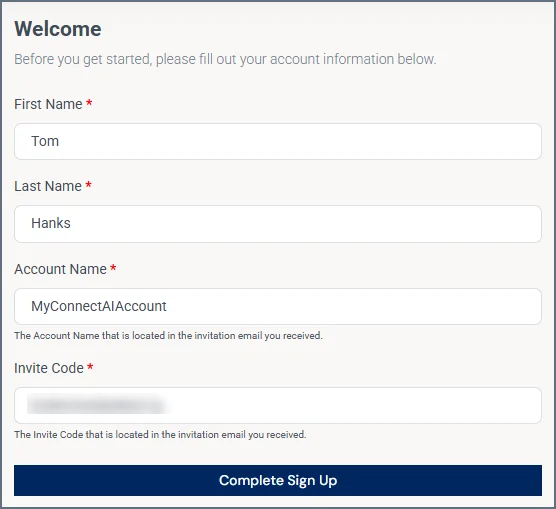
Connect AI supports Single Sign-On (SSO) through popular SSO providers. If SSO is enabled on your
account, the invitation flow uses your SSO provider instead of the manual password process.
Manage Invitations
If a user has a pending invitation that they have not accepted, their status displays as Invited. Click a pending user to view and manage their invitation. On this page, you can view the pending user’s email address, the expiration time for the invitation, and the invite code. You can also manage the user’s invitation, as follows:- To revoke the invitation and delete the user, click Delete User.
- To resend the invitation email to the entered email address, click Resend Invite.
Edit Users
Click a user in the list (or click the Edit button) to open the Edit User page.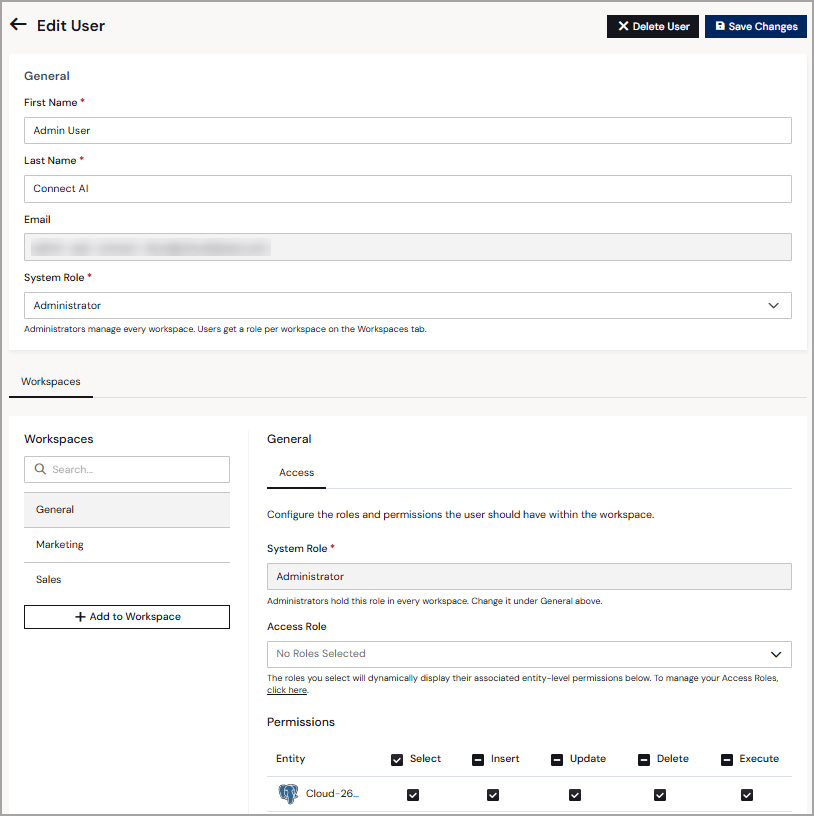
- Editable First Name and Last Name fields.
- A non-editable Email field.
- A drop-down menu to select the user’s System Role (Administrator or User). Administrators have full access to the account and every workspace, while Users have access set per workspace.
- The Workspaces section contains the workspaces in which to view the user’s system and access roles. Select a workspace to view the user’s roles in that workspace. Click + Add to Workspace to add the user to an additional workspace. See Add a User to a Workspace for details.
-
The General section contains a drop-down menu for selecting the user’s System Role within that workspace (Workspace Administrator, Connection Administrator, User Administrator, or Query), and an optional Access Role. This drop-down is available only for a user whose account-wide system role is User. Access roles are created in Roles.
A user can hold only one system role per workspace. Access Roles are additive, so a user can hold several Access Roles in the same workspace alongside their single system role.
- The Permissions section contains check boxes for toggling the user’s permissions for each data source. These permissions are for the selected workspace only. (Note that CData Connect Spreadsheets users do not have a permissions section, because they have full permissions.)
Add a User to a Workspace
A user must be added to a workspace before you can assign them a system role or an access role in that workspace.1
In the Workspaces section of the Edit User page, click + Add to Workspace to open the Add User to Workspace dialog.
2
Select the Workspace to add the user to.
3
Select a System Role and an Access Role (optional) for the user in the workspace. See Roles for role definitions.
4
Click Add to add the user to the workspace.
Delete a User
To delete a user, click Delete User on the Edit User page.If the user is the last remaining Administrator on your account, they cannot be deleted.