> ## Documentation Index
> Fetch the complete documentation index at: https://docs.cloud.cdata.com/llms.txt
> Use this file to discover all available pages before exploring further.
# ODBC
> This page outlines the steps to use the ODBC Driver with Connect AI Embed.
## Prerequisites
Before you connect, you must first generate an [OAuth JWT bearer token](/ja/API/Authentication-Embedded). Copy this down, as it acts as your password during authentication.
## Install the Driver
Download and run the ODBC setup file for your operating system.
* [Windows Download](https://www.cdata.com/download/getfile.aspx?file=free/LFDK-A/setup.exe\&name=CData%20Connect%20ODBC%20Driver\&tag=Download-connect)
* [Linux Download (64-bit.deb)](https://www.cdata.com/download/getfile.aspx?file=free/LFDK-U/setup.x86_64.deb\&name=CData%20Connect%20ODBC%20Driver%20\(Unix\)\&tag=Download-connect)
* [Linux Download (64-bit.rpm)](https://www.cdata.com/download/getfile.aspx?file=free/LFDK-U/setup.x86_64.rpm\&name=CData%20Connect%20ODBC%20Driver%20\(Unix\)\&tag=Download-connect)
After installation, follow the steps for your platform below.
## Create a DSN
The following guides show how to use the standard tools to configure data source names (DSN). You will need to configure the DSN to use the driver.
### Windows
Follow these steps to edit the DSN configuration using the Microsoft ODBC Data Source Administrator:
Open the Start menu and enter *ODBC Data Sources* in the Search box.
Choose the version of the ODBC Administrator that corresponds to your application (32-bit or 64-bit).
Click the **System DSN** tab.
Select **Connect Sys** and click **Configure**.
For the **Auth Scheme**, select **OAuth**.
In the **Misc** section, enter the connection name of the data source you want to access in the **Default Catalog** field (e.g., Salesforce1).
Click **Test Connection** to open the Connect AI sign-in window in your web browser.
If you are not already signed in, sign in to your Connect AI account.
When the **OAuth Authorization Successful** message appears, close the web browser and return to the ODBC Administrator.
Click **OK** on the success message, **OK** in the DSN Configuration window, then **OK** in the ODBC Data Source Administrator window.
**Note:** For .NET Framework 4.0, the driver distributes Microsoft Visual C++ 2017 Redistributable. For .NET Framework 3.5, the driver distributes Microsoft Visual C++ 2008 Redistributable.
### macOS
**Note:** The ODBC Driver for Connect AI requires macOS Sierra (10.12) or above.
On macOS, the ODBC Driver for Connect AI is pre-configured for use with the iODBC driver manager. You can find the latest version of iODBC on the [iODBC site](http://www.iodbc.org/).
Follow these steps to configure the driver:
Install iODBC and ODBC Driver for the Connect AI.
Launch the iODBC Data Source Administrator.
* Under most circumstances, the driver should automatically appear in the **System DSN** tab of the iODBC Data Source Administrator. If it does, continue to [Logging In](#logging-in).
* If the driver does not appear automatically, follow the steps under [Manually Add the Driver](#manually-add-the-driver).
#### Logging In
Connect AI Embed users can connect the ODBC client using OAuthJWT authentication. Set the **Auth Scheme** in your ODBC connection as **OAuthJWT**.
Follow the steps below to connect the driver to your Connect AI account:
In the iODBC Data Source Administrator, click on the driver entry on the **User DSN** or **System DSN** tab to select it.
Click **Test**.
A login prompt appears. Leave the fields blank and click **OK**.
The Connect AI OAuth login page opens in your default web browser. If you are not already logged in, enter your credentials and sign in.
When the OAuth success page appears, close the window and return to iODBC.
Click **OK** on the success message, and click **OK** to close the iODBC Data Source Administrator.
You can now use the configured connection in any tools or applications that support ODBC connectivity.
#### Manually Add the Driver
If the ODBC Driver for Connect AI does not automatically appear in the iODBC Data Source Administrator, first check if you have existing ODBC configuration files called `odbc.ini` and `odbcinst.ini`.
* User DSN files appear in `/Users/[myuser]/Library/ODBC/`.
* System DSN files appear in `/Library/ODBC/`.
**Files Do Not Exist**\
If the files do not already exist in either of the directories above, follow these steps:
Navigate to the driver install directory. By default, this is `/Applications/CData ODBC Driver for CData Connect/`.
Open the `etc` folder and copy the `odbc.ini` and `odbcinst.ini` files.
Copy the files to either the User DSN or System DSN directory.
* The User DSN directory is `/Users/[myuser]/Library/ODBC/`. If you choose this option, you can only access your connection for the user you install it for.
* The System DSN directory is `/Library/ODBC/`. If you choose this option, you can access the connection for all users, but copying the files may prompt you for elevated permissions.
Quit and re-launch the iODBC Data Source Administrator.
Follow the steps for [Logging in](#logging-in) to complete setup.
**Files Already Exist**\
If you already have ODBC configuration files in one of the directories above, follow these steps:
Navigate to the driver install directory. By default, this is `/Applications/CData ODBC Driver for CData Connect/`.
Open the `etc` folder and then open the `odbc.ini` file. Copy the contents to your clipboard.
Open the existing `odbc.ini` file in the DSN directory.
* If it is in the User DSN directory (`/Users/[myuser]/Library/ODBC/`), you can open the file directly through Finder.
* If it is in the System DSN directory (`/Library/ODBC/`), you will need to open the file with elevated permissions. Open a Terminal window and enter:
```bash theme={null}
sudo nano /Library/ODBC/odbc.ini
```
Provide your password when prompted.
Paste the contents of the `odbc.ini` file from the Driver installation directory into the bottom of the existing `odbc.ini` file in the DSN directory.
Save your changes. If you are in a terminal window, use the key combination **Control ^**+**O**.
Repeat steps 2 through 5 above for the `odbcinst.ini` file.
Quit and re-launch the iODBC Data Source Administrator.
Follow the steps for [Logging in](#logging-in) to complete setup.
### Linux
Click [here](https://cdn.cdata.com/help/LFG/odbc/pg_connectionodbclinux.htm) for documentation on configuring a DSN on Linux.
## Designate a Log File
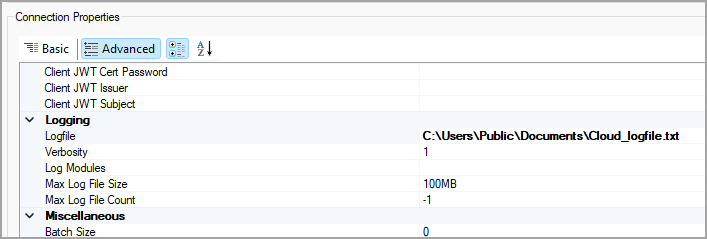
You can designate a log file for the ODBC driver in the **Advanced** tab of **Connection Properties**. You can also change the verbosity of the log file for greater detail.
 ## More Information
To learn more information about using the ODBC Driver for Connect AI, click [here](https://cdn.cdata.com/help/LFM/odbc/default.htm).
## More Information
To learn more information about using the ODBC Driver for Connect AI, click [here](https://cdn.cdata.com/help/LFM/odbc/default.htm).