> ## Documentation Index
> Fetch the complete documentation index at: https://docs.cloud.cdata.com/llms.txt
> Use this file to discover all available pages before exploring further.
# Microsoft Power Apps
> OpenAPI 仕様または仮想SQL Server API を使用して、Microsoft Power Apps をConnect AI に接続できます。
## OpenAPI 経由で接続するための前提条件
OpenAPI 経由で接続する前に、まず以下を実行します。
* データソースをConnect AI アカウントに接続します。詳しくは、[Sources](/ja/Sources) を参照してください。
* ワークスペースに[ワークスペースを追加](/ja/Workspaces#ワークスペースを追加)します。
* ワークスペースに[アセットを追加](/ja/Workspaces#ワークスペースのアセット)します。
* [Settings](/ja/Settings#personal-access-tokens) ページでPersonal Access Token (PAT) を生成します。PAT をコピーし、認証時にパスワードとして使用します。
## OpenAPI 経由で接続
OpenAPI 経由でMicrosoft Power Apps からConnect AI へのコネクションを確立するには、以下の手順に従います。
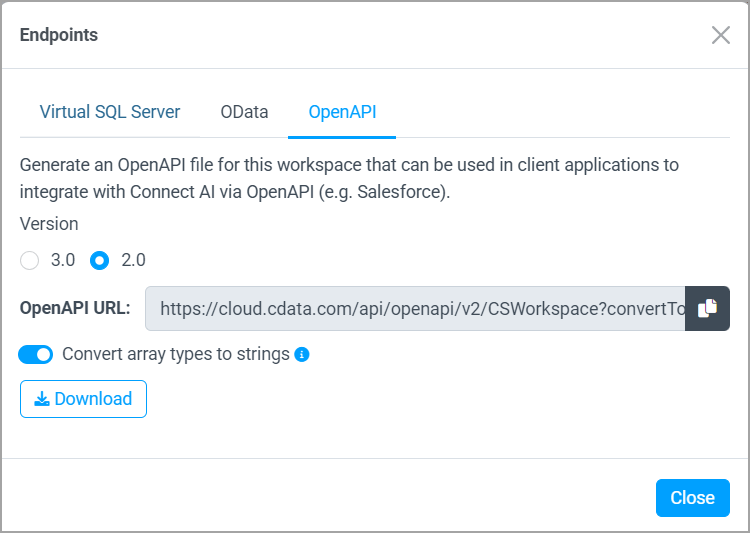
Connect AI の**Workspaces** で、ワークスペースを選択し、そのワークスペースの OpenAPI 仕様をダウンロードします。詳しくは、[OpenAPI](/ja/API/OpenAPI) を参照してください。
OpenAPI バージョン2.0 を使用し、**Convert array types to strings** を選択する必要があります。
 Microsoft Power Apps にログインします。
**Custom connectors** を選択してカスタムコネクタを作成します(**Custom connectors** を見つけるには、**Discover all** をクリックする必要がある場合があります)。
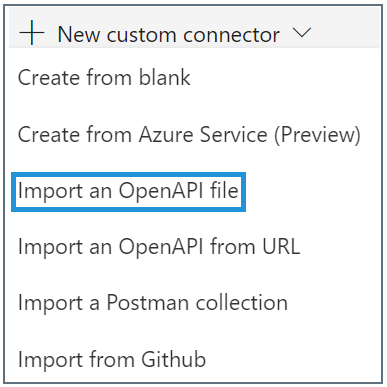
Select **New custom connector** > **Import an OpenAPI file**.
Microsoft Power Apps にログインします。
**Custom connectors** を選択してカスタムコネクタを作成します(**Custom connectors** を見つけるには、**Discover all** をクリックする必要がある場合があります)。
Select **New custom connector** > **Import an OpenAPI file**.
 Enter a **Connector name** and import the OpenAPI specification file you downloaded.
In the **1. General** step, enter general information about the connector, including a description. **Host** and **Base URL** are required, but are already filled in.
In the **2. Security** step, select an **Authentication type** of **Basic authentication**. Users have to provide a user name and password before using this API. Enter the parameter labels that users will see.
When you use the custom connector, the user name is the Connect AI user name, and the password is the PAT created in the prerequisites.
The **3. Definition** step of the connector defines all the actions of the connector that are contained in the OpenAPI specification file. The actions include all the functions you need for the table, including list, get, create, update, and delete records.
In the **3. Definition** step, you can edit the **Actions**, **References**, and **Policies** imported from the OpenAPI specification.
* **Actions**—each action in the custom connector has **General** information, as well as the **Request**, **Response**, and **Validation** of the response.
For example, the following request is a GET request to list drives.
Enter a **Connector name** and import the OpenAPI specification file you downloaded.
In the **1. General** step, enter general information about the connector, including a description. **Host** and **Base URL** are required, but are already filled in.
In the **2. Security** step, select an **Authentication type** of **Basic authentication**. Users have to provide a user name and password before using this API. Enter the parameter labels that users will see.
When you use the custom connector, the user name is the Connect AI user name, and the password is the PAT created in the prerequisites.
The **3. Definition** step of the connector defines all the actions of the connector that are contained in the OpenAPI specification file. The actions include all the functions you need for the table, including list, get, create, update, and delete records.
In the **3. Definition** step, you can edit the **Actions**, **References**, and **Policies** imported from the OpenAPI specification.
* **Actions**—each action in the custom connector has **General** information, as well as the **Request**, **Response**, and **Validation** of the response.
For example, the following request is a GET request to list drives.
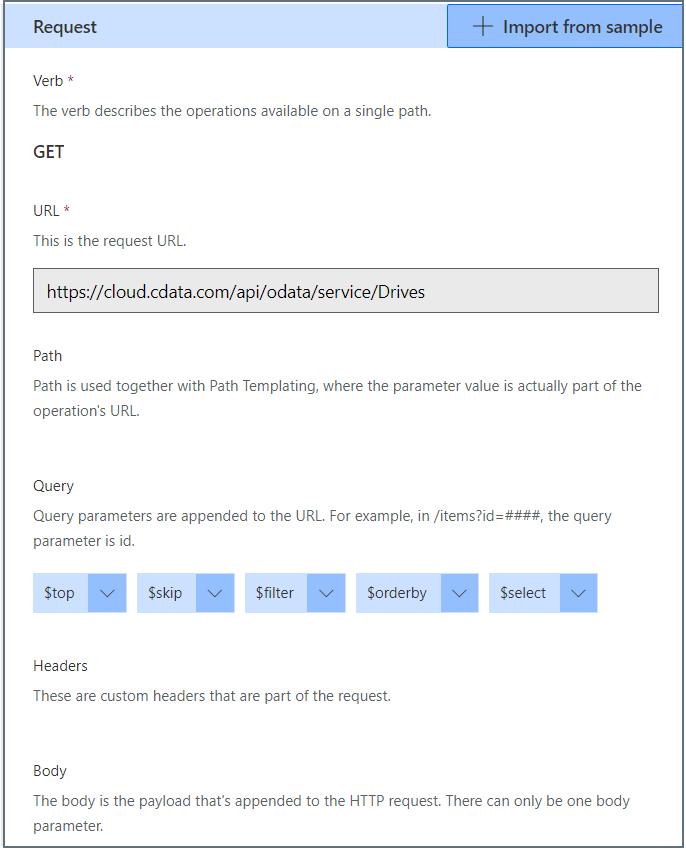 The request includes query parameters that are appended to the URL, such as `$top`, `$filter`, and `$orderby`. You can edit and delete the query parameters here. The parameters are based on the OData protocol.
See [API Operations](/ja/API/OpenAPI#api-operations) for a complete reference.
The **Test** step of creating a custom connector is where you can test out the query parameters.
Similarly, there is a POST request to create a new record. The request contains all the fields for the record. You can edit these fields in the definition.
* **References**—reusable parameters that are used by both actions and triggers. Each reference has a **Definition** and **Validation**.
* **Policies**—used to change the behavior of actions through configuration.
Save the custom connector.
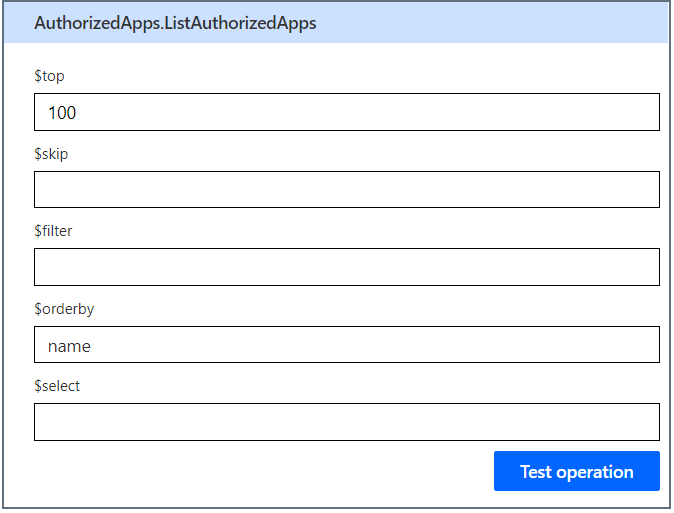
In the **6. Test** step, you can test the behavior of each operation defined in the OpenAPI specification by applying query parameters.
For example, you can test the `$top` and `$orderby` query parameters by returning the top 100 records, ordered by `name`.
The request includes query parameters that are appended to the URL, such as `$top`, `$filter`, and `$orderby`. You can edit and delete the query parameters here. The parameters are based on the OData protocol.
See [API Operations](/ja/API/OpenAPI#api-operations) for a complete reference.
The **Test** step of creating a custom connector is where you can test out the query parameters.
Similarly, there is a POST request to create a new record. The request contains all the fields for the record. You can edit these fields in the definition.
* **References**—reusable parameters that are used by both actions and triggers. Each reference has a **Definition** and **Validation**.
* **Policies**—used to change the behavior of actions through configuration.
Save the custom connector.
In the **6. Test** step, you can test the behavior of each operation defined in the OpenAPI specification by applying query parameters.
For example, you can test the `$top` and `$orderby` query parameters by returning the top 100 records, ordered by `name`.
 You can now build apps with your custom connector.
## 仮想SQL Server API 経由で接続するための前提条件
仮想SQL Server API 経由で接続する前に、まず以下を実行します。
* データソースをConnect AI アカウントに接続します。詳しくは、[Sources](/ja/Sources) を参照してください。
* Connect AI ワークスペースに接続する場合は、Workspaces に[ワークスペースを追加](/ja/Workspaces)して、自分のワークスペースに[アセットを追加](/ja/Workspaces)します。
* [Settings](/ja/Settings#personal-access-tokens) ページでPersonal Access Token (PAT) を生成します。PAT をコピーし、認証時にパスワードとして使用します。
## 仮想SQL Server API 経由で接続
Microsoft Power Apps からConnect AI の仮想SQL Server API へのコネクションを確立するには以下の手順に従います。
Microsoft Power Apps にログインします。
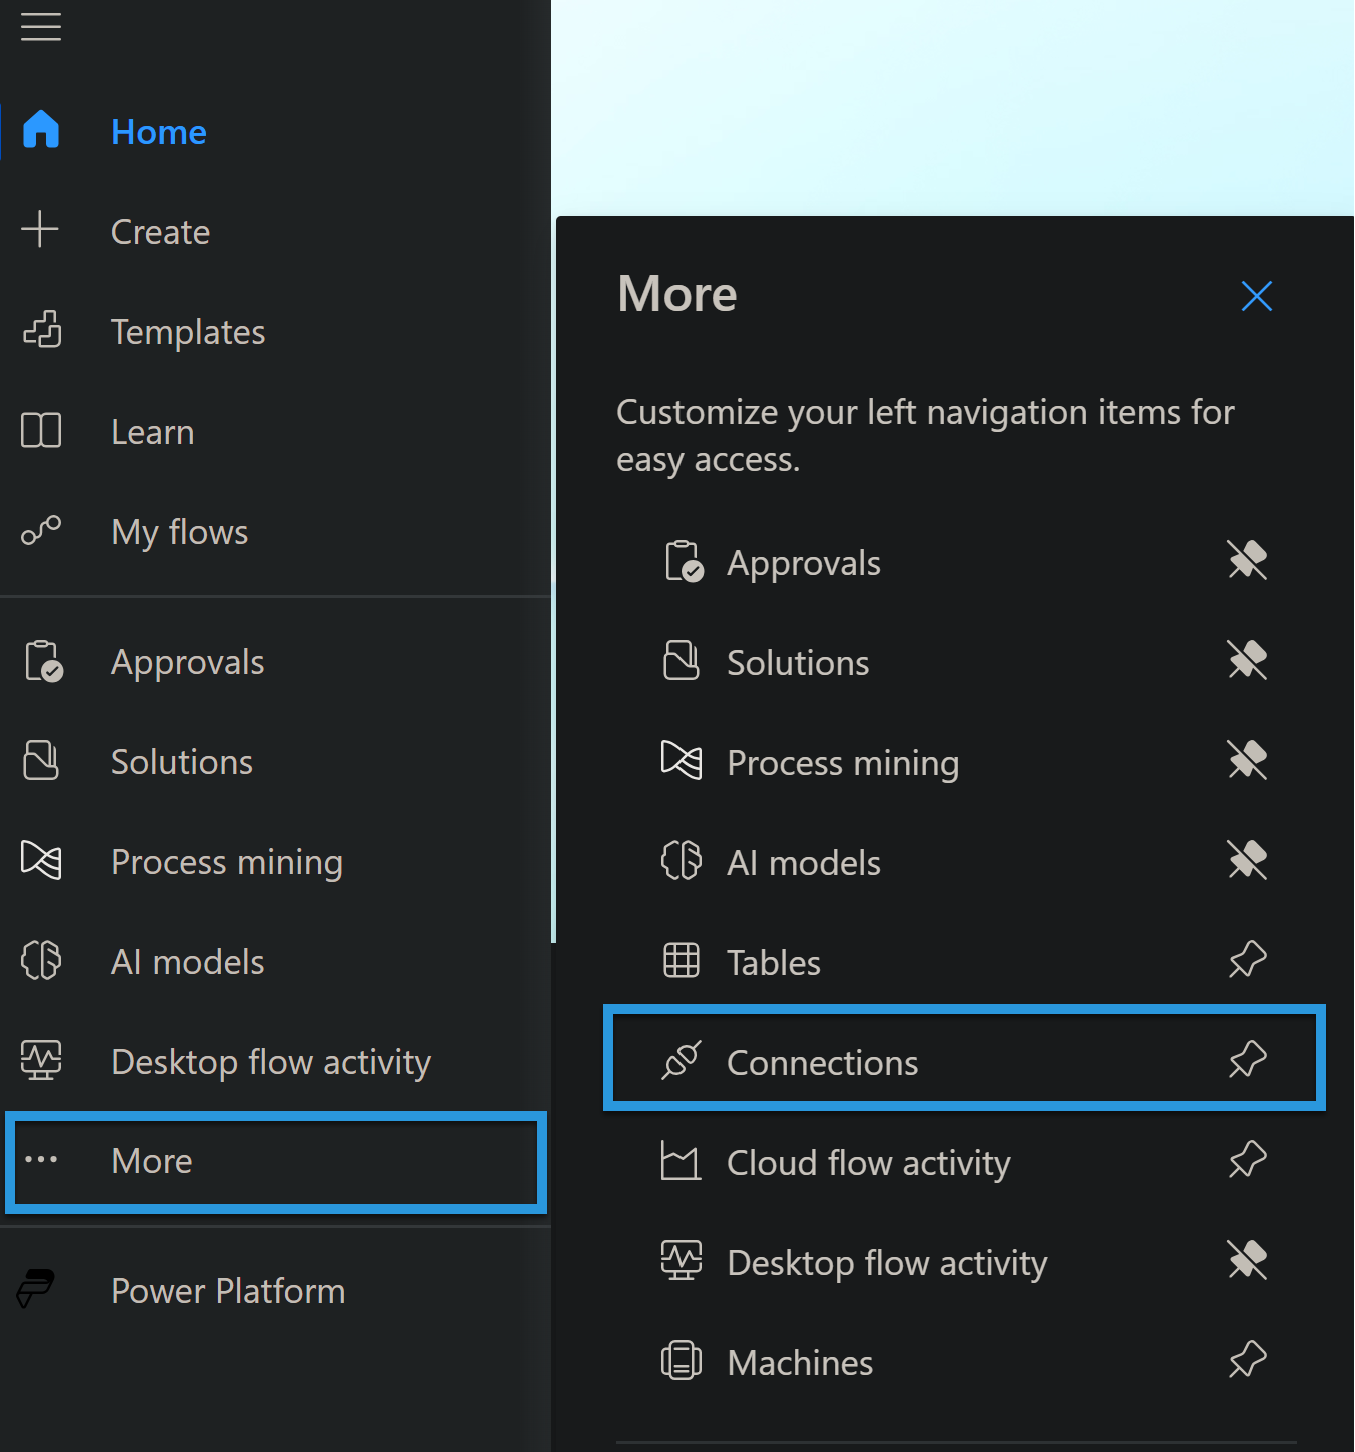
ナビゲーションメニューで**More** -> **接続** を開きます。
You can now build apps with your custom connector.
## 仮想SQL Server API 経由で接続するための前提条件
仮想SQL Server API 経由で接続する前に、まず以下を実行します。
* データソースをConnect AI アカウントに接続します。詳しくは、[Sources](/ja/Sources) を参照してください。
* Connect AI ワークスペースに接続する場合は、Workspaces に[ワークスペースを追加](/ja/Workspaces)して、自分のワークスペースに[アセットを追加](/ja/Workspaces)します。
* [Settings](/ja/Settings#personal-access-tokens) ページでPersonal Access Token (PAT) を生成します。PAT をコピーし、認証時にパスワードとして使用します。
## 仮想SQL Server API 経由で接続
Microsoft Power Apps からConnect AI の仮想SQL Server API へのコネクションを確立するには以下の手順に従います。
Microsoft Power Apps にログインします。
ナビゲーションメニューで**More** -> **接続** を開きます。
 **新しい接続**をクリックし、利用できる接続のリストを開きます。
**SQL Server** を選択します。ダイアログが表示されたら、**SQL Server 認証**を選択します。
接続設定を入力します。
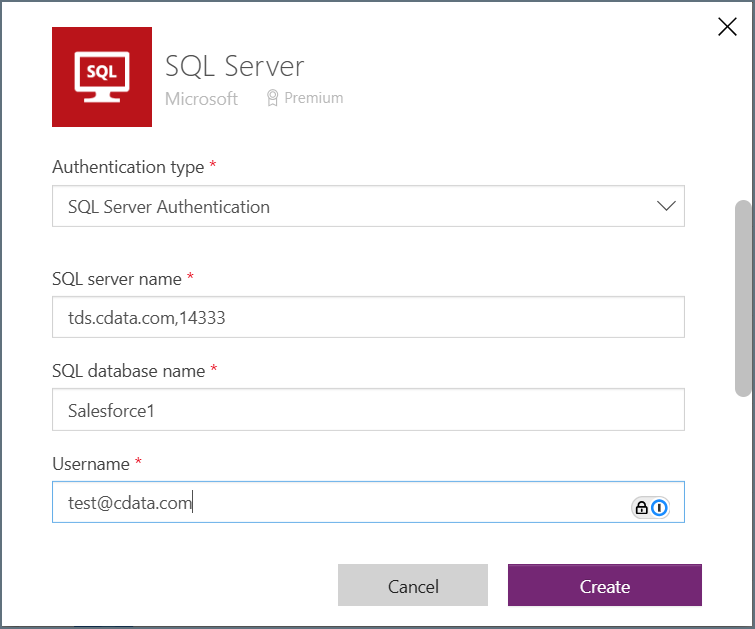
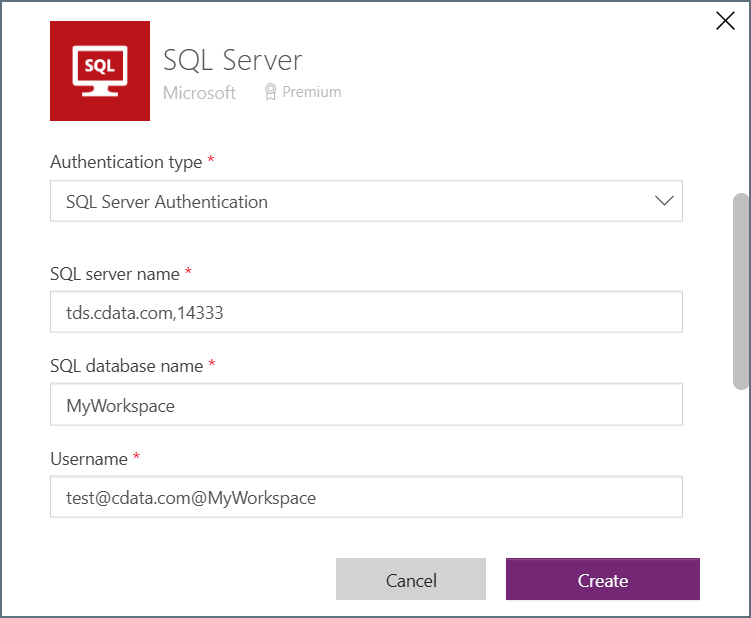
* **SQL サーバー名**—次のように仮想SQL Server のエンドポイントとポートをカンマで区切って入力します。例:*tds.cdata.com*,*14333*
* **SQL データベース名**—接続したいConnect AI データソースのConnection Name を入力します。例:*Salesforce1* To connect to a workspace, set the **SQL database name** to the name of your workspace (for example, *MyWorkspace*).
* **ユーザー名**—Connect AI のユーザー名を入力します。ユーザー名は、Connect AI の画面の右上に表示されています。例:*[test@cdata.co.jp](mailto:test@cdata.co.jp)* To connect to a workspace, set the **Username** to `[CData_username]@[workspace_name]` (for example, *[test@cdata.com](mailto:test@cdata.com)@MyWorkspace*).
* **パスワード**—[Settings](/ja/Settings#personal-access-tokens) ページで生成したPAT を入力します。
* **ゲートウェイの選択**は空白のままにします。
*Connecting to a source*:
**新しい接続**をクリックし、利用できる接続のリストを開きます。
**SQL Server** を選択します。ダイアログが表示されたら、**SQL Server 認証**を選択します。
接続設定を入力します。
* **SQL サーバー名**—次のように仮想SQL Server のエンドポイントとポートをカンマで区切って入力します。例:*tds.cdata.com*,*14333*
* **SQL データベース名**—接続したいConnect AI データソースのConnection Name を入力します。例:*Salesforce1* To connect to a workspace, set the **SQL database name** to the name of your workspace (for example, *MyWorkspace*).
* **ユーザー名**—Connect AI のユーザー名を入力します。ユーザー名は、Connect AI の画面の右上に表示されています。例:*[test@cdata.co.jp](mailto:test@cdata.co.jp)* To connect to a workspace, set the **Username** to `[CData_username]@[workspace_name]` (for example, *[test@cdata.com](mailto:test@cdata.com)@MyWorkspace*).
* **パスワード**—[Settings](/ja/Settings#personal-access-tokens) ページで生成したPAT を入力します。
* **ゲートウェイの選択**は空白のままにします。
*Connecting to a source*:
 *Connecting to a workspace*:
 **作成**をクリックし接続を確立します。
これで、接続リストに作成した接続が表示されます。このプロセスを繰り返し、異なる**SQL データベース名** を入力することで、Connect AI アカウントからさらにデータソースを追加することができます。
テーブルにINTEGER カラムの主キーがある場合のみ、Microsoft Power Apps で仮想テーブルをプレビューできます。詳しくは、[Microsoft Power Apps ドキュメント](https://learn.microsoft.com/ja-jp/power-apps/maker/data-platform/limits-tshoot-virtual-tables?tabs=sql)を参照してください。
## 詳細
Microsoft Power Apps での SQL Server 接続については、[Microsoft 社のサポート記事](https://docs.microsoft.com/ja-jp/powerapps/maker/canvas-apps/connections/connection-azure-sqldatabase) を参照してください。
**作成**をクリックし接続を確立します。
これで、接続リストに作成した接続が表示されます。このプロセスを繰り返し、異なる**SQL データベース名** を入力することで、Connect AI アカウントからさらにデータソースを追加することができます。
テーブルにINTEGER カラムの主キーがある場合のみ、Microsoft Power Apps で仮想テーブルをプレビューできます。詳しくは、[Microsoft Power Apps ドキュメント](https://learn.microsoft.com/ja-jp/power-apps/maker/data-platform/limits-tshoot-virtual-tables?tabs=sql)を参照してください。
## 詳細
Microsoft Power Apps での SQL Server 接続については、[Microsoft 社のサポート記事](https://docs.microsoft.com/ja-jp/powerapps/maker/canvas-apps/connections/connection-azure-sqldatabase) を参照してください。