> ## Documentation Index
> Fetch the complete documentation index at: https://docs.cloud.cdata.com/llms.txt
> Use this file to discover all available pages before exploring further.
# Alteryx
> This page outlines the steps that are required to use Alteryx with Connect AI. These instructions include Alteryx Desktop and Alteryx Cloud editions.
## Prerequisites
Before you connect, you must first do the following:
* Connect a data source to your Connect AI account. See [Sources](/ja/Sources) for more information.
* Generate a Personal Access Token (PAT) on the [Settings](/ja/Settings#personal-access-tokens) page. Copy this down, as it acts as your password during authentication.
* If you are connecting to Connect AI using Alteryx Desktop, you must have the Microsoft ODBC Driver for SQL Server installed. Click [here](https://go.microsoft.com/fwlink/?linkid=2280794) for the download.
## Connect to Connect AI from Alteryx Desktop
To establish a connection from Alteryx Desktop to the Connect AI Virtual SQL Server API, follow these steps.
Set up an account in Alteryx.
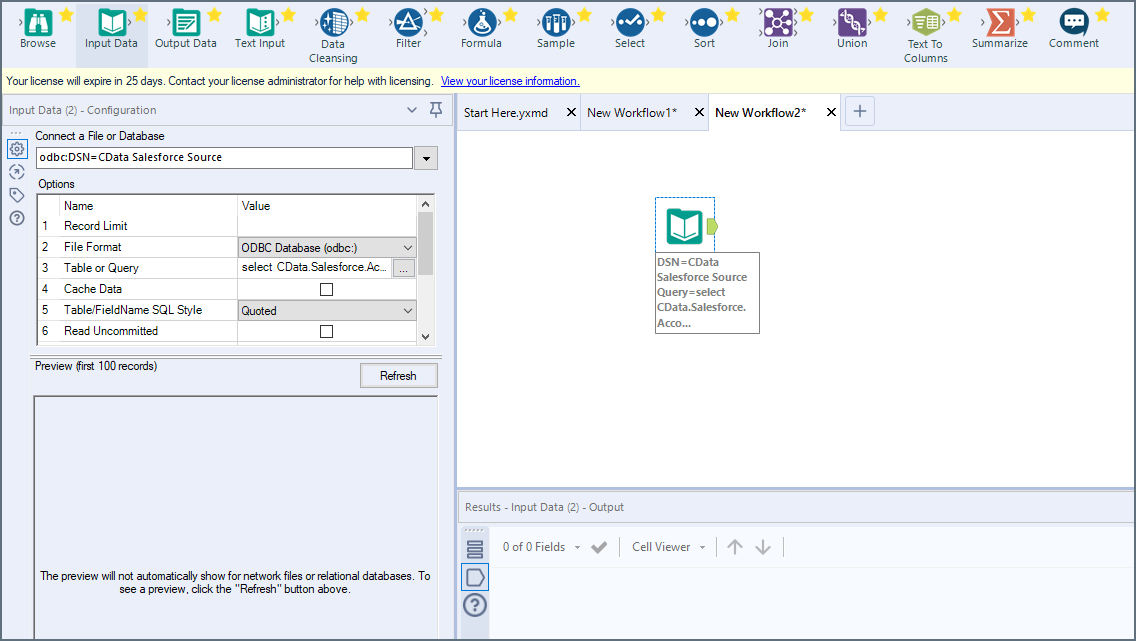
Drag and drop a new Input Data tool onto the workflow.
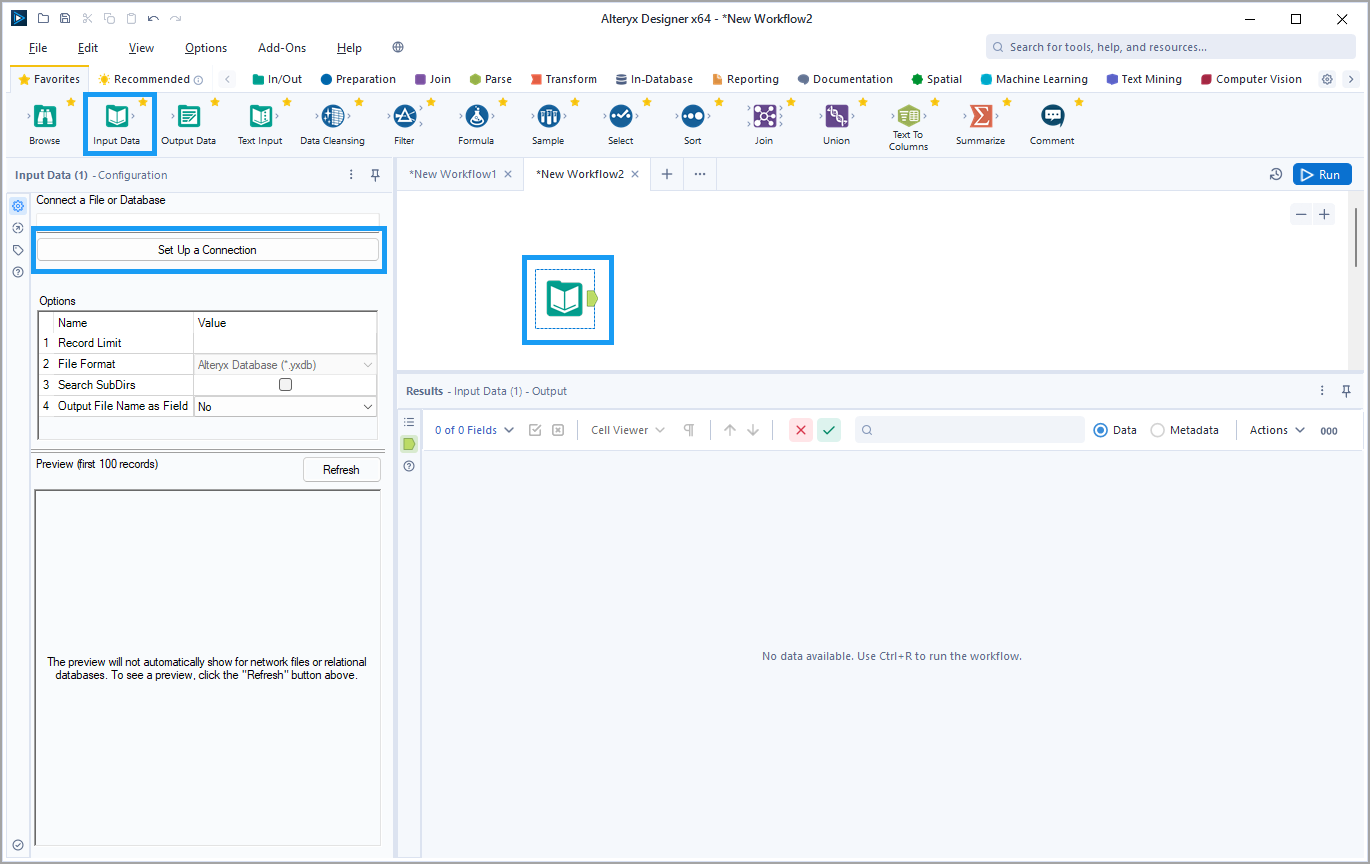 While the Input Data tool is selected, click **Set Up a Connection** in the navigation pane. A **Data connections** dialog appears.
Click **Data sources**. Select **Microsoft SQL Server > \*\*Quick connect**.
While the Input Data tool is selected, click **Set Up a Connection** in the navigation pane. A **Data connections** dialog appears.
Click **Data sources**. Select **Microsoft SQL Server > \*\*Quick connect**.
 In the **Connection Manager** dialog, click **New**.
In the **New Data Source** dialog, enter the following information:
* **Data Source Name**—*Microsoft SQL Server ODBC DSN-less*.
* **Driver**—select **ODBC Driver 18 for SQL Server** from the drop-down list.
* **Server**—*tds.cdata.com*,*14333*
* **Database**—接続したいConnect AI データソースのConnection Name を入力します。例:*Salesforce1*
In the **Connection Manager** dialog, click **New**.
In the **New Data Source** dialog, enter the following information:
* **Data Source Name**—*Microsoft SQL Server ODBC DSN-less*.
* **Driver**—select **ODBC Driver 18 for SQL Server** from the drop-down list.
* **Server**—*tds.cdata.com*,*14333*
* **Database**—接続したいConnect AI データソースのConnection Name を入力します。例:*Salesforce1*
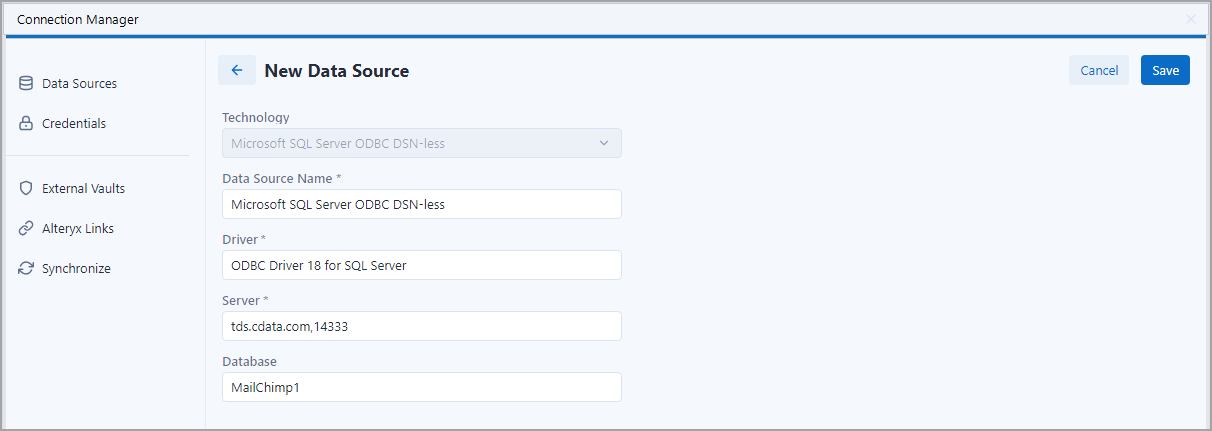 Click **Save**. Then click **Connect Credential**.
In **Connections**, enter the following:
* **Authentication Method**—select **Username and password**.
* **Credential**—select **Create New Credential**.
* **Credential Name**—enter a name to identify the credential.
* **Username**—Connect AI のユーザー名を入力します。ユーザー名は、Connect AI の画面の右上に表示されています。例:*[test@cdata.co.jp](mailto:test@cdata.co.jp)*
* **Password**—[Settings](/ja/Settings#personal-access-tokens) ページで生成したPAT を入力します。
Click **Test Connection**. If successful, click **Create and link**.
**Connect** with your credentials.
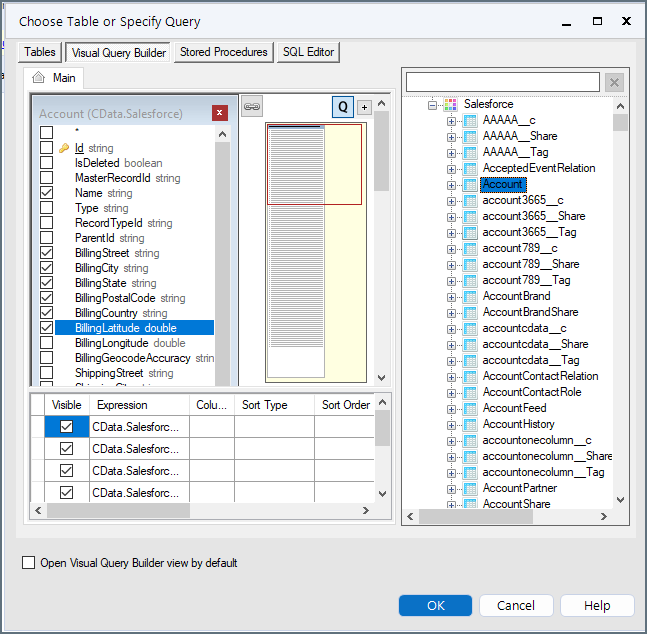
In the wizard that opens, drag and drop the table to be queried in the **Query Builder box**. Select the fields by checking the boxes that you want to include in your query. Where possible, the complex queries generated by the filters and aggregations will be pushed down to your data source, while any unsupported operations (which can include SQL functions and JOIN operations) will be managed client-side by the CData SQL engine embedded in the connector.
Click **Save**. Then click **Connect Credential**.
In **Connections**, enter the following:
* **Authentication Method**—select **Username and password**.
* **Credential**—select **Create New Credential**.
* **Credential Name**—enter a name to identify the credential.
* **Username**—Connect AI のユーザー名を入力します。ユーザー名は、Connect AI の画面の右上に表示されています。例:*[test@cdata.co.jp](mailto:test@cdata.co.jp)*
* **Password**—[Settings](/ja/Settings#personal-access-tokens) ページで生成したPAT を入力します。
Click **Test Connection**. If successful, click **Create and link**.
**Connect** with your credentials.
In the wizard that opens, drag and drop the table to be queried in the **Query Builder box**. Select the fields by checking the boxes that you want to include in your query. Where possible, the complex queries generated by the filters and aggregations will be pushed down to your data source, while any unsupported operations (which can include SQL functions and JOIN operations) will be managed client-side by the CData SQL engine embedded in the connector.
 To further customize the dataset, you can open the SQL Editor and modify the query manually, adding clauses, aggregations, and other operations to ensure that you are retrieving exactly the data desired.
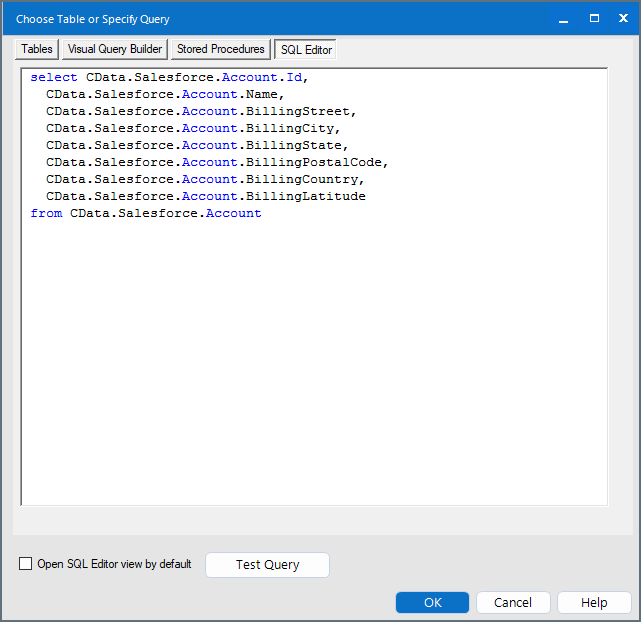 With the query defined, you are ready to work with your data in Alteryx Designer.
 ## Connect to Connect AI from Alteryx Cloud
To establish a connection from Alteryx Cloud to the Connect AI Virtual SQL Server API, follow these steps.
Sign in to your Alteryx Cloud account.
Click **Create Connection**.
Search for *Microsoft SQL Server* and the click the data source. A **Create Connection** dialog appears.
## Connect to Connect AI from Alteryx Cloud
To establish a connection from Alteryx Cloud to the Connect AI Virtual SQL Server API, follow these steps.
Sign in to your Alteryx Cloud account.
Click **Create Connection**.
Search for *Microsoft SQL Server* and the click the data source. A **Create Connection** dialog appears.
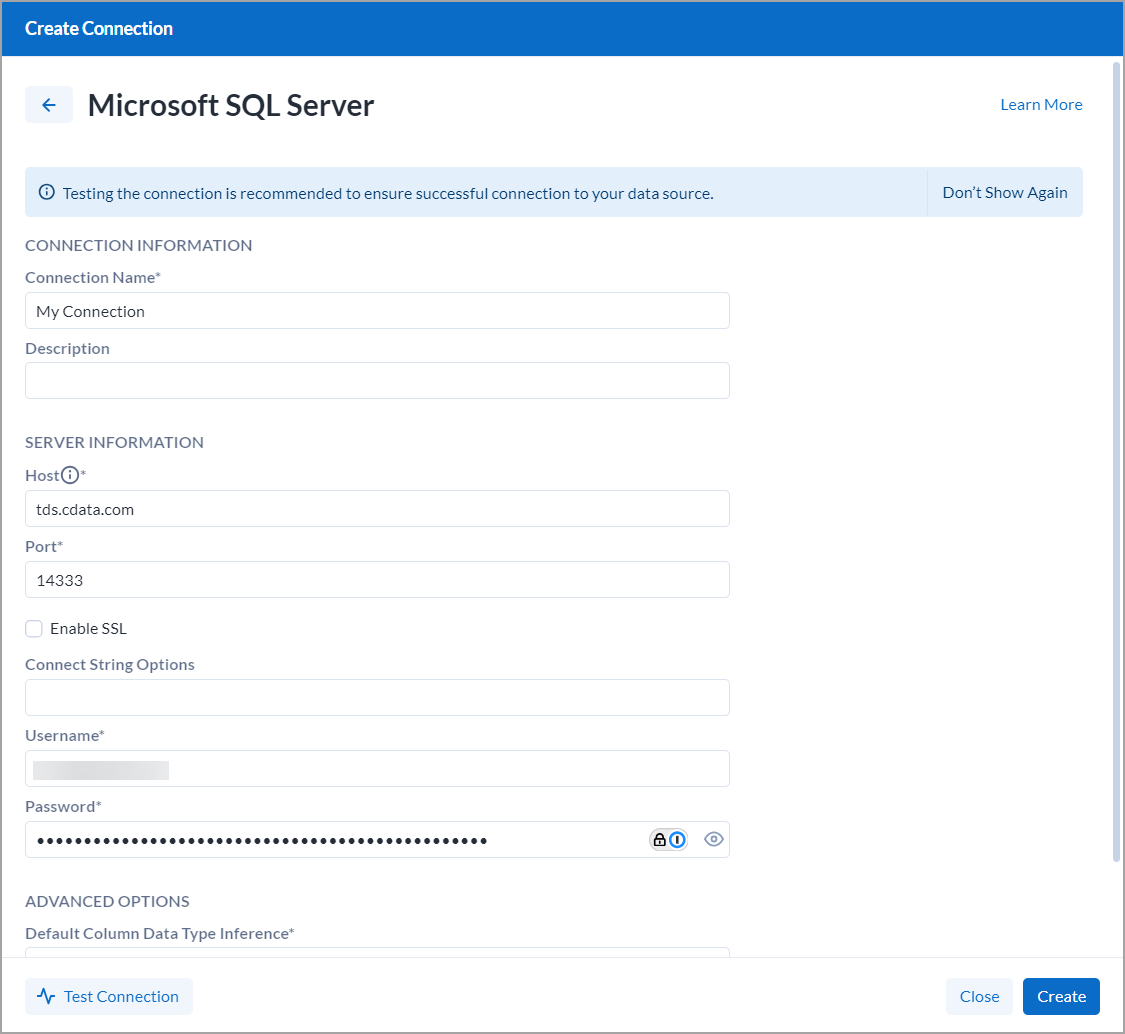 Enter the following information:
* **Connection Name**—the name of your data connection for display purposes.
* **Host**—*tds.cdata.com*
* **Port**—*14333*
* **Username**—Connect AI のユーザー名を入力します。ユーザー名は、Connect AI の画面の右上に表示されています。例:*[test@cdata.co.jp](mailto:test@cdata.co.jp)*
* **Password**—[Settings](/ja/Settings#personal-access-tokens) ページで生成したPAT を入力します。
Click **Test Connection** to test.
Click **Create** to save your successful connection.
In the **Connections** screen, click **Browse Data**. You can now work with the connected data.
Enter the following information:
* **Connection Name**—the name of your data connection for display purposes.
* **Host**—*tds.cdata.com*
* **Port**—*14333*
* **Username**—Connect AI のユーザー名を入力します。ユーザー名は、Connect AI の画面の右上に表示されています。例:*[test@cdata.co.jp](mailto:test@cdata.co.jp)*
* **Password**—[Settings](/ja/Settings#personal-access-tokens) ページで生成したPAT を入力します。
Click **Test Connection** to test.
Click **Create** to save your successful connection.
In the **Connections** screen, click **Browse Data**. You can now work with the connected data.
