> ## Documentation Index
> Fetch the complete documentation index at: https://docs.cloud.cdata.com/llms.txt
> Use this file to discover all available pages before exploring further.
# Virtual Schemas (formerly Workspaces)
> The **Virtual Schemas** feature is a data catalog that streamlines the accessibility of diverse data sources.
Workspaces has been renamed to Virtual Schemas.
## Overview
Virtual Schemas provide a way to organize, catalog, and control access to specific data (assets) in Connect AI. You can bundle related assets separately in a scalable way. Virtual Schemas offer a customizable organization scheme that streamlines data analysis across numerous business functions.
In the Connect AI data catalog, you can view a preview of the virtual schema’s column metadata.
Virtual Schema assets can be:
* **Folders**–you can create one level of folders within a virtual schema.
* **Tables and Views**–from connected Connect AI data sources
* **Derived Views**–derived from one or many data sources in Connect AI
Tables, views, and derived views are exposed directly without transformations, so the column names and other properties remain the same. Any table, view, or derived view can be added to any number of virtual schemas. They can be referenced by a unique **Alias**. Tables that are virtual schemas support full CRUD capabilities.
## Add a Virtual Schema
Virtual Schemas are the highest level of organization. They are customizable to adjust to various business needs. A business unit like marketing or data science can have their own separate virtual schemas. Sales may organize folders in their virtual schema for each client. Teams can pick the structure that supports them best.
To get started, you can create a virtual schema using the following steps:
Click **Virtual Schemas** on the left side of the dashboard.
Click **Add** on the top right side.
Enter a **Virtual Schema Name**.
Click **Confirm** to create your new virtual schema.
After setting a name and description for a *Virtual Schema*, SQL Server, OData, and OpenAPI **Endpoints** are automatically generated. Endpoints are the door to a wide range of connections that form the foundation of virtual schemas.
To view connection details for connecting from a virtual schema via Virtual SQL Server, OData, or OpenAPI, click **View Endpoints**. The **Endpoints** dialog contains three tabs, one for **Virtual SQL Server**, one for **OData**, and one for **OpenAPI**.
### Inbound Connections
When connecting to Connect AI from a client application, you can connect directly to a virtual schema via virtual-schema-specific endpoints. Connect AI supports several endpoints for inbound connections, including a REST API, Virtual SQL Server, OData, and OpenAPI. You can identify endpoints quickly via a configurable naming structure that places periods between virtual schema, folder, and asset names by default—for example, *VirtualSchema.Folder.Asset*.
Connect AI supports the OpenAPI specification version 2.0 and 3.0, allowing you to connect no-code/low-code applications that integrate with OpenAPI. Connect AI allows you to connect a virtual schema via OpenAPI by downloading an OpenAPI document from a virtual schema and importing the file in your client application.
#### Connect to the REST API
To make a connection to the REST API, add a URL parameter to the REST API URL named "workspace." Set this to the name of the virtual schema you want to query. This works with both the GET operation on the metadata endpoint, as well as the POST operation on the query and batch endpoints. Note that the /exec endpoint does not support virtual schemas.
#### Connect via Virtual SQL Server
The **Virtual SQL Server** tab of the **Endpoints** dialog contains the settings you need to connect from a virtual schema via Virtual SQL Server clients. Copy the settings in the dialog.
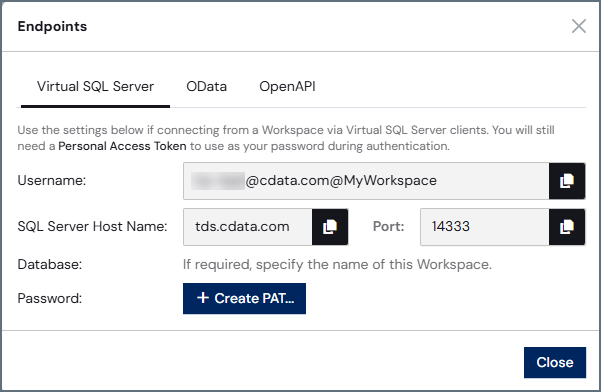 * **Username**—your username to connect to a virtual schema is in the format of `[your_email_address]@[virtual_schema_name]`.
* **SQL Server Host Name**—the SQL Server host name (*tds.cdata.com*).
* **Port**—the SQL Server port (*14333*).
* **Database**—the name of the virtual schema (if required).
* **Password**—click **Create PAT** to create a Personal Access Token to use as your password during authentication.
#### Connect via OData
The **OData** tab of the **Endpoints** dialog contains the settings you need to connect from a virtual schema via OData clients. Copy the settings in the dialog.
* **Username**—your username to connect to a virtual schema is in the format of `[your_email_address]@[virtual_schema_name]`.
* **SQL Server Host Name**—the SQL Server host name (*tds.cdata.com*).
* **Port**—the SQL Server port (*14333*).
* **Database**—the name of the virtual schema (if required).
* **Password**—click **Create PAT** to create a Personal Access Token to use as your password during authentication.
#### Connect via OData
The **OData** tab of the **Endpoints** dialog contains the settings you need to connect from a virtual schema via OData clients. Copy the settings in the dialog.
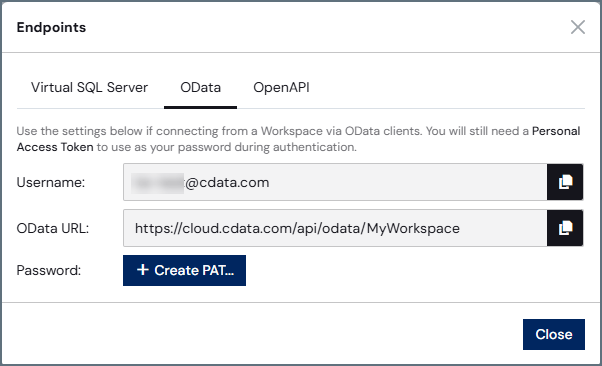 * **Username**—your username to connect to a virtual schema is in the format of your email address.
* **OData URL**—the virtual schema name you want to connect to. The URL has the format `https://cloud.cdata.com/api/odata/{virtual_schema_name}`.
* **Password**—click **Create PAT** to create a Personal Access Token to use as your password during authentication.
#### Connect via OpenAPI
The **OpenAPI** tab of the **Endpoints** dialog contains the settings you need to connect from a virtual schema via OpenAPI. You can generate an OpenAPI specification file for the selected virtual schema. This file can be used in client applications to integrate with Connect AI via OpenAPI.
* **Username**—your username to connect to a virtual schema is in the format of your email address.
* **OData URL**—the virtual schema name you want to connect to. The URL has the format `https://cloud.cdata.com/api/odata/{virtual_schema_name}`.
* **Password**—click **Create PAT** to create a Personal Access Token to use as your password during authentication.
#### Connect via OpenAPI
The **OpenAPI** tab of the **Endpoints** dialog contains the settings you need to connect from a virtual schema via OpenAPI. You can generate an OpenAPI specification file for the selected virtual schema. This file can be used in client applications to integrate with Connect AI via OpenAPI.
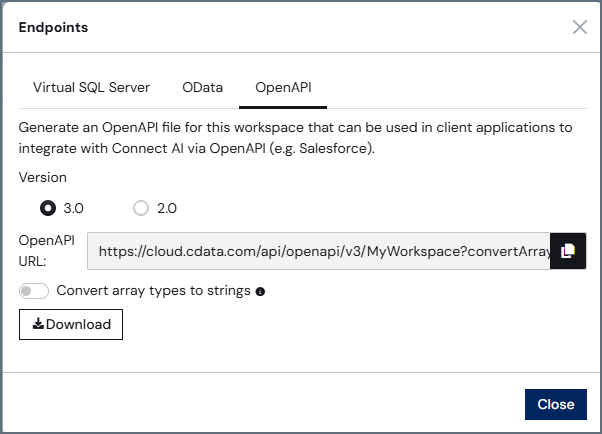 Select version 2.0 or 3.0 of OpenAPI.
Toggle **Convert array types to strings** on if the client application does not support array types (such as Microsoft Power Apps).
Click **Download** to download the OpenAPI specification file for the virtual schema. This is the file that is imported into the client application.
You can also copy and paste the **OpenAPI URL**.
#### Connect to Development Tools (JDBC/ODBC/SSIS)
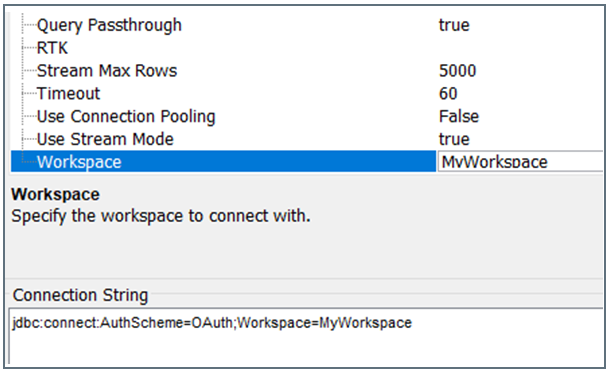
To make a connection from the virtual schema to CData development tools, enter the virtual schema name in the **Workspace** field in the **Advanced** tab of the driver for Connect AI. Below is an example for the JDBC driver.
Select version 2.0 or 3.0 of OpenAPI.
Toggle **Convert array types to strings** on if the client application does not support array types (such as Microsoft Power Apps).
Click **Download** to download the OpenAPI specification file for the virtual schema. This is the file that is imported into the client application.
You can also copy and paste the **OpenAPI URL**.
#### Connect to Development Tools (JDBC/ODBC/SSIS)
To make a connection from the virtual schema to CData development tools, enter the virtual schema name in the **Workspace** field in the **Advanced** tab of the driver for Connect AI. Below is an example for the JDBC driver.
 #### Connection Authentication
To authenticate, use your Connect AI email address as your username. You need a Personal Access Token (PAT) to use as your password. You can generate a PAT in the **Endpoints** dialog or on the [Settings](/en/Settings/Personal-Access-Tokens) page.
## Virtual Schema Assets
The assets created within virtual schemas link to specific data items and provide a second layer of organization. You can organize assets into folders, but you cannot create subfolders. On the left of the asset is an icon specifying whether the asset is a folder, table, or derived view. On the right of the asset is an icon displaying the data source of the asset (not applicable for derived views).
#### Connection Authentication
To authenticate, use your Connect AI email address as your username. You need a Personal Access Token (PAT) to use as your password. You can generate a PAT in the **Endpoints** dialog or on the [Settings](/en/Settings/Personal-Access-Tokens) page.
## Virtual Schema Assets
The assets created within virtual schemas link to specific data items and provide a second layer of organization. You can organize assets into folders, but you cannot create subfolders. On the left of the asset is an icon specifying whether the asset is a folder, table, or derived view. On the right of the asset is an icon displaying the data source of the asset (not applicable for derived views).
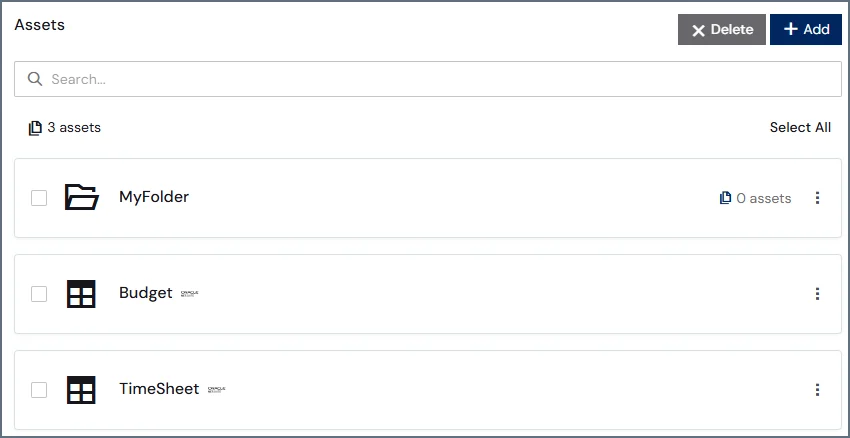 To create an asset inside of the virtual schema:
Within the virtual schema, click **Add** on the top right side. The **Add Asset** dialog appears.
To create an asset inside of the virtual schema:
Within the virtual schema, click **Add** on the top right side. The **Add Asset** dialog appears.
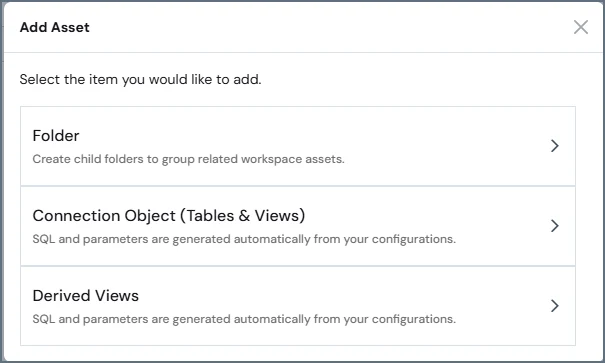 Select from the menu what you want to add:
* **Folder**
* **Tables and Views**
* **Derived Views**
If you select **Folder**, enter the folder name. If you select **Tables and Views**, you must select the connection and the tables or views to add. If you select **Derived Views**, you must select the derived views to add.
Click **Confirm**.
When you click on an asset in a virtual schema, the horizontal tabs offer the following functionality:
* **Columns**–a table with the column metadata
* **Preview**–the connected data item’s contents in a preview table
* **SQL**–a generated reference SQL query for a table, view, or derived view, including the configurable **Alias** which is an important reference when querying.
### Data Model
The data model follows a `VirtualSchema.Folder.Table` design. If no folder is present in the hierarchy, it displays as `[ROOT]`. For more information about the data model, refer to [SQL Reference](/en/SQL-Reference/SQL-Reference#data-model).
This documentation is built and hosted on [Mintlify](https://mintlify.com), a developer documentation platform.
Select from the menu what you want to add:
* **Folder**
* **Tables and Views**
* **Derived Views**
If you select **Folder**, enter the folder name. If you select **Tables and Views**, you must select the connection and the tables or views to add. If you select **Derived Views**, you must select the derived views to add.
Click **Confirm**.
When you click on an asset in a virtual schema, the horizontal tabs offer the following functionality:
* **Columns**–a table with the column metadata
* **Preview**–the connected data item’s contents in a preview table
* **SQL**–a generated reference SQL query for a table, view, or derived view, including the configurable **Alias** which is an important reference when querying.
### Data Model
The data model follows a `VirtualSchema.Folder.Table` design. If no folder is present in the hierarchy, it displays as `[ROOT]`. For more information about the data model, refer to [SQL Reference](/en/SQL-Reference/SQL-Reference#data-model).
This documentation is built and hosted on [Mintlify](https://mintlify.com), a developer documentation platform.