> ## Documentation Index
> Fetch the complete documentation index at: https://docs.cloud.cdata.com/llms.txt
> Use this file to discover all available pages before exploring further.
# Users and Roles
> The ***Users*** page enables you to manage the users and roles on your Connect AI account and assign users to roles.
The **Users** page contains three tabs: **Users**, **Service Accounts**, and **Roles**.
A **User** is an account that can log in and use Connect AI. A **Service Account** is a non-human identity, such as an agent, that is authorized to interact with Connect AI. A **Role** defines the user's privileges and permissions.
In Connect AI, privileges are administrative actions, while permissions are data and execution access.
The following system roles are available:
* **Administrator** has full access to all Connect AI functions, including adding and managing users.
* **Connection Administrator** can create, edit, and delete connections and workspaces. They can also assign connection and workspace permissions, view users, query all connections, and view connection-related audit log events.
* **User Administrator** can create, invite, edit, and disable users, assign and revoke the **User Administrator** and **Query** roles, and view user-related audit events.
* **Query** users can authenticate to a connection with their own credentials, as long as the user and connection meet the following criteria:
* An Administrator or Connection Administrator grants the user permission to use the connection.
* An Administrator selects **Per-User Authentication**, rather than **Shared Authentication**, for the connection.
The query user can also issue queries to connections they have access to through the [Data Explorer](/en/Data-Explorer) page and through [integration tools](/en/Integrations). This role also allows viewing personal query logs.
Every account must have at least one active Administrator.
See [Permissions and Access Control](/en/Permissions) for more information about the scope of these roles.
By default, all CData Connect Spreadsheets users have an Administrator role. They have full Select, Insert, Update, Delete, and Execute permissions.
## Users
The **Users** tab contains information about every user in Connect AI.
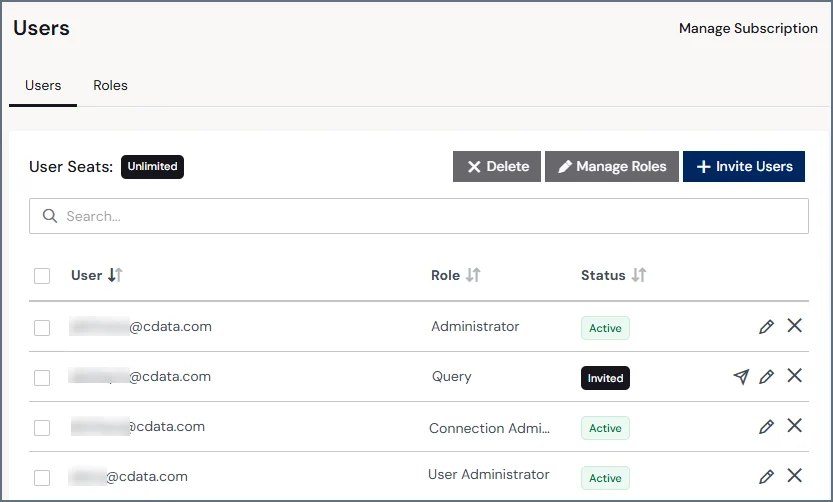 It contains the following information:
* The number of **user seats** that are available on your account.
* A row for every user on your account:
* **User** displays the email address that is associated with the user.
* **Role** indicates the user’s system role.
* **Status** shows the state of the user’s account (**Active**, **Inactive**, or **Invited**).
* Edit and delete icons for the user. If the user's status is **Invited**, there is also an icon to resend the user's invitation.
### Invite Users
If you have Just-in-Time (JIT) provisioning enabled, you do not need to invite users manually.
To add users to your Connect AI account, follow these steps:
In the **Users** tab, click **Invite Users** to open the user invitation dialog.
Enter the email address of the user that you want to invite. To send multiple invitations at the same time, add a space between each email address.
It contains the following information:
* The number of **user seats** that are available on your account.
* A row for every user on your account:
* **User** displays the email address that is associated with the user.
* **Role** indicates the user’s system role.
* **Status** shows the state of the user’s account (**Active**, **Inactive**, or **Invited**).
* Edit and delete icons for the user. If the user's status is **Invited**, there is also an icon to resend the user's invitation.
### Invite Users
If you have Just-in-Time (JIT) provisioning enabled, you do not need to invite users manually.
To add users to your Connect AI account, follow these steps:
In the **Users** tab, click **Invite Users** to open the user invitation dialog.
Enter the email address of the user that you want to invite. To send multiple invitations at the same time, add a space between each email address.
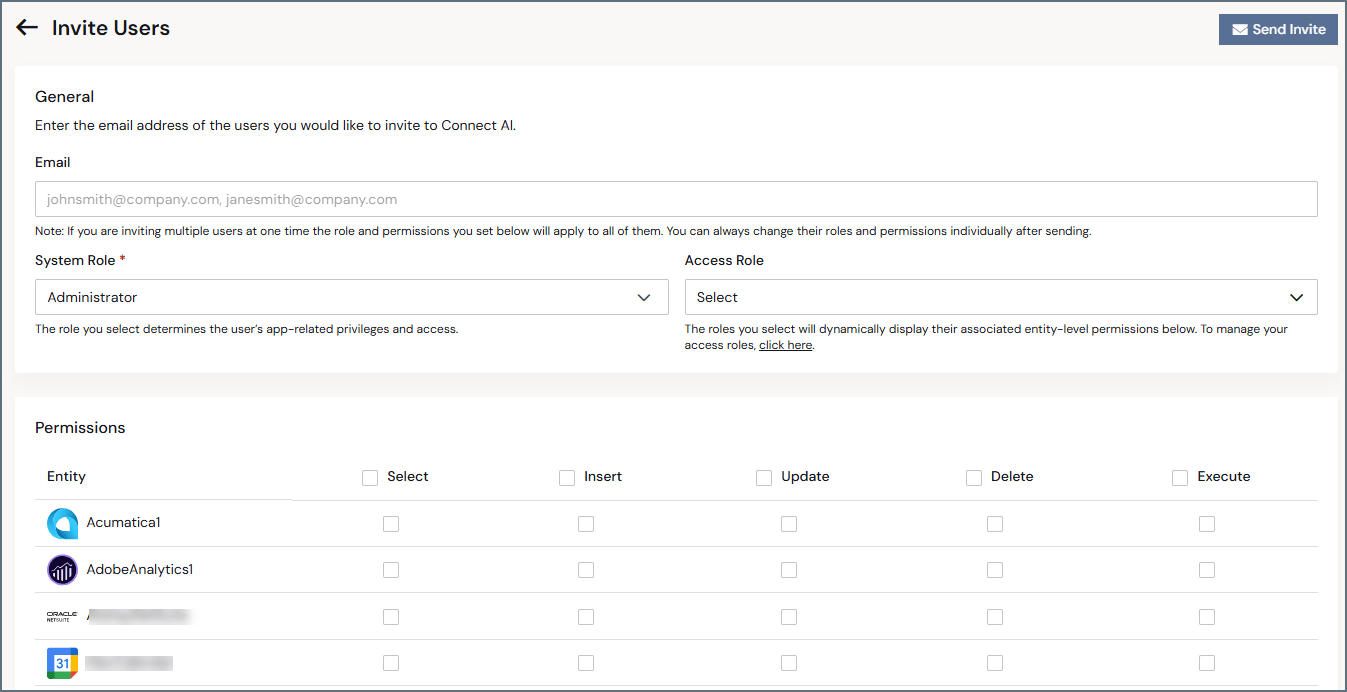 If you invite multiple users at the same time, they will have the same role(s). You can change their role(s) individually after sending the invitation.
Select the **System Role** for the new user(s).
(Optional) Select an **Access Role** for the new user(s).
(Query users only) Toggle on **Support Access Privileges** if you want the user(s) to be able to authorize support access to their account. Administrators can revoke support access at any time.
(Optional) Select **Permissions** for the new user(s). Select the allowed permissions for each entity (data connection or workspace) in the system. Administrators and Connection Administrators can edit permissions later.
For more information about permissions, see [Permissions and Access Control](/en/Permissions).
Click **Send Invite**. If a user is registered already to an email address that you enter, the dialog prompts you to enter a different email address.
#### Accept an Invitation
Follow these steps to set up access after receiving an invitation email:
Click **Accept Invite** in the invitation email to open the password creation page.
Create a password that meets the provided criteria. After you create a password, the login page appears.
Log in with your email address and your new password. After you log in, the sign-up page appears.
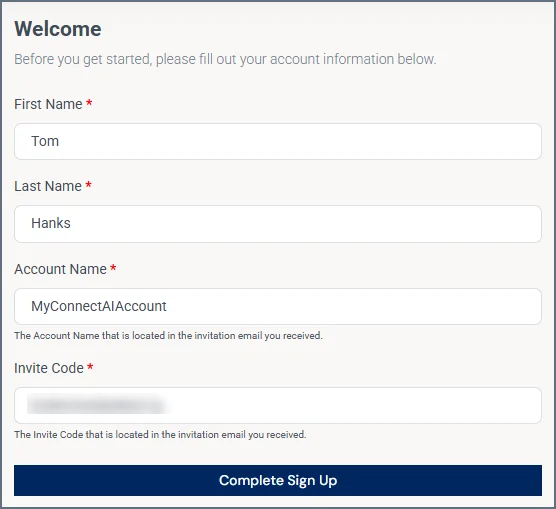
Enter your first name and last name.
Enter the account name and the invite code from the invitation email. Then, click **Complete Sign Up**.
If you invite multiple users at the same time, they will have the same role(s). You can change their role(s) individually after sending the invitation.
Select the **System Role** for the new user(s).
(Optional) Select an **Access Role** for the new user(s).
(Query users only) Toggle on **Support Access Privileges** if you want the user(s) to be able to authorize support access to their account. Administrators can revoke support access at any time.
(Optional) Select **Permissions** for the new user(s). Select the allowed permissions for each entity (data connection or workspace) in the system. Administrators and Connection Administrators can edit permissions later.
For more information about permissions, see [Permissions and Access Control](/en/Permissions).
Click **Send Invite**. If a user is registered already to an email address that you enter, the dialog prompts you to enter a different email address.
#### Accept an Invitation
Follow these steps to set up access after receiving an invitation email:
Click **Accept Invite** in the invitation email to open the password creation page.
Create a password that meets the provided criteria. After you create a password, the login page appears.
Log in with your email address and your new password. After you log in, the sign-up page appears.
Enter your first name and last name.
Enter the account name and the invite code from the invitation email. Then, click **Complete Sign Up**.
 Connect AI supports Single Sign-On (SSO) through popular SSO providers. If SSO is enabled on your account, the invitation flow uses your SSO provider instead of the manual password process.
#### Manage Invitations
If a user has a pending invitation that they have not accepted, their status displays as **Invited**. Click a pending user to view and manage their invitation.
On this page, you can view the pending user’s email address, the expiration time for the invitation, and the invite code. You can also manage the user’s invitation, as follows:
* To revoke the invitation and delete the user, click **Delete User**.
* To resend the invitation email to the entered email address, click **Resend Invite**.
### Edit Users
Click a user in the list (or click the **Edit** button) to open the **Edit User** page.
Connect AI supports Single Sign-On (SSO) through popular SSO providers. If SSO is enabled on your account, the invitation flow uses your SSO provider instead of the manual password process.
#### Manage Invitations
If a user has a pending invitation that they have not accepted, their status displays as **Invited**. Click a pending user to view and manage their invitation.
On this page, you can view the pending user’s email address, the expiration time for the invitation, and the invite code. You can also manage the user’s invitation, as follows:
* To revoke the invitation and delete the user, click **Delete User**.
* To resend the invitation email to the entered email address, click **Resend Invite**.
### Edit Users
Click a user in the list (or click the **Edit** button) to open the **Edit User** page.
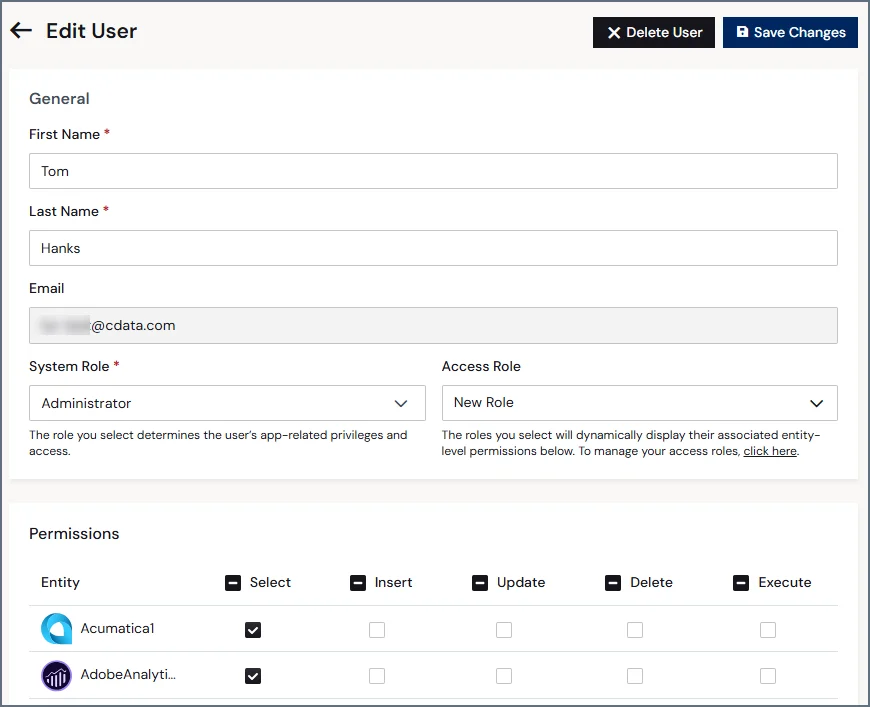 This page contains the following information:
* Editable **First Name** and **Last Name** fields.
* A non-editable **Email** field.
* A drop-down menu to select the user’s **System Role**.
* A drop-down menu to select an additional **Access Role** (optional). These are any access roles that were created.
* A toggle for enabling or disabling **Support Access Privileges** (query users only). If enabled, the query user can grant account access to the CData support team.
* Check boxes for toggling the user’s permissions for each data source. (Note that CData Connect Spreadsheets users do not have a permissions section, because they have full permissions.)
To save changes to the user, click **Save Changes**.
### Delete Users
To delete the user, click **Delete User**.
If the user is the last remaining Administrator on your account, they cannot be deleted.
## Service Accounts
The **Service Accounts** tab contains information about every service account in Connect AI. Service accounts authenticate via OAuth 2.0 Client Credentials. Use them to grant programmatic access to scripts, jobs, and external services.
This page contains the following information:
* Editable **First Name** and **Last Name** fields.
* A non-editable **Email** field.
* A drop-down menu to select the user’s **System Role**.
* A drop-down menu to select an additional **Access Role** (optional). These are any access roles that were created.
* A toggle for enabling or disabling **Support Access Privileges** (query users only). If enabled, the query user can grant account access to the CData support team.
* Check boxes for toggling the user’s permissions for each data source. (Note that CData Connect Spreadsheets users do not have a permissions section, because they have full permissions.)
To save changes to the user, click **Save Changes**.
### Delete Users
To delete the user, click **Delete User**.
If the user is the last remaining Administrator on your account, they cannot be deleted.
## Service Accounts
The **Service Accounts** tab contains information about every service account in Connect AI. Service accounts authenticate via OAuth 2.0 Client Credentials. Use them to grant programmatic access to scripts, jobs, and external services.
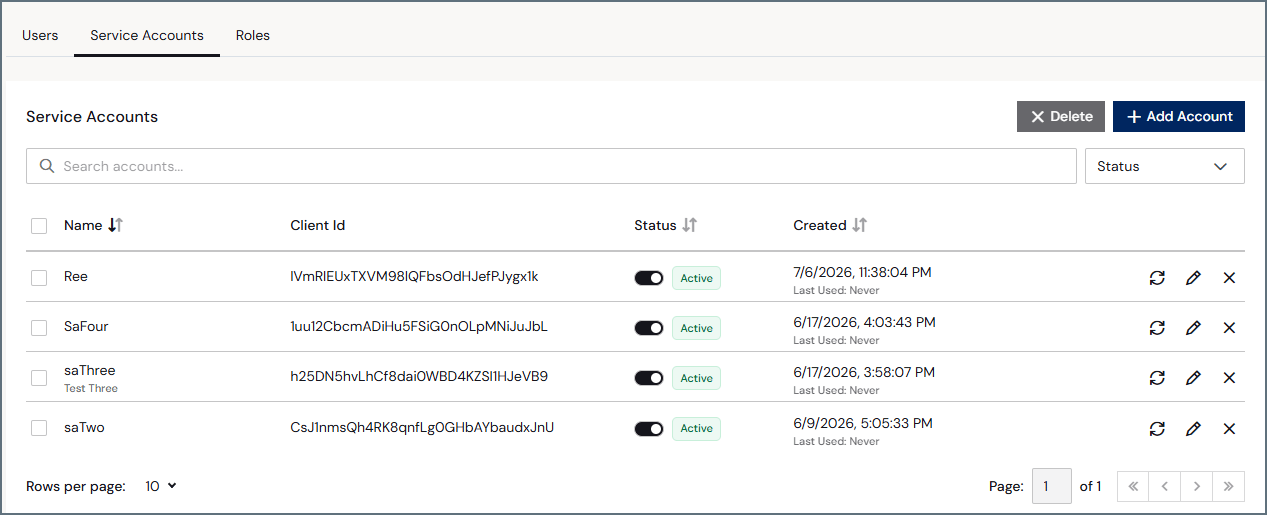 It contains the following information:
* A row for every service account in your account:
* **Name** is the service account name.
* **Client Id** is the unique identifier used to authenticate the service account via OAuth 2.0 Client Credentials.
* **Status** is the status of the service account (active or inactive). If you deactivate a service account, any services or automations using these credentials will fail on the next request. The service account remains in the registry for audit purposes.
* **Created** is the date and time the service account was created.
* Rotate, edit, and delete icons for the service account. When you rotate credentials, the current credentials stop working immediately. You must update dependent services before the next request.
### Add a Service Account
In the **Service Accounts** tab, click **Add Account** to open the **Add Service Account** page.
It contains the following information:
* A row for every service account in your account:
* **Name** is the service account name.
* **Client Id** is the unique identifier used to authenticate the service account via OAuth 2.0 Client Credentials.
* **Status** is the status of the service account (active or inactive). If you deactivate a service account, any services or automations using these credentials will fail on the next request. The service account remains in the registry for audit purposes.
* **Created** is the date and time the service account was created.
* Rotate, edit, and delete icons for the service account. When you rotate credentials, the current credentials stop working immediately. You must update dependent services before the next request.
### Add a Service Account
In the **Service Accounts** tab, click **Add Account** to open the **Add Service Account** page.
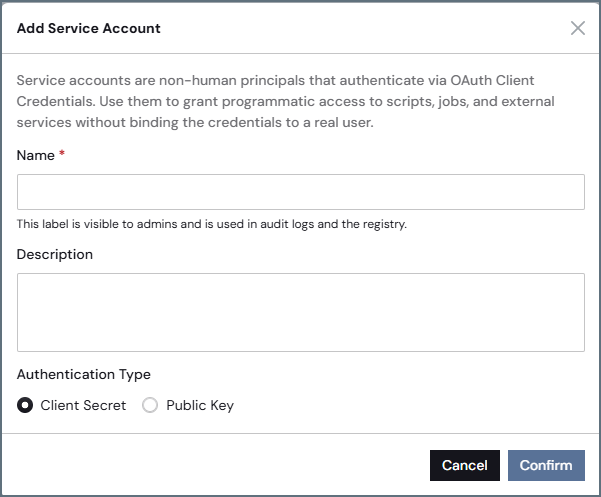 Enter the **Name** of the service account.
Enter a short **Description** of the service account.
Select an **Authentication Type** of **Client Secret** or **Public Key**. If you select **Public Key**, you are asked to upload the public key (PEM) file (RS256 or ES256).
Click **Confirm** to save the service account.
If you selected **Client Secret**, an **Add Service Account** dialog appears. Copy the **Client Id** and **Client Secret**. The **Client Secret** only appears once.
Use these credentials to authenticate API calls. See [Authentication](/en/API/Authentication#oauth-20-client-credentials) for details.
Click **Done**. An **Edit Service Account** page appears.
Enter the **Name** of the service account.
Enter a short **Description** of the service account.
Select an **Authentication Type** of **Client Secret** or **Public Key**. If you select **Public Key**, you are asked to upload the public key (PEM) file (RS256 or ES256).
Click **Confirm** to save the service account.
If you selected **Client Secret**, an **Add Service Account** dialog appears. Copy the **Client Id** and **Client Secret**. The **Client Secret** only appears once.
Use these credentials to authenticate API calls. See [Authentication](/en/API/Authentication#oauth-20-client-credentials) for details.
Click **Done**. An **Edit Service Account** page appears.
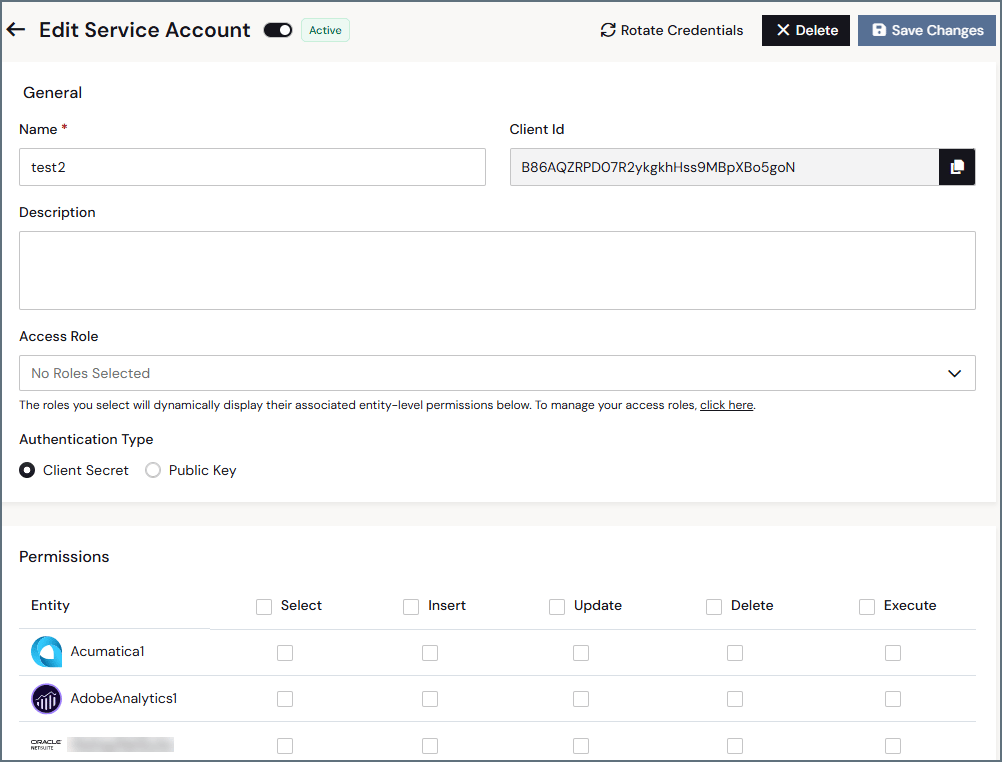 (Optional) Add an **Access Role** to the service account. Selecting an access role automatically updates the **Permissions** to the entities below.
(Optional) In **Permissions**, manually select the service account's permissions to entities (data connections and workspaces) in your Connect AI instance. For more information about permissions, see [Permissions and Access Control](/en/Permissions).
### Edit a Service Account
You can modify any service account, rotate credentials, or delete a service account at any time by clicking the rotate, edit, or delete icons in the **Service Accounts** list.
In the **Edit Service Account** page, you can do the following:
* Edit the **Name** and **Description** fields.
* Add and remove access roles.
* Manually update permissions.
* Rotate credentials (the current credentials will stop working immediately).
* Delete the entire service account.
## Roles
The **Roles** tab contains information about every role in Connect AI. Roles consist of predefined **system roles** and **access roles**.
* A **system role** (Administrator, Connection Administrator, User Administrator, or Query) defines what a user can do across the platform (managing connections, users, and running queries), and every user has exactly one.
* An **access role** is an optional, admin-defined set of data and workspace permissions assigned on top of the system role; access roles are additive, so a user can hold several.
(Optional) Add an **Access Role** to the service account. Selecting an access role automatically updates the **Permissions** to the entities below.
(Optional) In **Permissions**, manually select the service account's permissions to entities (data connections and workspaces) in your Connect AI instance. For more information about permissions, see [Permissions and Access Control](/en/Permissions).
### Edit a Service Account
You can modify any service account, rotate credentials, or delete a service account at any time by clicking the rotate, edit, or delete icons in the **Service Accounts** list.
In the **Edit Service Account** page, you can do the following:
* Edit the **Name** and **Description** fields.
* Add and remove access roles.
* Manually update permissions.
* Rotate credentials (the current credentials will stop working immediately).
* Delete the entire service account.
## Roles
The **Roles** tab contains information about every role in Connect AI. Roles consist of predefined **system roles** and **access roles**.
* A **system role** (Administrator, Connection Administrator, User Administrator, or Query) defines what a user can do across the platform (managing connections, users, and running queries), and every user has exactly one.
* An **access role** is an optional, admin-defined set of data and workspace permissions assigned on top of the system role; access roles are additive, so a user can hold several.
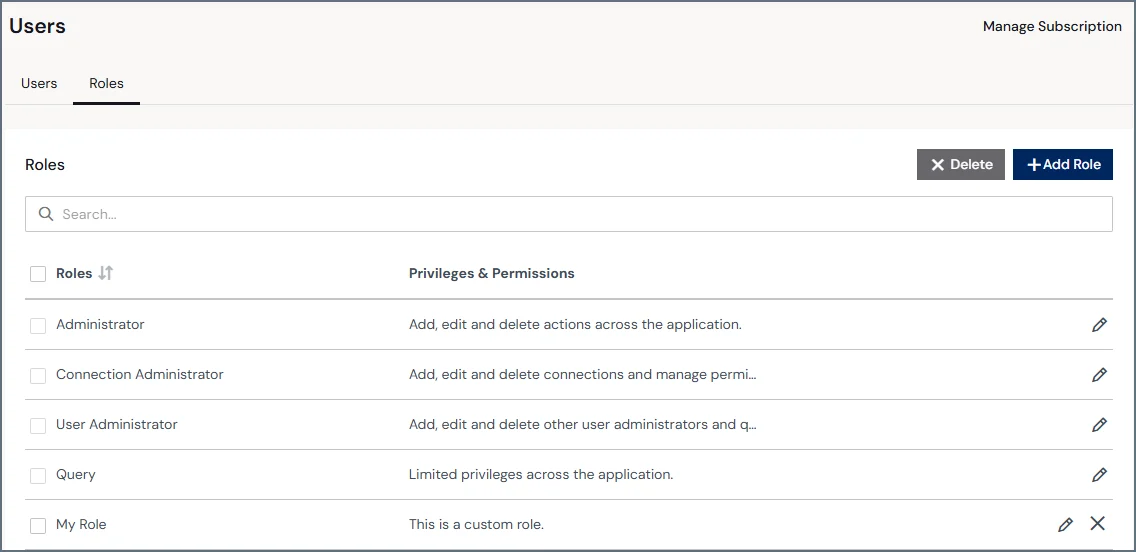 It contains the following information:
* A row for every role in your account:
* **Role** is the role name.
* **Privileges & Permissions** is a short overview of the scope of the role.
* Edit and delete icons for the role. System roles cannot be deleted.
### Add an Access Role
In the **Roles** tab, click **Add Role** to open the **Add Role** page.
It contains the following information:
* A row for every role in your account:
* **Role** is the role name.
* **Privileges & Permissions** is a short overview of the scope of the role.
* Edit and delete icons for the role. System roles cannot be deleted.
### Add an Access Role
In the **Roles** tab, click **Add Role** to open the **Add Role** page.
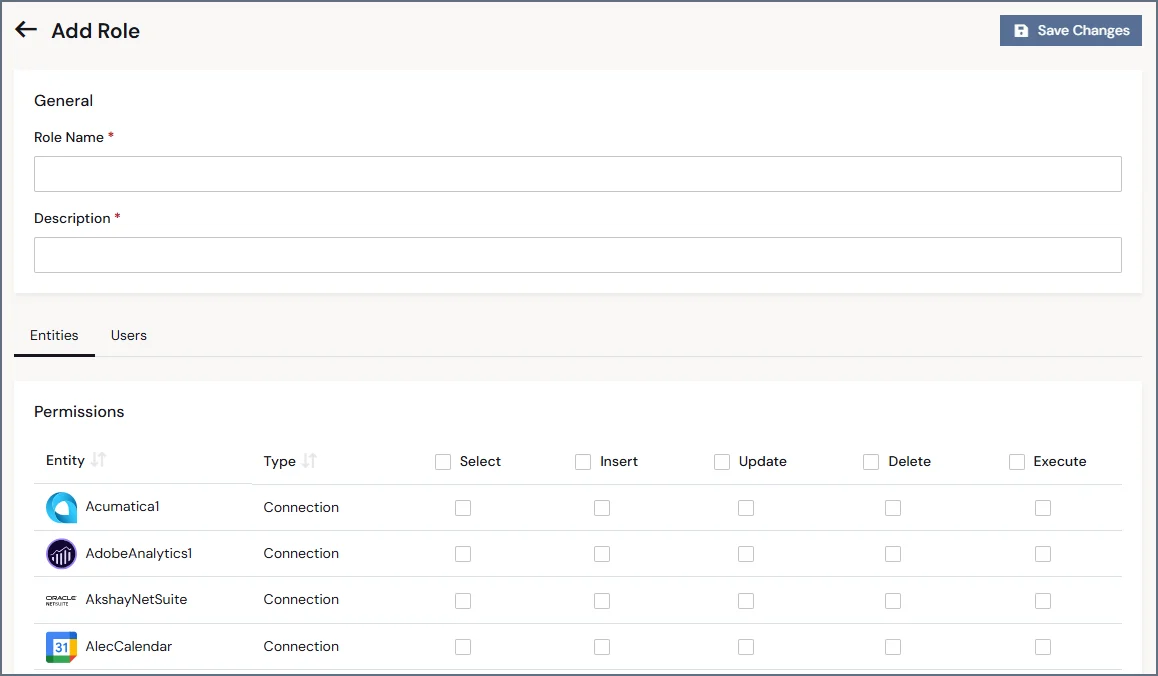 Enter the **Role Name**.
Enter a short description of the role that will appear on the **Roles** list.
In the **Entities** tab, select the appropriate permissions for entities (data connections and workspaces) in your Connect AI instance. For more information about permissions, see [Permissions and Access Control](/en/Permissions).
In the **Users** tab, click **Assign Users** to assign multiple users to the same access role.
You can also add permissions to a user on an individual basis. These permissions are added to the role-based permissions.
Select one or more users to assign to the role, and click **Confirm**.
Click **Save Changes** to save the role.
### Edit a Role
You can modify any role or delete an access role at any time by clicking the edit or delete icons in the **Roles** list.
Enter the **Role Name**.
Enter a short description of the role that will appear on the **Roles** list.
In the **Entities** tab, select the appropriate permissions for entities (data connections and workspaces) in your Connect AI instance. For more information about permissions, see [Permissions and Access Control](/en/Permissions).
In the **Users** tab, click **Assign Users** to assign multiple users to the same access role.
You can also add permissions to a user on an individual basis. These permissions are added to the role-based permissions.
Select one or more users to assign to the role, and click **Confirm**.
Click **Save Changes** to save the role.
### Edit a Role
You can modify any role or delete an access role at any time by clicking the edit or delete icons in the **Roles** list.
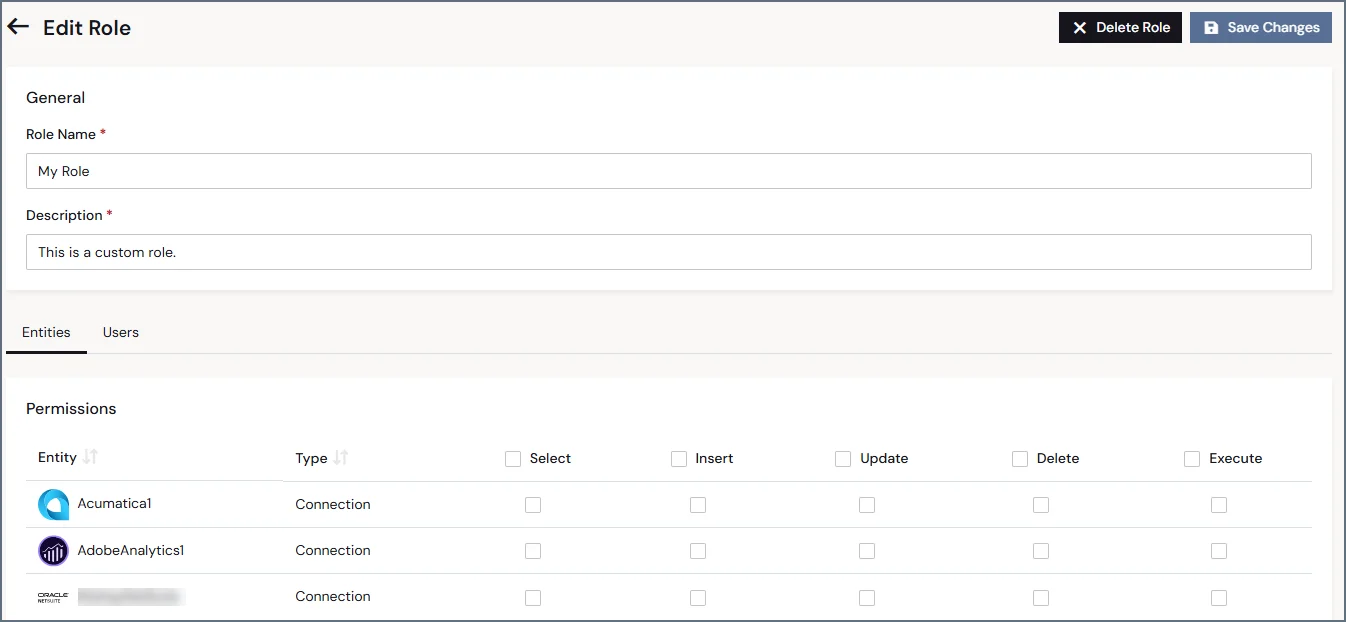 In the **Edit Role** page, you can do the following:
* Edit the **Role Name** and **Description** fields (access roles only).
* Edit the permissions for the role.
* Assign or delete the users assigned to the role.
* Delete the entire role (access roles only).
In the **Edit Role** page, you can do the following:
* Edit the **Role Name** and **Description** fields (access roles only).
* Edit the permissions for the role.
* Assign or delete the users assigned to the role.
* Delete the entire role (access roles only).