> ## Documentation Index
> Fetch the complete documentation index at: https://docs.cloud.cdata.com/llms.txt
> Use this file to discover all available pages before exploring further.
# Settings
> You can access your *Settings* page by clicking the Gear Icon in the upper-right corner of the dashboard and selecting **Settings**.
 The Settings page contains the following tabs (depending on your Connect AI plan):
* [**Profile**](#profile)
* [**Account**](#account)
* [**Security**](#security)
* [**Personal Access Tokens**](#personal-access-tokens)
* [**OAuth Apps**](#oauth-apps)
* [**Keys**](#keys)
* [**Billing**](#billing)
The following sections describe these tabs.
## Profile
The **Profile** tab opens by default when you access Settings. This tab contains settings for the account you are currently signed in with.
The Settings page contains the following tabs (depending on your Connect AI plan):
* [**Profile**](#profile)
* [**Account**](#account)
* [**Security**](#security)
* [**Personal Access Tokens**](#personal-access-tokens)
* [**OAuth Apps**](#oauth-apps)
* [**Keys**](#keys)
* [**Billing**](#billing)
The following sections describe these tabs.
## Profile
The **Profile** tab opens by default when you access Settings. This tab contains settings for the account you are currently signed in with.
 In the **User Profile** section, you can edit the first name and last name for the current user. Your user role appears in the **Role** text box, but it cannot be edited on this page. See [Users and Roles](/en/Users) for more information about roles.
You can change the email that you use to log in by entering the new email and clicking **Save Changes**. If you want to reset your password, click **Reset Password**. This action sends a password reset email to the email address that appears in **Email**.
If you are an SSO user, you must contact the administrator in your organization to change your email and/or password.
In the **Grant Support Access** section, administrators can toggle support access on so that the CData support team can log in and help troubleshoot issues for the users in the administrator's account. Administrators can revoke access at any time by disabling this setting.
Click **Save Changes** to save the selection. Then click **Accept** in the **Grant Support Access** dialog to agree to the terms and conditions of granting support access.
This feature is enabled for administrators only. Query users can contact their administrator to grant support access to their accounts.
## Account
The **Account** tab provides access to account-wide settings.
In the **User Profile** section, you can edit the first name and last name for the current user. Your user role appears in the **Role** text box, but it cannot be edited on this page. See [Users and Roles](/en/Users) for more information about roles.
You can change the email that you use to log in by entering the new email and clicking **Save Changes**. If you want to reset your password, click **Reset Password**. This action sends a password reset email to the email address that appears in **Email**.
If you are an SSO user, you must contact the administrator in your organization to change your email and/or password.
In the **Grant Support Access** section, administrators can toggle support access on so that the CData support team can log in and help troubleshoot issues for the users in the administrator's account. Administrators can revoke access at any time by disabling this setting.
Click **Save Changes** to save the selection. Then click **Accept** in the **Grant Support Access** dialog to agree to the terms and conditions of granting support access.
This feature is enabled for administrators only. Query users can contact their administrator to grant support access to their accounts.
## Account
The **Account** tab provides access to account-wide settings.
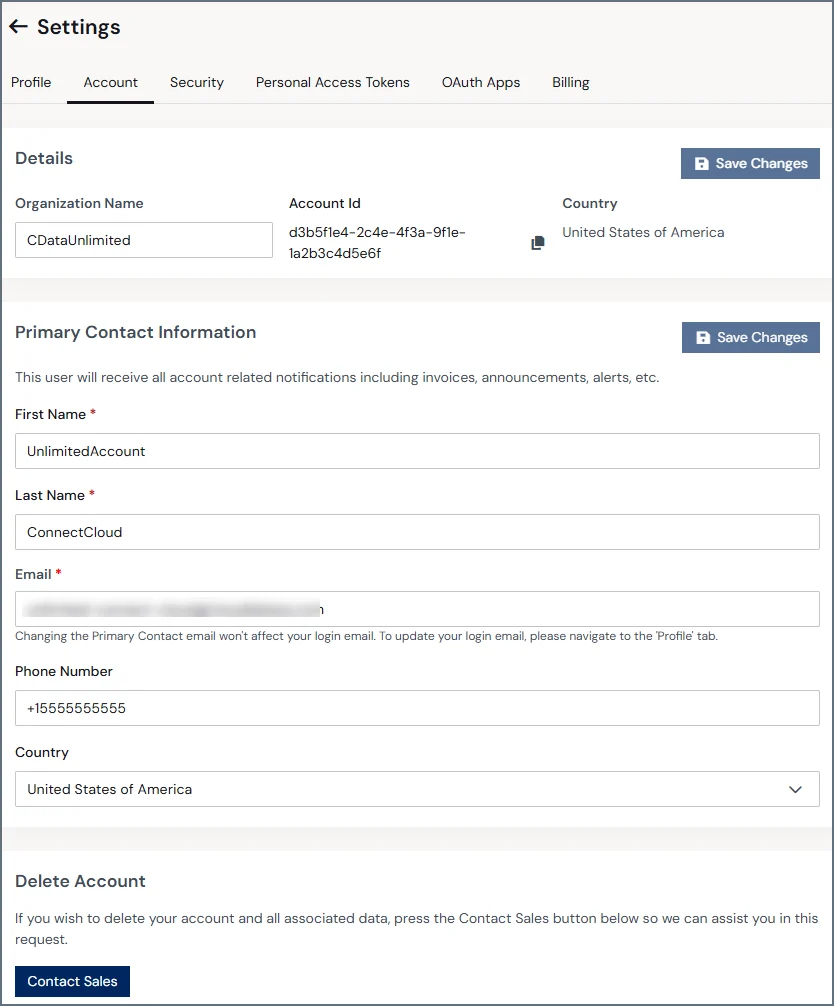 The sections of this page are described below.
### Details
The **Details** section lists the following global account information:
* Organization Name
* Account Id
* Country
### Primary Contact Information
This section contains the following fields that define the account's primary contact for invoices, announcements, and other communication. These fields can only be edited by administrators.
* First name
* Last name
* Email
* Phone Number
* Country
The email in this section is not the user login email. Change the login email in the **Profile** tab.
### Delete Account
If you want to delete your Connect AI account and all of its data, click **Contact Sales** for assistance.
Account deletion is permanent. If you delete your account and later want to use Connect AI again, you must create a new account.
## Security
The security settings on this tab are applied globally.
The sections of this page are described below.
### Details
The **Details** section lists the following global account information:
* Organization Name
* Account Id
* Country
### Primary Contact Information
This section contains the following fields that define the account's primary contact for invoices, announcements, and other communication. These fields can only be edited by administrators.
* First name
* Last name
* Email
* Phone Number
* Country
The email in this section is not the user login email. Change the login email in the **Profile** tab.
### Delete Account
If you want to delete your Connect AI account and all of its data, click **Contact Sales** for assistance.
Account deletion is permanent. If you delete your account and later want to use Connect AI again, you must create a new account.
## Security
The security settings on this tab are applied globally.
 ### Personal Access Token Expiration
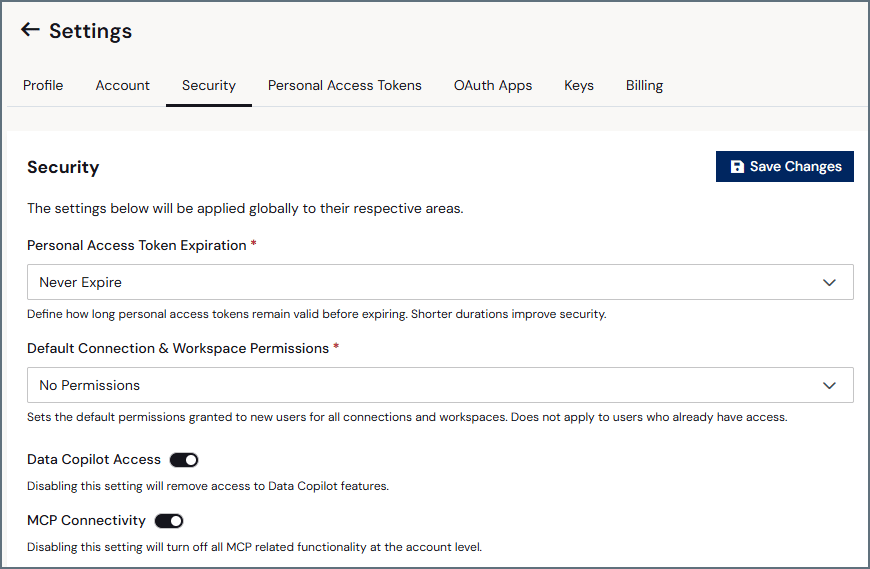
This section allows you to set a global Personal Access Token (PAT) expiration (such as **30 Days**, **60 Days**, or **Never Expire**). Shorter durations improve security. When the PAT expires, the PAT displays **Expired** in the **Security** tab of **Settings**, and any authentication using the PAT fails with an `"Invalid personal access token"` error.
To create a PAT, see [Personal Access Tokens](#personal-access-tokens).
### Default Connection & Workspace Permissions
From the drop-down list, select the default permissions granted to new users for all connections and workspaces. Options include **No Permissions** to connections and workspaces by default or **Select Only** permissions to connections and workspaces by default.
This setting does not affect the connection and workspace access of existing users.
### Data Copilot Access
Toggle this feature off if you do not want your users to have access to [Data Copilot](/en/Data-Copilot).
### MCP Connectivity
Toggle this feature off if you do not want your users to have access to any MCP-related functionality.
### SSO
**Just-in-Time (JIT) User Provisioning** automatically provisions new users the first time they sign in to an SSO-enabled domain.
### Personal Access Token Expiration
This section allows you to set a global Personal Access Token (PAT) expiration (such as **30 Days**, **60 Days**, or **Never Expire**). Shorter durations improve security. When the PAT expires, the PAT displays **Expired** in the **Security** tab of **Settings**, and any authentication using the PAT fails with an `"Invalid personal access token"` error.
To create a PAT, see [Personal Access Tokens](#personal-access-tokens).
### Default Connection & Workspace Permissions
From the drop-down list, select the default permissions granted to new users for all connections and workspaces. Options include **No Permissions** to connections and workspaces by default or **Select Only** permissions to connections and workspaces by default.
This setting does not affect the connection and workspace access of existing users.
### Data Copilot Access
Toggle this feature off if you do not want your users to have access to [Data Copilot](/en/Data-Copilot).
### MCP Connectivity
Toggle this feature off if you do not want your users to have access to any MCP-related functionality.
### SSO
**Just-in-Time (JIT) User Provisioning** automatically provisions new users the first time they sign in to an SSO-enabled domain.
 To enable JIT user provisioning:
Enable the toggle for a domain to turn on JIT provisioning.
Select the **JIT User Role** for new JIT users.
Select the **JIT Access Role** for new JIT users.
Click **Save Changes**.
See [User Provisioning and SSO](/en/SCIM) for more information about JIT. See [Users and Roles](/en/Users) for more information about user roles and access roles.
## Personal Access Tokens
Personal access tokens (PATs) are used when you connect to your data through the [REST API](/en/API/REST-API), the [OData protocol](/en/Data-Sources/OData), or the [Virtual SQL Server](/en/SQL-Server). You can create and manage your PATs on this tab.
To enable JIT user provisioning:
Enable the toggle for a domain to turn on JIT provisioning.
Select the **JIT User Role** for new JIT users.
Select the **JIT Access Role** for new JIT users.
Click **Save Changes**.
See [User Provisioning and SSO](/en/SCIM) for more information about JIT. See [Users and Roles](/en/Users) for more information about user roles and access roles.
## Personal Access Tokens
Personal access tokens (PATs) are used when you connect to your data through the [REST API](/en/API/REST-API), the [OData protocol](/en/Data-Sources/OData), or the [Virtual SQL Server](/en/SQL-Server). You can create and manage your PATs on this tab.
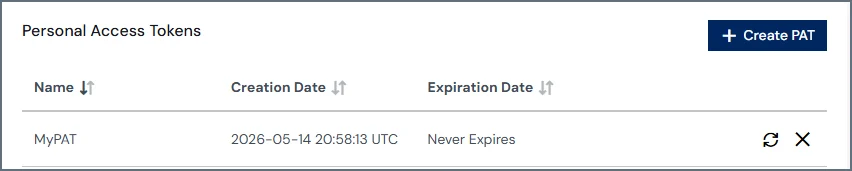 ### Create a PAT
Follow these steps to create a new PAT:
Click **Create PAT**.
Enter a name for the PAT in the dialog that appears. It might be useful to enter a name that indicates its purpose.
Click **Create** and a new dialog appears.
Click the copy icon in that dialog to copy the PAT to your clipboard. The icon is to the right of the token field.
You cannot view the PAT again after you close this dialog.
### Create a PAT
Follow these steps to create a new PAT:
Click **Create PAT**.
Enter a name for the PAT in the dialog that appears. It might be useful to enter a name that indicates its purpose.
Click **Create** and a new dialog appears.
Click the copy icon in that dialog to copy the PAT to your clipboard. The icon is to the right of the token field.
You cannot view the PAT again after you close this dialog.
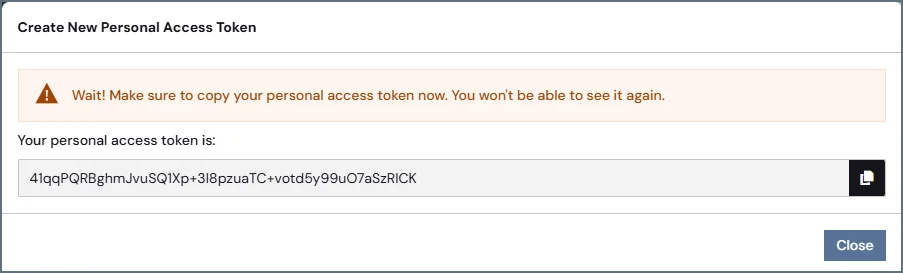 Click **Close** to close the dialog. The new PAT appears in the list and includes its **Creation Date** and **Expiration Date**.
The PAT expiration date is set globally in the **Security** tab.
### Regenerate a PAT
To regenerate a PAT, click the regeneration icon in the PAT list and follow the prompts.
Click **Close** to close the dialog. The new PAT appears in the list and includes its **Creation Date** and **Expiration Date**.
The PAT expiration date is set globally in the **Security** tab.
### Regenerate a PAT
To regenerate a PAT, click the regeneration icon in the PAT list and follow the prompts.
 Regenerating a PAT revokes access for any applications that use the PAT. Therefore, you must enter the newly generated PAT in any such applications.
### Delete a PAT
To delete a PAT that you no longer use, click the delete icon in the PAT list.
Regenerating a PAT revokes access for any applications that use the PAT. Therefore, you must enter the newly generated PAT in any such applications.
### Delete a PAT
To delete a PAT that you no longer use, click the delete icon in the PAT list.
 Click **Confirm** in the confirmation dialog that is displayed.
Deleting a PAT revokes access for any applications that use the PAT. Therefore, you must create a new PAT and enter it into those applications to restore this access.
## OAuth Apps
The **OAuth Apps** tab allows you to generate a custom OAuth application for client integrations. It contains a list of available OAuth apps, including their application type and creation date.
Click **Confirm** in the confirmation dialog that is displayed.
Deleting a PAT revokes access for any applications that use the PAT. Therefore, you must create a new PAT and enter it into those applications to restore this access.
## OAuth Apps
The **OAuth Apps** tab allows you to generate a custom OAuth application for client integrations. It contains a list of available OAuth apps, including their application type and creation date.
 ### Create a Custom OAuth Application
To create a custom OAuth application:
Click **+ Create App**. The **Create OAuth App** dialog appears.
### Create a Custom OAuth Application
To create a custom OAuth application:
Click **+ Create App**. The **Create OAuth App** dialog appears.
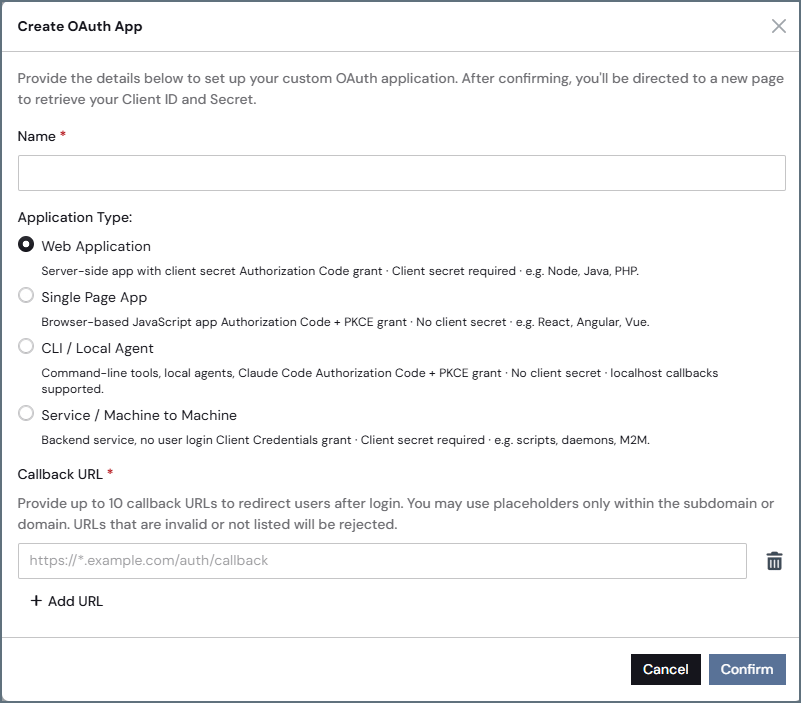 Enter the **Name** of the OAuth app.
Select the **Application Type** for your OAuth application.
* **Web Application**–select this option for service-side apps with a client secret Authorization Code grant. A client secret is required.
* **Single Page App**–select this option for browser-based Authorization Code + PKCE grant. No client secret is required.
* **CLI/Local Agent**–select this option for command-line tools. No client secret is required.
* **Service/Machine to Machine**–select this option for backend services where there is no user involvement. A client secret is required. When you select this application type, you must also select the **User** for whom the OAuth app will run. You can create a user name specifically for this purpose.
Go to your client application and create a new application registration there. The client application will provide a callback URL.
Return to the **Create OAuth App** dialog in Connect AI and paste the **Callback URL** from the client application. This URL redirects users after login. You can provide up to 10 callback URLs for your OAuth app.
Click **Confirm**. Connect AI creates the OAuth app and generates a **Client Id** and **Client Secret** for the client application. Copy these values.
Enter the **Name** of the OAuth app.
Select the **Application Type** for your OAuth application.
* **Web Application**–select this option for service-side apps with a client secret Authorization Code grant. A client secret is required.
* **Single Page App**–select this option for browser-based Authorization Code + PKCE grant. No client secret is required.
* **CLI/Local Agent**–select this option for command-line tools. No client secret is required.
* **Service/Machine to Machine**–select this option for backend services where there is no user involvement. A client secret is required. When you select this application type, you must also select the **User** for whom the OAuth app will run. You can create a user name specifically for this purpose.
Go to your client application and create a new application registration there. The client application will provide a callback URL.
Return to the **Create OAuth App** dialog in Connect AI and paste the **Callback URL** from the client application. This URL redirects users after login. You can provide up to 10 callback URLs for your OAuth app.
Click **Confirm**. Connect AI creates the OAuth app and generates a **Client Id** and **Client Secret** for the client application. Copy these values.
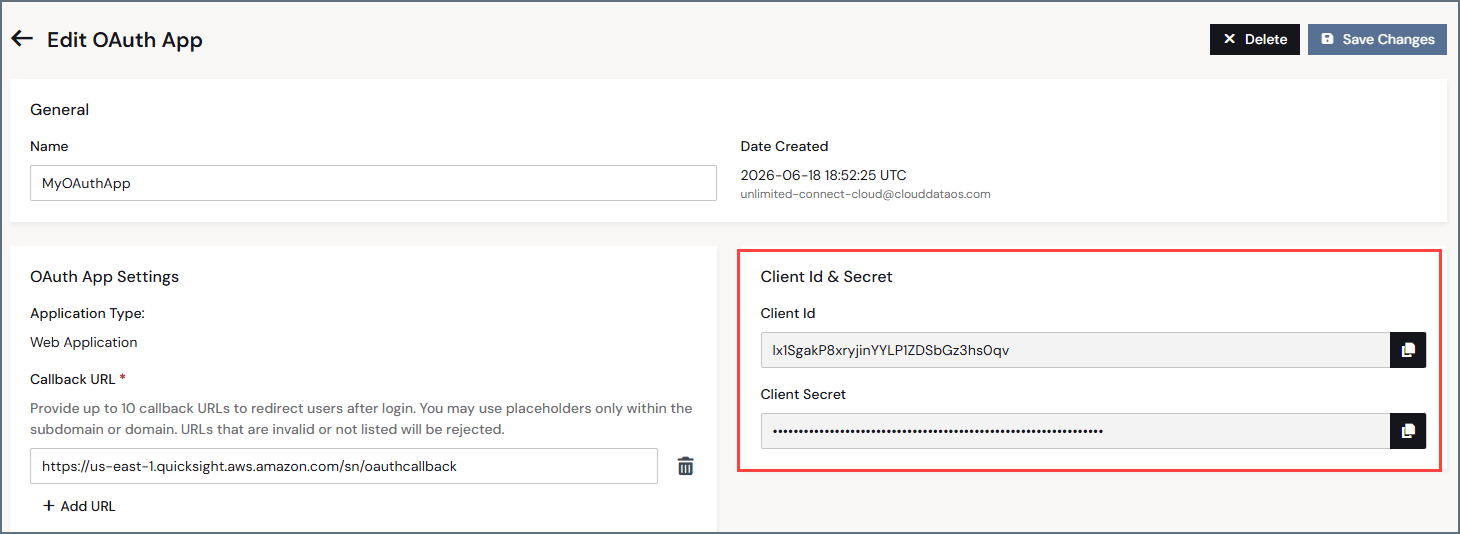 Return to the client application and paste the **Client Id** and **Client Secret** in the appropriate fields. For example, in Gemini Enterprise:
 The new OAuth app appears in the list of apps. Click the edit icon () to edit the app and add more callback URLs for other client applications, if needed.
Your external system might ask for information about the CData authorization, token, and registration URLs. They are as follows:
| Endpoint | Value |
| :---------------------------- | :------------------------------------------------------------------------------------- |
| **Authorization URL** | [https://cloud-login.cdata.com/authorize](https://cloud-login.cdata.com/authorize) |
| **Token URL** | [https://cloud-login.cdata.com/oauth/token](https://cloud-login.cdata.com/oauth/token) |
| **Registration URL** | [https://mcp.cloud.cdata.com/register](https://mcp.cloud.cdata.com/register) |
| **Authorization server base** | [https://mcp.cloud.cdata.com](https://mcp.cloud.cdata.com) |
| **Resource** | [https://mcp.cloud.cdata.com/mcp](https://mcp.cloud.cdata.com/mcp) |
## Keys
Connect AI supports storing data source authentication information in key vaults. Instead of entering authentication information directly in the **Add Connection** page for your data source, you enter the name of the key vault. You can then update the information in the key vault without affecting your data connection.
* Currently supports Azure Key Vault. Support for additional key vault providers is planned.
* Available for Business tier in Connect AI only.
* Not available for Connect AI Embed.
### Create a New Key Vault
Click **+ Add Vault**. The **Add Azure Key Vault** dialog appears.
Enter the **Vault Name** of your Azure key vault.
Enter the **Vault URI**, which can be found on the **Overview** page of your Azure Portal.
Enter the **Application Id**, also known as the **Client Id**. This value can be found on the **Overview** page of your Azure Portal.
Enter the **Directory Id**, also known as the **Tenant Id**. This value can be found on the **Overview** page of your Azure Portal.
Click **Confirm** to save your credentials. If successfully saved, the new key vault appears in the list of key vaults, along with the **Key Vault URL** and **Creation Date**.
Once you create a new key vault, you can use the key vault as a credential for data source connections.
### Delete a Key Vault
To delete a key vault that you no longer use, click the delete icon in the key vault list.
## Billing
The **Billing** tab provides information and controls for your account plan and usage.
The new OAuth app appears in the list of apps. Click the edit icon () to edit the app and add more callback URLs for other client applications, if needed.
Your external system might ask for information about the CData authorization, token, and registration URLs. They are as follows:
| Endpoint | Value |
| :---------------------------- | :------------------------------------------------------------------------------------- |
| **Authorization URL** | [https://cloud-login.cdata.com/authorize](https://cloud-login.cdata.com/authorize) |
| **Token URL** | [https://cloud-login.cdata.com/oauth/token](https://cloud-login.cdata.com/oauth/token) |
| **Registration URL** | [https://mcp.cloud.cdata.com/register](https://mcp.cloud.cdata.com/register) |
| **Authorization server base** | [https://mcp.cloud.cdata.com](https://mcp.cloud.cdata.com) |
| **Resource** | [https://mcp.cloud.cdata.com/mcp](https://mcp.cloud.cdata.com/mcp) |
## Keys
Connect AI supports storing data source authentication information in key vaults. Instead of entering authentication information directly in the **Add Connection** page for your data source, you enter the name of the key vault. You can then update the information in the key vault without affecting your data connection.
* Currently supports Azure Key Vault. Support for additional key vault providers is planned.
* Available for Business tier in Connect AI only.
* Not available for Connect AI Embed.
### Create a New Key Vault
Click **+ Add Vault**. The **Add Azure Key Vault** dialog appears.
Enter the **Vault Name** of your Azure key vault.
Enter the **Vault URI**, which can be found on the **Overview** page of your Azure Portal.
Enter the **Application Id**, also known as the **Client Id**. This value can be found on the **Overview** page of your Azure Portal.
Enter the **Directory Id**, also known as the **Tenant Id**. This value can be found on the **Overview** page of your Azure Portal.
Click **Confirm** to save your credentials. If successfully saved, the new key vault appears in the list of key vaults, along with the **Key Vault URL** and **Creation Date**.
Once you create a new key vault, you can use the key vault as a credential for data source connections.
### Delete a Key Vault
To delete a key vault that you no longer use, click the delete icon in the key vault list.
## Billing
The **Billing** tab provides information and controls for your account plan and usage.
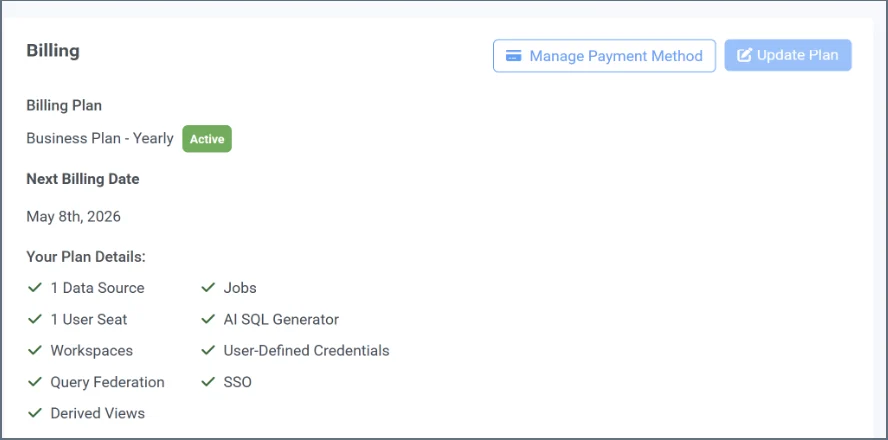 This tab consists of the following:
* The **Billing** section displays your plan information and next billing date.
* Click **Manage Payment Method** to open your account with Stripe. You can manage your billing settings, such as your payment method and billing address. If your subscription has lapsed, you must reactivate your plan to continue using Connect AI.
* The **Update Plan** section on the right (if applicable) contains information about contacting the Connect AI sales team. You can also email [sales@cdata.com](mailto:sales@cdata.com).
* If you are on a free trial account, this section displays your trial information.
* The **Additional Usage** section displays what is remaining in your current plan.
This tab consists of the following:
* The **Billing** section displays your plan information and next billing date.
* Click **Manage Payment Method** to open your account with Stripe. You can manage your billing settings, such as your payment method and billing address. If your subscription has lapsed, you must reactivate your plan to continue using Connect AI.
* The **Update Plan** section on the right (if applicable) contains information about contacting the Connect AI sales team. You can also email [sales@cdata.com](mailto:sales@cdata.com).
* If you are on a free trial account, this section displays your trial information.
* The **Additional Usage** section displays what is remaining in your current plan.