> ## Documentation Index
> Fetch the complete documentation index at: https://docs.cloud.cdata.com/llms.txt
> Use this file to discover all available pages before exploring further.
# Query Builder
> The Connect AI *Query Builder* allows you to build queries from your data without needing to write SQL code.
## Prerequisites
Before you can use the Query Builder, you must properly configure a connection within Connect AI. For more information about configuring a connection, see [Sources](/en/Sources). You can select any of your pre-made connections to query.
## Query Builder
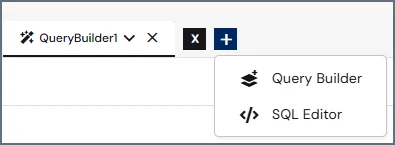
To access the Query Builder, click **Build Query** in the home page of Data Explorer. You can also access the Query Builder by clicking the add tab button and selecting **Query Builder**:
 The **Query Builder** appears in the right pane of the Data Explorer.
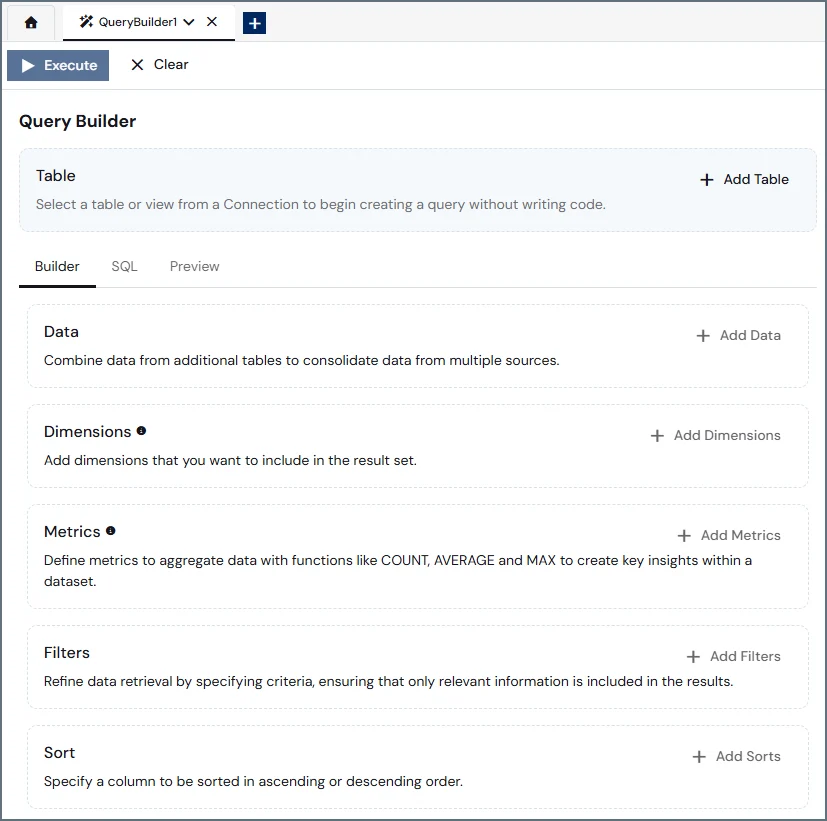 To start configuring Query Builder, follow these steps:
Click **Add Table**. A **Query Builder** dialog appears.
To start configuring Query Builder, follow these steps:
Click **Add Table**. A **Query Builder** dialog appears.
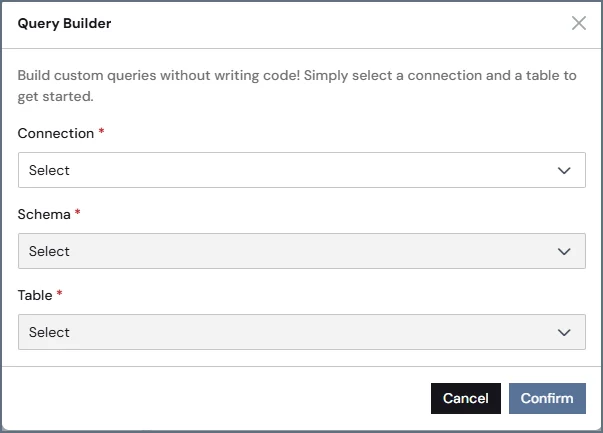 Select a Connect AI connection from the **Connection** list.
Select a schema for the connection from the **Schema** field.
Select the table you are interested in querying from the **Table** field. You can add additional tables in the **Add Data** step.
Click **Confirm**. Your initial query appears in the Query Builder.
Select a Connect AI connection from the **Connection** list.
Select a schema for the connection from the **Schema** field.
Select the table you are interested in querying from the **Table** field. You can add additional tables in the **Add Data** step.
Click **Confirm**. Your initial query appears in the Query Builder.
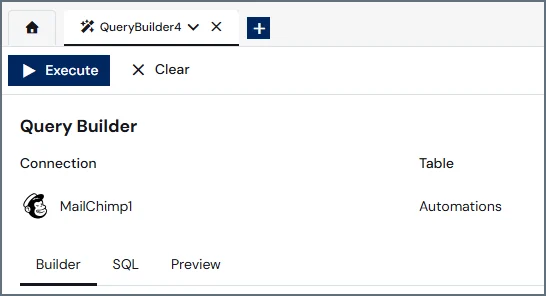 You are now ready to add other elements to your query, such as additional tables, dimensions, metrics, filters, and sorts. At any time, you can click the **SQL** tab to see your Query Builder query as SQL code. Click the **Preview** tab to preview the query results.
### Combine Data from Additional Tables
The Query Builder can create queries from multiple tables. To add a table to your query, follow these steps:
In the **Builder** tab of the Query Builder, click **Add Data**. An **Add Data** dialog appears.
You are now ready to add other elements to your query, such as additional tables, dimensions, metrics, filters, and sorts. At any time, you can click the **SQL** tab to see your Query Builder query as SQL code. Click the **Preview** tab to preview the query results.
### Combine Data from Additional Tables
The Query Builder can create queries from multiple tables. To add a table to your query, follow these steps:
In the **Builder** tab of the Query Builder, click **Add Data**. An **Add Data** dialog appears.
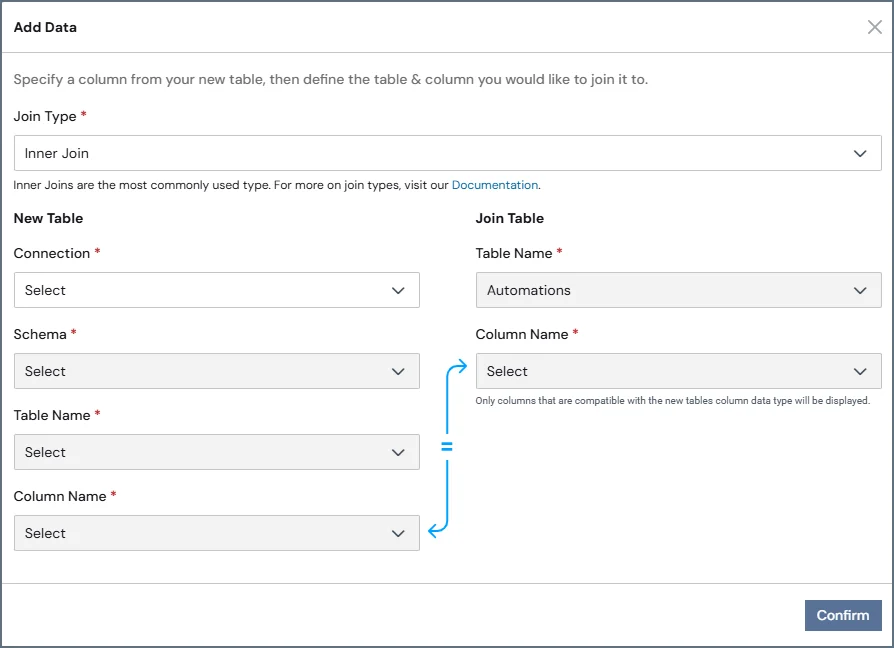 Select a **Join Type**. The join types available in Query Builder are as follows:
* **Inner Join**—this is the most common type of join. Connect AI combines records from the original and added table whenever there are matching values in a column common to both tables. It is equivalent to `INNER JOIN` in SQL.
* **Right Join**—this type of join returns all records from the added (new) table, plus the matching records from the original table. It is equivalent to `RIGHT JOIN` in SQL.
* **Left Join**—this type of join returns all records from the original table, plus the matching records from the added table. It is equivalent to `LEFT JOIN` in SQL.
* **Full Outer Join**—this type of join returns all records where there is a match in either the original table or in the added table. If there is no match, the result contains `NULL` values for columns from the table that does not have a matching row. It is equivalent to `FULL JOIN` in SQL. This join results in the largest data set.
Select a **Connection** containing the new table you want to add.
Select the **Schema** containing the new table.
Select the **Table Name** to add.
Select the **Column Name** in the original table and the new table. This is the column on which to join the two tables. Note that the joining columns must be of the same data type.
Click **Confirm** to save your new table. Your new table appears in the Query Builder in the **Data** section.
Select a **Join Type**. The join types available in Query Builder are as follows:
* **Inner Join**—this is the most common type of join. Connect AI combines records from the original and added table whenever there are matching values in a column common to both tables. It is equivalent to `INNER JOIN` in SQL.
* **Right Join**—this type of join returns all records from the added (new) table, plus the matching records from the original table. It is equivalent to `RIGHT JOIN` in SQL.
* **Left Join**—this type of join returns all records from the original table, plus the matching records from the added table. It is equivalent to `LEFT JOIN` in SQL.
* **Full Outer Join**—this type of join returns all records where there is a match in either the original table or in the added table. If there is no match, the result contains `NULL` values for columns from the table that does not have a matching row. It is equivalent to `FULL JOIN` in SQL. This join results in the largest data set.
Select a **Connection** containing the new table you want to add.
Select the **Schema** containing the new table.
Select the **Table Name** to add.
Select the **Column Name** in the original table and the new table. This is the column on which to join the two tables. Note that the joining columns must be of the same data type.
Click **Confirm** to save your new table. Your new table appears in the Query Builder in the **Data** section.
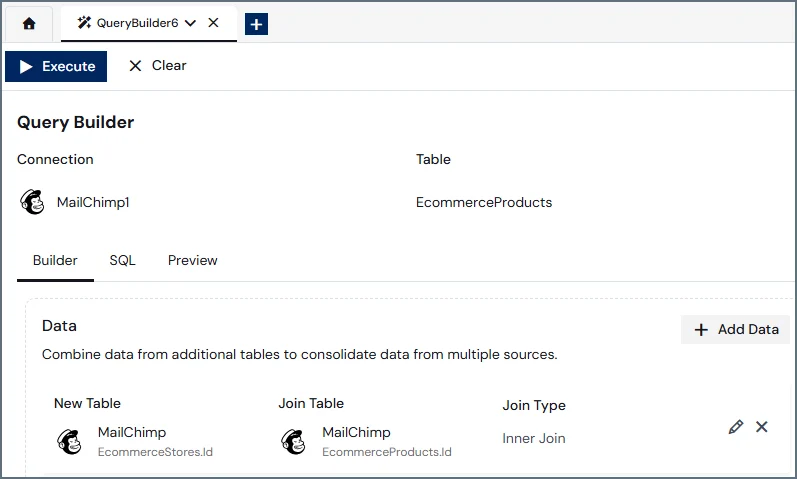 Click the **SQL** tab to view your query in SQL code:
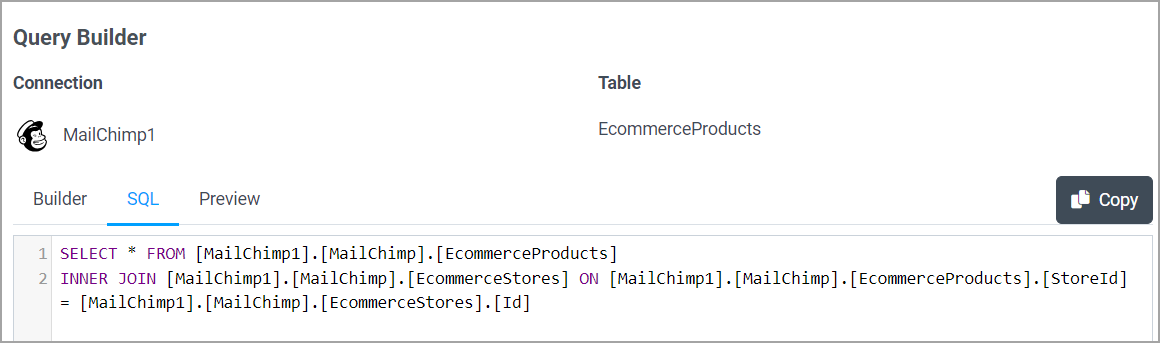 Click **Add Data** again to join additional tables. You can add a maximum of three joined tables. Click the edit icon to edit the joined table and the delete icon to delete the joined table.
### Add Dimensions to Results
A dimension is a categorical variable used to describe and segment data. It represents qualitative attributes and is often used to group or filter data. Dimensions help in breaking down data into more meaningful segments and provide context. For example, if you have sales data, the dimensions might include the sales region or the time period.
To add dimensions to your Query Builder results, follow these steps:
In the **Dimensions** section of the Query Builder, click **Add Dimensions**. An **Add Dimensions** dialog appears.
For each table in the query, select column names from the drop-down list. These are the columns you want to see in the result set.
Click **Confirm**. All the columns you selected appear in the **Dimensions** section of the Query Builder. Hover over the dimension to view the full table name.
Click **Add Data** again to join additional tables. You can add a maximum of three joined tables. Click the edit icon to edit the joined table and the delete icon to delete the joined table.
### Add Dimensions to Results
A dimension is a categorical variable used to describe and segment data. It represents qualitative attributes and is often used to group or filter data. Dimensions help in breaking down data into more meaningful segments and provide context. For example, if you have sales data, the dimensions might include the sales region or the time period.
To add dimensions to your Query Builder results, follow these steps:
In the **Dimensions** section of the Query Builder, click **Add Dimensions**. An **Add Dimensions** dialog appears.
For each table in the query, select column names from the drop-down list. These are the columns you want to see in the result set.
Click **Confirm**. All the columns you selected appear in the **Dimensions** section of the Query Builder. Hover over the dimension to view the full table name.
 You can drag and drop the columns to change the order. Click **Add Dimensions** to add more dimensions. Click the X on the dimension to delete the dimension.
### Add Metrics to Aggregate Data
A metric is a quantitative measure used to assess performance or progress. It represents numerical values that can be aggregated, compared, or analyzed. Metrics provide the actual data points that are measured and analyzed. They are used to evaluate the performance and outcomes based on the dimensions. For example, you can display the total dollar amount of sales with SUM or count the number of unique clients with DISTINCT COUNT.
To add metrics to your Query Builder results, follow these steps:
In the **Metrics** section of the Query Builder, click **Add Metrics**. An **Add Metrics** dialog appears.
Select the table name, column name, and the metric type to use to aggregate the results. Note that the metric types displayed depend on the column type. For example, string columns can use only COUNT or DISTINCT COUNT.
Click **Confirm**. The column and the metric to use appear in the **Metrics** sections of the Query Builder. Hover over the metric to view the full table name.
You can drag and drop the columns to change the order. Click **Add Dimensions** to add more dimensions. Click the X on the dimension to delete the dimension.
### Add Metrics to Aggregate Data
A metric is a quantitative measure used to assess performance or progress. It represents numerical values that can be aggregated, compared, or analyzed. Metrics provide the actual data points that are measured and analyzed. They are used to evaluate the performance and outcomes based on the dimensions. For example, you can display the total dollar amount of sales with SUM or count the number of unique clients with DISTINCT COUNT.
To add metrics to your Query Builder results, follow these steps:
In the **Metrics** section of the Query Builder, click **Add Metrics**. An **Add Metrics** dialog appears.
Select the table name, column name, and the metric type to use to aggregate the results. Note that the metric types displayed depend on the column type. For example, string columns can use only COUNT or DISTINCT COUNT.
Click **Confirm**. The column and the metric to use appear in the **Metrics** sections of the Query Builder. Hover over the metric to view the full table name.
 You can drag and drop the columns to change the order. Click **Add Metrics** to add more metrics. Click the X on the metric to delete the metric.
### Add Filters to the Data
Filters refine your data so that only relevant information is included in your query results.
The SQL operator to apply to your query depends on the data type of the column. If the column is a text data type, you can choose the following operators only:
* Equal to
* Not equal to
If the column is numeric or alphanumeric, you can choose the following operators only:
* Between
* Equal to
* Greater than
* Greater than or equal to
* Less than
* Less than or equal to
* Not equal to
To add filters to your Query Builder results, follow these steps:
In the **Filters** section of the Query Builder, click **Add Filters**. An **Add Filters** dialog appears.
Select the table name, column name, the SQL operator to apply, and the value for the filter.
Click **Confirm**. The column, operator type, and value appear in the **Filters** section of the Query Builder.
You can drag and drop the columns to change the order. Click **Add Metrics** to add more metrics. Click the X on the metric to delete the metric.
### Add Filters to the Data
Filters refine your data so that only relevant information is included in your query results.
The SQL operator to apply to your query depends on the data type of the column. If the column is a text data type, you can choose the following operators only:
* Equal to
* Not equal to
If the column is numeric or alphanumeric, you can choose the following operators only:
* Between
* Equal to
* Greater than
* Greater than or equal to
* Less than
* Less than or equal to
* Not equal to
To add filters to your Query Builder results, follow these steps:
In the **Filters** section of the Query Builder, click **Add Filters**. An **Add Filters** dialog appears.
Select the table name, column name, the SQL operator to apply, and the value for the filter.
Click **Confirm**. The column, operator type, and value appear in the **Filters** section of the Query Builder.
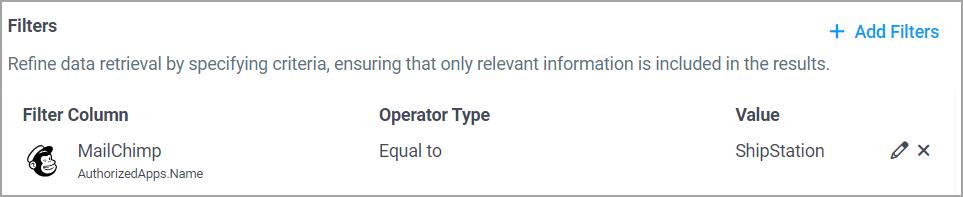 Click **Add Filters** to add more columns to filter, if desired. Select whether all filter conditions must be true (**And**) or at least one of the filters is true (**Or**).
Use the edit icon to edit the filter definition, and the delete icon to delete the filter.
### Sort the Data
To sort the resulting data, follow these steps:
In the **Sort** section of the Query Builder, click **Add Sorts**. An **Add Sorts** dialog appears.
Select the table name and column name to sort.
Select whether the sort is ascending or descending.
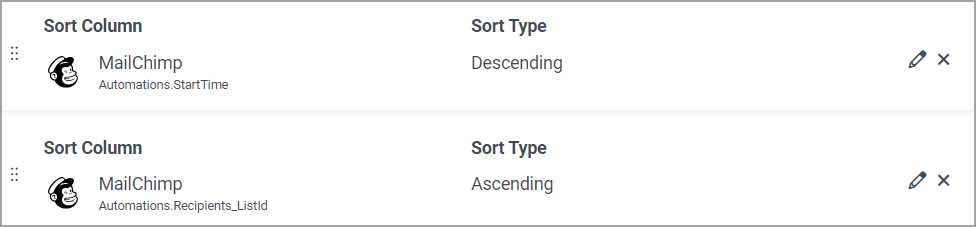
Click **Confirm**. The table name, column name, and the sort type appear in the **Sort** section of the Query Builder.
Click **Add Sorts** to add more columns to sort, if desired. Use the grid icon to the left to change the order of the sort columns. Click the edit icon to edit the sort definition, and the delete icon to delete the sort.
Click **Add Filters** to add more columns to filter, if desired. Select whether all filter conditions must be true (**And**) or at least one of the filters is true (**Or**).
Use the edit icon to edit the filter definition, and the delete icon to delete the filter.
### Sort the Data
To sort the resulting data, follow these steps:
In the **Sort** section of the Query Builder, click **Add Sorts**. An **Add Sorts** dialog appears.
Select the table name and column name to sort.
Select whether the sort is ascending or descending.
Click **Confirm**. The table name, column name, and the sort type appear in the **Sort** section of the Query Builder.
Click **Add Sorts** to add more columns to sort, if desired. Use the grid icon to the left to change the order of the sort columns. Click the edit icon to edit the sort definition, and the delete icon to delete the sort.
 ### Execute and Save the Query
To execute and save the query, follow these steps:
When you are satisfied with the preview of your query, click **Execute** to execute the query. The query results appear in a new tab.
### Execute and Save the Query
To execute and save the query, follow these steps:
When you are satisfied with the preview of your query, click **Execute** to execute the query. The query results appear in a new tab.
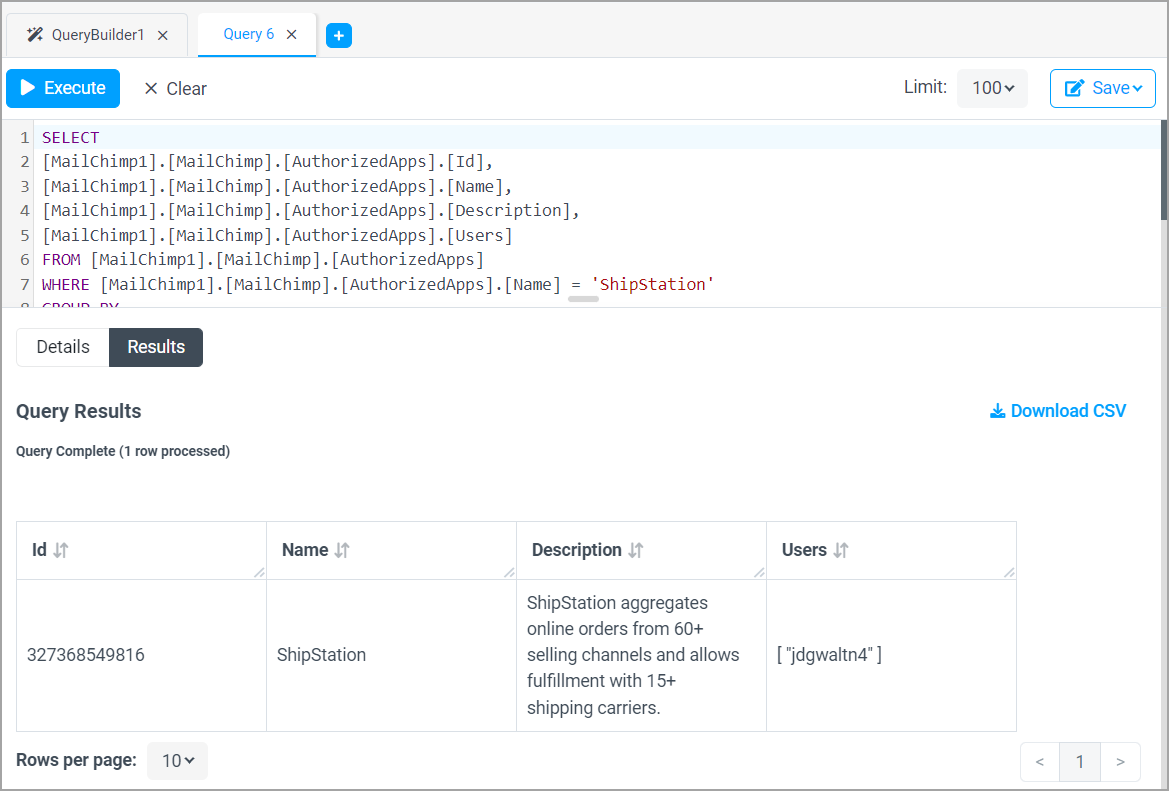 Click **Save** to save the query as a derived view, a saved query, or a scheduled query. If you save as a derived view or saved query, a **Save** dialog appears.
If you save the query as a scheduled query, an **Add Job** page appears. This is where you add details about the scheduled query job, such as how often it runs. See [Scheduled Queries](/en/Scheduled-Queries) for details.
For more information about derived views, see [Configuring Derived Views](/en/Data-Explorer#configure-derived-views). For more information about saved queries, see [Saving a Query](/en/Data-Explorer#save-a-query).
Enter the saved query or derived view name, and click **Confirm**. The saved query or derived view appears in the Data Explorer.
Click **Download CSV** to save your query results as a CSV file.
You can also save your SQL query by clicking **Copy** in the SQL tab of the Query Builder and pasting it into any text editor.
Click **Save** to save the query as a derived view, a saved query, or a scheduled query. If you save as a derived view or saved query, a **Save** dialog appears.
If you save the query as a scheduled query, an **Add Job** page appears. This is where you add details about the scheduled query job, such as how often it runs. See [Scheduled Queries](/en/Scheduled-Queries) for details.
For more information about derived views, see [Configuring Derived Views](/en/Data-Explorer#configure-derived-views). For more information about saved queries, see [Saving a Query](/en/Data-Explorer#save-a-query).
Enter the saved query or derived view name, and click **Confirm**. The saved query or derived view appears in the Data Explorer.
Click **Download CSV** to save your query results as a CSV file.
You can also save your SQL query by clicking **Copy** in the SQL tab of the Query Builder and pasting it into any text editor.