> ## Documentation Index
> Fetch the complete documentation index at: https://docs.cloud.cdata.com/llms.txt
> Use this file to discover all available pages before exploring further.
# Projects
> Projects route LLM traffic according to an assigned routing rule.
A project is a named routing context that groups related LLM traffic together and assigns it a routing rule. It routes traffic to a specific provider (or failover chain) based on its assigned routing rule. Projects allow different teams or workloads to use different providers without interfering with one another.
The **Projects** tab of the **LLM Gateway** page contains a list of LLM Gateway projects.
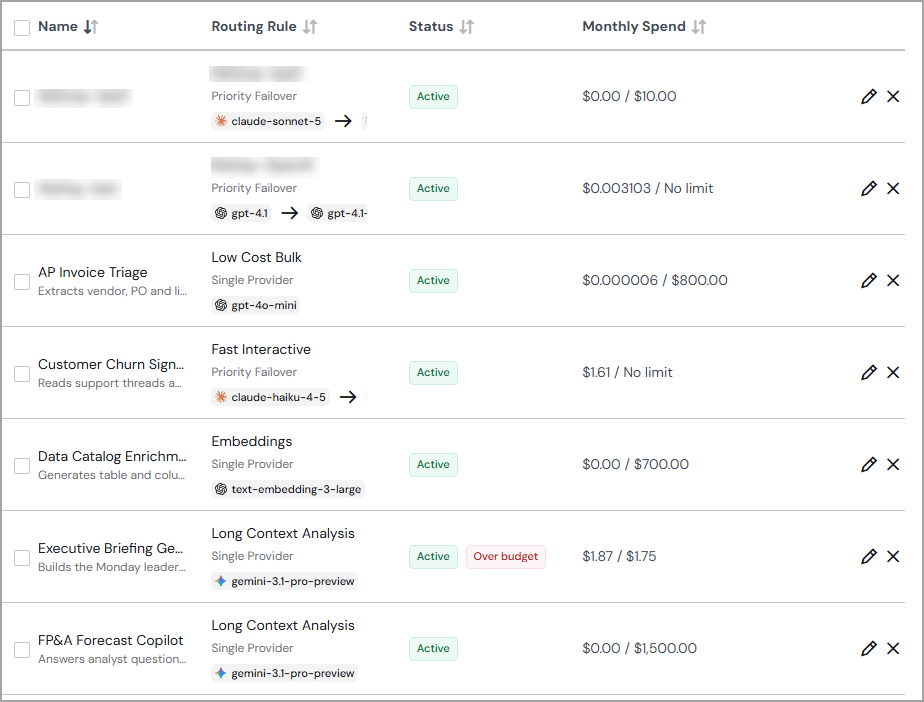 Each project displays the following information:
* **Name**–the user-defined name of the project.
* **Routing Rule**–the routing rule for the project. Routing rules are set up on the [**Routing Rules**](/en/LLM-Gateway/Routing-Rules) page.
- **Status**–the status of the project: **Active** or **Inactive**. Active projects receive routed traffic.
- **Monthly Spend**–the monthly spend allotted to the project, along with the amount spent this month. For example, **\$100 / \$700** means \$100 of the \$700 monthly budget has been spent.
Click the project's edit icon to view details about each project, including its routing rule and virtual keys. You can edit the **Name**, **Description**, and **Routing Rule**. You can also issue, rotate, and delete virtual keys for the project. Click the delete icon to delete the project.
## Add a Project to the LLM Gateway
To add a project, do the following:
Click **+ Add Project**. An **Add Project** dialog appears.
In the **Details** tab of the dialog (Step 1), enter a **Name** and **Description** for the project. Click **Next**.
In the **Routing Rule** tab of the dialog (Step 2), select an **Existing Routing Rule** or **Create a New Routing Rule**. See [**Routing Rules**](/en/LLM-Gateway/Routing-Rules) for more information on creating routing rules. Click **Next**.
In the **Limits** tab of the dialog (Step 4), add the following:
**Spend Limits** section:
* **Budget**—enter the monthly budget for this project, or select **Unlimited**. If you select **Unlimited**, the remaining Spend Limits fields are hidden.
* **Limit Type**—toggle **Hard Limit** or **Soft Limit**. A hard limit stops requests after the budgeted amount. A soft limit sends a notification that the limit was reached, but allows requests to go through.
* **Notification Threshold**—set a threshold level, such as 75% of budget, for sending a notification (required for soft limit).
* **Notification Frequency**—select **Once** or **Hourly** for sending threshold notifications.
**Rate Limits** section:
Select **Unlimited** to apply no rate limits. Otherwise, enter the following:
* **Request Limit**—enter the maximum number of requests and select the time period: minutes, hours, or days.
* **Token Limit**—enter the maximum number of tokens and select the time period: minutes, hours, or days.
Click **Add** to add the project. The new project's summary appears on the project's details page.
You can issue a virtual key for the project or return to it later. See [**Virtual Keys**](/en/LLM-Gateway/Virtual-Keys) for details.
Make any other changes to the project and click **Save Changes**. The new project appears on the **Projects** tab with a default status of **Active**.
## Edit a Project
To edit a project, do the following:
On the **Projects** tab, click the edit icon for the project you want to edit. The project's details page appears.
Edit the **Name** and **Description** as needed.
In the **Routing Rule** tab, change the routing rule or the prompt enrichment settings. See [**Routing Rules**](/en/LLM-Gateway/Routing-Rules) for details.
In the **Spend Limits** tab, edit the spend limits for the project. See [**Spend Limits**](#spend-limits) for field descriptions.
In the **Rate Limits** tab, edit the rate limits for the project. See [**Rate Limits**](#rate-limits) for field descriptions.
To manage virtual keys for the project, see [**Virtual Keys**](/en/LLM-Gateway/Virtual-Keys).
Click **Save Changes**.
## Spend Limits
The **Spend Limits** tab controls the monthly budget and notification settings for a project.
* **Budget**—enter the monthly budget for this project, or select **Unlimited**. If you select **Unlimited**, the remaining Spend Limits fields are hidden.
* **Limit Type**—toggle **Hard Limit** or **Soft Limit**. A hard limit stops requests after the budgeted amount. A soft limit sends a notification that the limit was reached, but allows requests to go through.
* **Notification Threshold**—set a threshold level, such as 75% of budget, for sending a notification (required for soft limit).
* **Notification Frequency**—select **Once** or **Hourly** for sending threshold notifications.
## Rate Limits
The **Rate Limits** tab controls the maximum number of requests and tokens for a project. Select **Unlimited** to apply no rate limits. Otherwise, enter the following:
* **Request Limit**—enter the maximum number of requests and select the time period: minutes, hours, or days.
* **Token Limit**—enter the maximum number of tokens and select the time period: minutes, hours, or days.
This documentation is built and hosted on [Mintlify](https://mintlify.com), a developer documentation platform.
Each project displays the following information:
* **Name**–the user-defined name of the project.
* **Routing Rule**–the routing rule for the project. Routing rules are set up on the [**Routing Rules**](/en/LLM-Gateway/Routing-Rules) page.
- **Status**–the status of the project: **Active** or **Inactive**. Active projects receive routed traffic.
- **Monthly Spend**–the monthly spend allotted to the project, along with the amount spent this month. For example, **\$100 / \$700** means \$100 of the \$700 monthly budget has been spent.
Click the project's edit icon to view details about each project, including its routing rule and virtual keys. You can edit the **Name**, **Description**, and **Routing Rule**. You can also issue, rotate, and delete virtual keys for the project. Click the delete icon to delete the project.
## Add a Project to the LLM Gateway
To add a project, do the following:
Click **+ Add Project**. An **Add Project** dialog appears.
In the **Details** tab of the dialog (Step 1), enter a **Name** and **Description** for the project. Click **Next**.
In the **Routing Rule** tab of the dialog (Step 2), select an **Existing Routing Rule** or **Create a New Routing Rule**. See [**Routing Rules**](/en/LLM-Gateway/Routing-Rules) for more information on creating routing rules. Click **Next**.
In the **Limits** tab of the dialog (Step 4), add the following:
**Spend Limits** section:
* **Budget**—enter the monthly budget for this project, or select **Unlimited**. If you select **Unlimited**, the remaining Spend Limits fields are hidden.
* **Limit Type**—toggle **Hard Limit** or **Soft Limit**. A hard limit stops requests after the budgeted amount. A soft limit sends a notification that the limit was reached, but allows requests to go through.
* **Notification Threshold**—set a threshold level, such as 75% of budget, for sending a notification (required for soft limit).
* **Notification Frequency**—select **Once** or **Hourly** for sending threshold notifications.
**Rate Limits** section:
Select **Unlimited** to apply no rate limits. Otherwise, enter the following:
* **Request Limit**—enter the maximum number of requests and select the time period: minutes, hours, or days.
* **Token Limit**—enter the maximum number of tokens and select the time period: minutes, hours, or days.
Click **Add** to add the project. The new project's summary appears on the project's details page.
You can issue a virtual key for the project or return to it later. See [**Virtual Keys**](/en/LLM-Gateway/Virtual-Keys) for details.
Make any other changes to the project and click **Save Changes**. The new project appears on the **Projects** tab with a default status of **Active**.
## Edit a Project
To edit a project, do the following:
On the **Projects** tab, click the edit icon for the project you want to edit. The project's details page appears.
Edit the **Name** and **Description** as needed.
In the **Routing Rule** tab, change the routing rule or the prompt enrichment settings. See [**Routing Rules**](/en/LLM-Gateway/Routing-Rules) for details.
In the **Spend Limits** tab, edit the spend limits for the project. See [**Spend Limits**](#spend-limits) for field descriptions.
In the **Rate Limits** tab, edit the rate limits for the project. See [**Rate Limits**](#rate-limits) for field descriptions.
To manage virtual keys for the project, see [**Virtual Keys**](/en/LLM-Gateway/Virtual-Keys).
Click **Save Changes**.
## Spend Limits
The **Spend Limits** tab controls the monthly budget and notification settings for a project.
* **Budget**—enter the monthly budget for this project, or select **Unlimited**. If you select **Unlimited**, the remaining Spend Limits fields are hidden.
* **Limit Type**—toggle **Hard Limit** or **Soft Limit**. A hard limit stops requests after the budgeted amount. A soft limit sends a notification that the limit was reached, but allows requests to go through.
* **Notification Threshold**—set a threshold level, such as 75% of budget, for sending a notification (required for soft limit).
* **Notification Frequency**—select **Once** or **Hourly** for sending threshold notifications.
## Rate Limits
The **Rate Limits** tab controls the maximum number of requests and tokens for a project. Select **Unlimited** to apply no rate limits. Otherwise, enter the following:
* **Request Limit**—enter the maximum number of requests and select the time period: minutes, hours, or days.
* **Token Limit**—enter the maximum number of tokens and select the time period: minutes, hours, or days.
This documentation is built and hosted on [Mintlify](https://mintlify.com), a developer documentation platform.