> ## Documentation Index
> Fetch the complete documentation index at: https://docs.cloud.cdata.com/llms.txt
> Use this file to discover all available pages before exploring further.
# Jobs
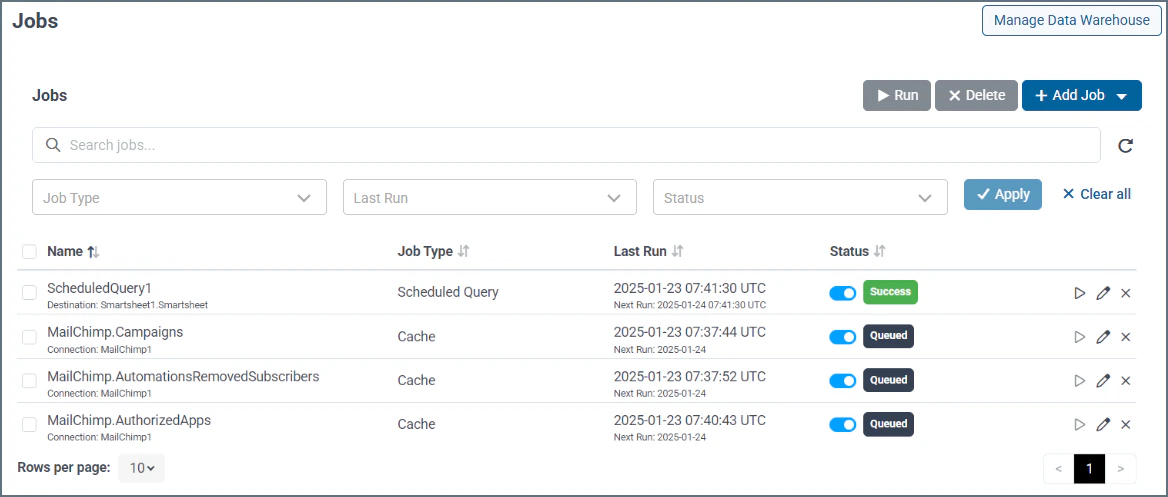
> The ***Jobs*** page enables you to manage and run various Connect AI jobs. From this page, you can manage either [Caching](/en/Caching) or [Scheduled Queries](/en/Scheduled-Queries).
 The **Connect AI caching feature** allows you to select tables to be cached, or saved to a database. Connect AI then fetches data for the selected tables on a scheduled basis, ensuring swift and reliable access to data whenever you need it.
Note that when you enable caching of data, Connect AI runs database queries against the *cached* data, not the live data. The cached data is stored in a PostgreSQL database, which you must set up before using the caching feature. You can set up the data warehouse for your cached data by clicking **Set Up Data Warehouse** on the Jobs page. This takes you to the **Add PostgreSQL Connection** page.
Once the data warehouse is set up, you can manage it by clicking **Manage Data Warehouse** at the top of the Jobs page. See [Caching](/en/Caching) for details.
The **Connect AI scheduled queries feature** allows you to write queries in Data Explorer and schedule them to write data to a variety of supported destinations based on a set schedule. Before you use the scheduled queries feature, you must set up a connection that contains the destination tables for the scheduled queries. See [Scheduled Queries](/en/Scheduled-Queries) for details.
The **Jobs** page contains the following information about each job:
* **Name**—the name of the job. For cached jobs, the job name is the table name. For scheduled queries, the job name is user defined.
* **Job Type**—The job type, which is either **Cache** or **Scheduled Query**.
* **Last Run**—The last time the job was run, and the next scheduled run.
* **Status**—The status of the job, which can be one of the following:
* **Success**—the job completed successfully.
* **Failed**—the job was unsuccessful. Click anywhere in the job to open the **Edit Job** page. **Edit Job** displays details about why the job failed.
* **Running**—the job is in progress.
* **Canceled**—the user canceled the job.
* **Queued**—the job is queued to run at the time specified in Next Run.
The toggle switch in the **Status** column indicates whether the job is enabled or disabled. You can disable a job temporarily without deleting it.
* **Job Actions**—The icons in the last column represent the various actions you can perform on a job.
* **Run (▷)**—Run the selected job immediately. You can run several jobs at once by selecting the jobs to run and clicking the **Run** button on the top of the page.
* **Edit (🖉)**—Edit the selected job in the **Edit Job** page.
* **Delete (🗙)**—Delete the selected job. You can delete several jobs at once by selecting the jobs to delete and clicking the **Delete** button at the top of the page.
Click **+Add Job** to add a new cache job or scheduled query. Note that you cannot add a cache job until you set up the data warehouse.
### Filtering
The section above the jobs table allows you to filter jobs by name, job type, last run, and/or status.
* **Name**—displays only jobs matching the job name.
* **Job Type**—select whether to display only cached jobs or only scheduled queries.
* **Last Run**—displays only jobs that were last run in the given date range (such as the last 7 days) or a custom date range selected from the date picker.
* **Status**—displays only jobs that have a certain status (success, failed, running, canceled, or queued).
Click **Apply** to apply the selected filter(s) to the jobs table and perform a search. Click **Clear all** to start over.
The **Connect AI caching feature** allows you to select tables to be cached, or saved to a database. Connect AI then fetches data for the selected tables on a scheduled basis, ensuring swift and reliable access to data whenever you need it.
Note that when you enable caching of data, Connect AI runs database queries against the *cached* data, not the live data. The cached data is stored in a PostgreSQL database, which you must set up before using the caching feature. You can set up the data warehouse for your cached data by clicking **Set Up Data Warehouse** on the Jobs page. This takes you to the **Add PostgreSQL Connection** page.
Once the data warehouse is set up, you can manage it by clicking **Manage Data Warehouse** at the top of the Jobs page. See [Caching](/en/Caching) for details.
The **Connect AI scheduled queries feature** allows you to write queries in Data Explorer and schedule them to write data to a variety of supported destinations based on a set schedule. Before you use the scheduled queries feature, you must set up a connection that contains the destination tables for the scheduled queries. See [Scheduled Queries](/en/Scheduled-Queries) for details.
The **Jobs** page contains the following information about each job:
* **Name**—the name of the job. For cached jobs, the job name is the table name. For scheduled queries, the job name is user defined.
* **Job Type**—The job type, which is either **Cache** or **Scheduled Query**.
* **Last Run**—The last time the job was run, and the next scheduled run.
* **Status**—The status of the job, which can be one of the following:
* **Success**—the job completed successfully.
* **Failed**—the job was unsuccessful. Click anywhere in the job to open the **Edit Job** page. **Edit Job** displays details about why the job failed.
* **Running**—the job is in progress.
* **Canceled**—the user canceled the job.
* **Queued**—the job is queued to run at the time specified in Next Run.
The toggle switch in the **Status** column indicates whether the job is enabled or disabled. You can disable a job temporarily without deleting it.
* **Job Actions**—The icons in the last column represent the various actions you can perform on a job.
* **Run (▷)**—Run the selected job immediately. You can run several jobs at once by selecting the jobs to run and clicking the **Run** button on the top of the page.
* **Edit (🖉)**—Edit the selected job in the **Edit Job** page.
* **Delete (🗙)**—Delete the selected job. You can delete several jobs at once by selecting the jobs to delete and clicking the **Delete** button at the top of the page.
Click **+Add Job** to add a new cache job or scheduled query. Note that you cannot add a cache job until you set up the data warehouse.
### Filtering
The section above the jobs table allows you to filter jobs by name, job type, last run, and/or status.
* **Name**—displays only jobs matching the job name.
* **Job Type**—select whether to display only cached jobs or only scheduled queries.
* **Last Run**—displays only jobs that were last run in the given date range (such as the last 7 days) or a custom date range selected from the date picker.
* **Status**—displays only jobs that have a certain status (success, failed, running, canceled, or queued).
Click **Apply** to apply the selected filter(s) to the jobs table and perform a search. Click **Clear all** to start over.