> ## Documentation Index
> Fetch the complete documentation index at: https://docs.cloud.cdata.com/llms.txt
> Use this file to discover all available pages before exploring further.
# Workspaces
> The Workspaces tab allows you to manage the users and service accounts in the workspaces of your account.
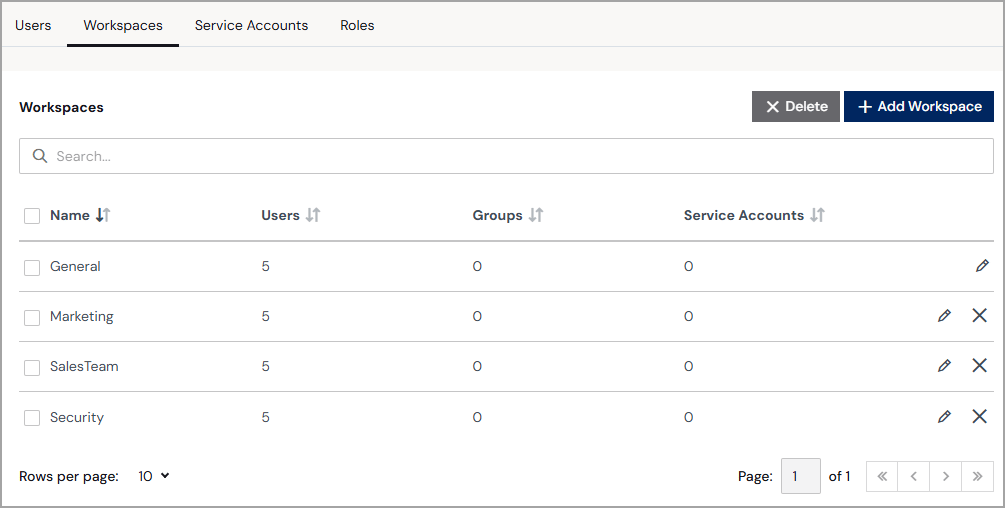
The **Workspaces** tab allows you to manage the users and service accounts within each workspace, as well as add new workspaces to your account.
 You must have an Administrator system role to create a workspace. You must have at least a Workspace Administrator system role to manage a workspace.
The **Workspaces** tab displays a search bar to search for a workspace. It also displays a row for every workspace in your account, with the following information:
* **Name** is the workspace name.
* **Users** is the number of users within the workspace. (Users with the Administrator system role are included in every workspace.)
* **Groups** are the number of SCIM groups the workspace contains.
* **Service Accounts** is the number of service accounts within the workspace.
* Edit and delete icons for the workspace. You cannot delete the **General** workspace.
## Add a Workspace
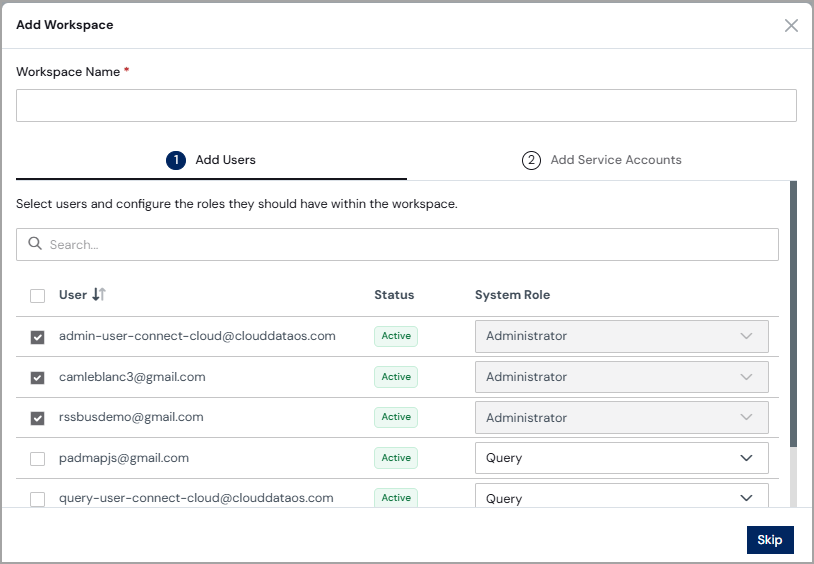
To add a new workspace to your account as an Administrator, click **+ Add Workspace** in the **Workspaces** tab of the **Identities** page. An **Add Workspace** dialog appears:
You must have an Administrator system role to create a workspace. You must have at least a Workspace Administrator system role to manage a workspace.
The **Workspaces** tab displays a search bar to search for a workspace. It also displays a row for every workspace in your account, with the following information:
* **Name** is the workspace name.
* **Users** is the number of users within the workspace. (Users with the Administrator system role are included in every workspace.)
* **Groups** are the number of SCIM groups the workspace contains.
* **Service Accounts** is the number of service accounts within the workspace.
* Edit and delete icons for the workspace. You cannot delete the **General** workspace.
## Add a Workspace
To add a new workspace to your account as an Administrator, click **+ Add Workspace** in the **Workspaces** tab of the **Identities** page. An **Add Workspace** dialog appears:
 Then complete the following steps:
Enter a **Workspace Name**.
In Step 1 of the dialog, add one or more users to the workspace. Use the search bar to search for users. All users with the system role of Administrator are added automatically to all new workspaces.
You can skip this step and add users to the workspace later.
(Optional) Select a new system role for the user from the drop-down list. You cannot change an **Administrator** role. See [Permissions](/en/Permissions) for a description of system roles.
In Step 2 of the dialog, add one or more service accounts to the workspace. A service account is a non-human identity, such as an agent, that is authorized to interact with Connect AI.
You can skip this step and add service accounts to the workspace later.
Click **Add Workspace** to add the workspace to your account.
## Edit a Workspace
You can modify or delete a workspace at any time by clicking the edit or delete icons in the **Workspaces** list.
In the **Edit Workspace** page, you can do the following:
* Edit the **Name** of the workspace.
* Add, edit, or delete users in the **Users** tab. See [Users](/en/Identities/Users) for details.
* Add, edit, or delete service accounts in the **Service Accounts** tab. See [Service Accounts](/en/Identities/Service-Accounts) for details.
* Assign system roles and access roles to users within the workspace.
This documentation is built and hosted on [Mintlify](https://mintlify.com), a developer documentation platform.
Then complete the following steps:
Enter a **Workspace Name**.
In Step 1 of the dialog, add one or more users to the workspace. Use the search bar to search for users. All users with the system role of Administrator are added automatically to all new workspaces.
You can skip this step and add users to the workspace later.
(Optional) Select a new system role for the user from the drop-down list. You cannot change an **Administrator** role. See [Permissions](/en/Permissions) for a description of system roles.
In Step 2 of the dialog, add one or more service accounts to the workspace. A service account is a non-human identity, such as an agent, that is authorized to interact with Connect AI.
You can skip this step and add service accounts to the workspace later.
Click **Add Workspace** to add the workspace to your account.
## Edit a Workspace
You can modify or delete a workspace at any time by clicking the edit or delete icons in the **Workspaces** list.
In the **Edit Workspace** page, you can do the following:
* Edit the **Name** of the workspace.
* Add, edit, or delete users in the **Users** tab. See [Users](/en/Identities/Users) for details.
* Add, edit, or delete service accounts in the **Service Accounts** tab. See [Service Accounts](/en/Identities/Service-Accounts) for details.
* Assign system roles and access roles to users within the workspace.
This documentation is built and hosted on [Mintlify](https://mintlify.com), a developer documentation platform.