> ## Documentation Index
> Fetch the complete documentation index at: https://docs.cloud.cdata.com/llms.txt
> Use this file to discover all available pages before exploring further.
# Service Accounts
> The **Service Accounts** tab on the ***Identities*** page enables you to manage non-human identities on your Connect AI account.
A **Service Account** is a non-human identity, such as an agent, that is authorized to interact with Connect AI. Service accounts authenticate via OAuth 2.0 Client Credentials. Use them to grant programmatic access to scripts, jobs, and external services.
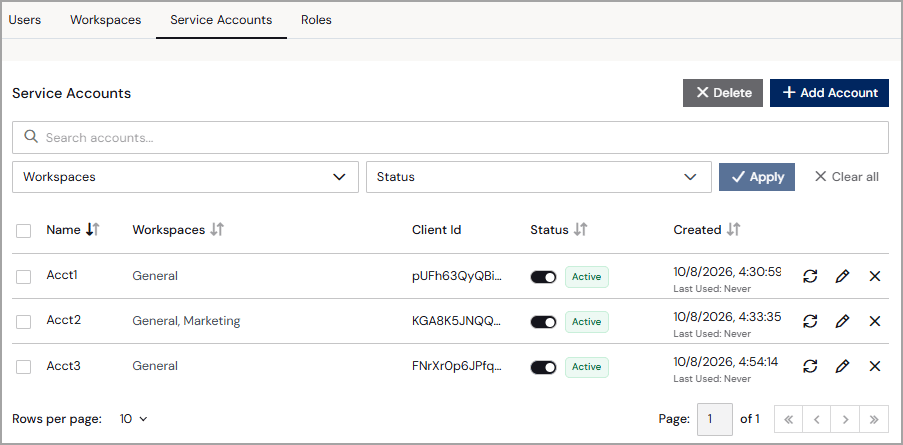 The **Service Accounts** tab contains the following information:
* A search bar for entering a service account name.
* Drop-down lists for filtering by workspace name and service account status.
* A row for every service account in your account:
* **Name** is the service account name.
* **Workspace** displays the workspace or workspaces containing the service account.
* **Client Id** is the unique identifier used to authenticate the service account via OAuth 2.0 Client Credentials.
* **Status** is the status of the service account (active or inactive). If you deactivate a service account, any services or automations using these credentials fail on the next request. The service account remains in the registry for audit purposes.
* **Created** is the date and time the service account was created.
* Rotate, edit, and delete icons for the service account. When you rotate credentials, the current credentials stop working immediately. You must update dependent services before the next request.
## Add a Service Account
In the **Service Accounts** tab of the **Identities** page, click **+ Add Account** to open the **Add
Service Account** page.
The **Service Accounts** tab contains the following information:
* A search bar for entering a service account name.
* Drop-down lists for filtering by workspace name and service account status.
* A row for every service account in your account:
* **Name** is the service account name.
* **Workspace** displays the workspace or workspaces containing the service account.
* **Client Id** is the unique identifier used to authenticate the service account via OAuth 2.0 Client Credentials.
* **Status** is the status of the service account (active or inactive). If you deactivate a service account, any services or automations using these credentials fail on the next request. The service account remains in the registry for audit purposes.
* **Created** is the date and time the service account was created.
* Rotate, edit, and delete icons for the service account. When you rotate credentials, the current credentials stop working immediately. You must update dependent services before the next request.
## Add a Service Account
In the **Service Accounts** tab of the **Identities** page, click **+ Add Account** to open the **Add
Service Account** page.
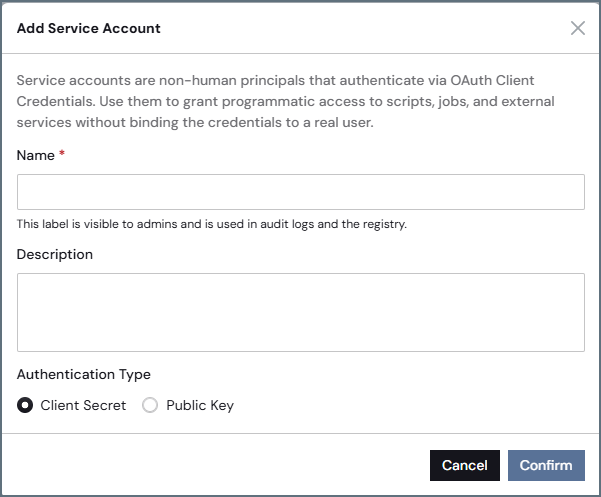 Enter the **Name** of the service account.
Enter a short **Description** of the service account.
Select an **Authentication Type** of **Client Secret** or **Public Key**. If you select **Public
Key**, you are asked to upload the public key (PEM) file (RS256 or ES256).
Click **Confirm** to save the service account.
If you selected **Client Secret**, an **Add Service Account** dialog appears. Copy the
**Client Id** and **Client Secret**. The **Client Secret** only appears once.
Share these credentials with the developer who will authenticate the service account using OAuth 2.0. See
[Service Account Setup](/en/API/Service-Account-Setup) for details.
Click **Done**. An **Edit Service Account** page appears.
Enter the **Name** of the service account.
Enter a short **Description** of the service account.
Select an **Authentication Type** of **Client Secret** or **Public Key**. If you select **Public
Key**, you are asked to upload the public key (PEM) file (RS256 or ES256).
Click **Confirm** to save the service account.
If you selected **Client Secret**, an **Add Service Account** dialog appears. Copy the
**Client Id** and **Client Secret**. The **Client Secret** only appears once.
Share these credentials with the developer who will authenticate the service account using OAuth 2.0. See
[Service Account Setup](/en/API/Service-Account-Setup) for details.
Click **Done**. An **Edit Service Account** page appears.
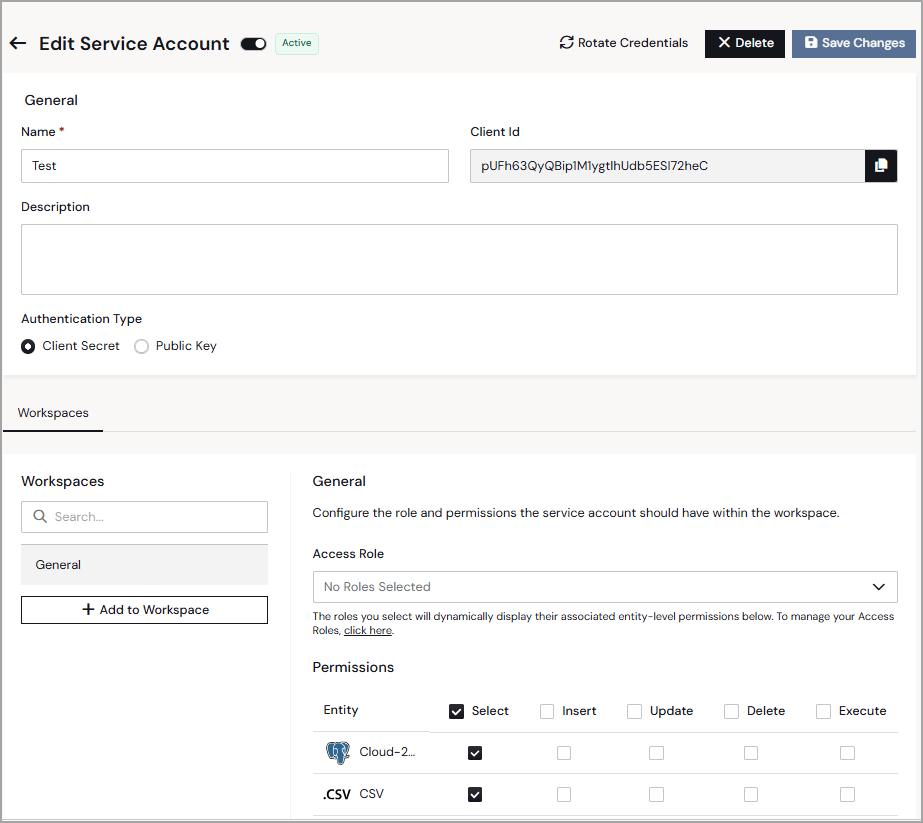 (Optional) Select a **Workspace** to apply the access to.
(Optional) Click **+ Add to Workspace** to add the service account to another workspace. See [Add a Service Account to a Workspace](#add-a-service-account-to-a-workspace) for details.
(Optional) Add an **Access Role** to the service account. Selecting an access role automatically
updates the **Permissions** to the entities below.
(Optional) In **Permissions**, manually select the service account's permissions to entities
(data connections and virtual schemas) in your Connect AI instance. For more information about
permissions, see [Permissions and Access Control](/en/Permissions).
Click **Save Changes** to save the service account settings.
## Edit a Service Account
You can modify any service account, rotate credentials, or delete a service account at any time by clicking the rotate, edit, or delete icons in the **Service Accounts** list.
In the **Edit Service Account** page, you can do the following:
* Edit the **Name** and **Description** fields.
* Add the service account to a workspace.
* Add and remove access roles for the selected workspace.
* Manually update permissions for the selected workspace.
* Rotate credentials (the current credentials stop working immediately).
* Delete the entire service account.
## Add a Service Account to a Workspace
A service account must be added to a workspace before you can assign it an access role in that workspace.
In the **Workspaces** section of the **Edit Service Account** page, click **+ Add to Workspace** to open the **Add Service Account to Workspace** dialog.
Select the **Workspace** to add the service account to. Click **Next**.
Select an **Access Role** (optional) for the service account in the workspace. See [Roles](/en/Identities/Roles) for information on creating access roles.
Click **Add** to add the service account to the workspace.
## Delete a Service Account
To delete a service account, click **Delete** on the **Edit Service Account** page.
This documentation is built and hosted on [Mintlify](https://mintlify.com), a developer documentation platform.
(Optional) Select a **Workspace** to apply the access to.
(Optional) Click **+ Add to Workspace** to add the service account to another workspace. See [Add a Service Account to a Workspace](#add-a-service-account-to-a-workspace) for details.
(Optional) Add an **Access Role** to the service account. Selecting an access role automatically
updates the **Permissions** to the entities below.
(Optional) In **Permissions**, manually select the service account's permissions to entities
(data connections and virtual schemas) in your Connect AI instance. For more information about
permissions, see [Permissions and Access Control](/en/Permissions).
Click **Save Changes** to save the service account settings.
## Edit a Service Account
You can modify any service account, rotate credentials, or delete a service account at any time by clicking the rotate, edit, or delete icons in the **Service Accounts** list.
In the **Edit Service Account** page, you can do the following:
* Edit the **Name** and **Description** fields.
* Add the service account to a workspace.
* Add and remove access roles for the selected workspace.
* Manually update permissions for the selected workspace.
* Rotate credentials (the current credentials stop working immediately).
* Delete the entire service account.
## Add a Service Account to a Workspace
A service account must be added to a workspace before you can assign it an access role in that workspace.
In the **Workspaces** section of the **Edit Service Account** page, click **+ Add to Workspace** to open the **Add Service Account to Workspace** dialog.
Select the **Workspace** to add the service account to. Click **Next**.
Select an **Access Role** (optional) for the service account in the workspace. See [Roles](/en/Identities/Roles) for information on creating access roles.
Click **Add** to add the service account to the workspace.
## Delete a Service Account
To delete a service account, click **Delete** on the **Edit Service Account** page.
This documentation is built and hosted on [Mintlify](https://mintlify.com), a developer documentation platform.