> ## Documentation Index
> Fetch the complete documentation index at: https://docs.cloud.cdata.com/llms.txt
> Use this file to discover all available pages before exploring further.
# QuickBooks Online
export const title_0 = "QuickBooks Online";
CData Connect AI includes embedded OAuth credentials for QuickBooks Online that simplify the connection process. With the embedded credentials, you can connect to QuickBooks Online without creating a custom OAuth application.
Note that the embedded OAuth credentials have limited functionality due to monthly query limits imposed by Intuit. If you exceed the monthly query limit, queries will return an error until the limit resets.
## Create a Custom OAuth Application
To avoid monthly query limits and experience full functionality, create a custom OAuth application in QuickBooks Online. This is recommended for production use or any scenario where you expect regular or high-volume queries.
To create a custom OAuth application in the Intuit Developer Portal, follow these steps:
Log in to the Intuit Developer Portal.
* Go to: [https://developer.intuit.com](https://developer.intuit.com/).
* Sign in with your Intuit account (or create one if you don't already have one).
Create a new app.
* From the dashboard, open an existing **Workspace** or create a new one if you do not yet have one. In the **Workspace**, click the **+** button to create a new app.
Set up app details.
* The **Type** screen should automatically pick **QuickBooks Online and Payments**.
* On the **Basic info** screen, provide a name for your application (for example, *CData QuickBooks Integration*).
* On **Permissions**, select the **com.intuit.quickbooks.accounting** permission.
* Click **Done** and **Confirm** the creation of your application. Afterwards, **Open** your application.
Configure the redirect URI.
* In the App Overview of your application, go to **Settings** > **Redirect URIs**. Click **Add URI** and add the following redirect URI (used by CData connectors): *[https://oauth.cdata.com/oauth/](https://oauth.cdata.com/oauth/)*.
* **Save** the configuration.
Set the Regulated Industries.
* Go to **Settings** > **Regulated Industries**. Select **None of the above**, then **Save**.
* This will shorten the questionnaire in the next step. Intuit recommends waiting 30 minutes after saving to ensure this takes effect.
Submit the app assessment for production keys.
* Intuit requires an assessment to be submitted for every application, even if it is used for internal use in your own company. In the App Overview, navigate to the **Compliance** tab. Click **Start questionnaire**.
* You should only see two tabs: **General Questions** and **App Information**. If you see more than two tabs, please wait for Step 5 to take effect.
* Under **General Info**, answer all the questions as per your organization's specifications.
* Under **App Information**, select **You were asked to create this app in order to get credentials/keys to be used on another platform that integrates with QuickBooks** for question 1. Provide the following link: *[https://www.cdata.com/drivers/qbonline/](https://www.cdata.com/drivers/qbonline/)*.
* Click **Submit** once you are done and wait to receive the **Application Assessment - Questionnaire Completed** email.
Retrieve your credentials.
* Once Intuit has approved your application, copy the **Client ID** and **Client Secret** generated for your app from the **Keys and Credentials** > **Production** section of the App Overview. You enter these values in the setup steps below.
## Setup Guide
Each connection to QuickBooks Online can only connect to one company.
Follow these steps to connect QuickBooks Online to your Connect AI account:
Open the **Sources** page of the Connect AI navigation menu.
Click **+ Add Connection** in the upper-right corner.
Type *QuickBooks Online* into the search field, then click the data source name.
On the **Basic Settings** tab of the new connection, enter a connection name or keep the default name.
Set **Use Sandbox** to **True** only if you are using a sandbox account. Otherwise, leave it as **False**.
Select the **Country Code** that best matches your location.
If you are using a custom OAuth application, click **Advanced Settings** and enter the **Client Id** and **Client Secret** obtained from the prerequisites.
If you are using embedded credentials, click **Sign in** to connect using those credentials. This action opens the QuickBooks Online sign-in page in a new tab.
At the top of the Connect AI **Add {title_0} Connection** page, click **Save & Test**.
* If the connection test succeeds, a **Connection successfully saved** message appears, indicating that your connection has been created. The **Status** on the **Edit Connection** page also changes to **Authenticated**. View the data model of your successful connection in the right pane of the **Edit Connection** page, in the **Data Model** tab.
* If the connection test fails, ensure that you entered your login information correctly with no stray spaces or other characters. Connect AI displays error messages under the required fields with missing data. Some data sources require that you sign in directly to the source website. If you did not, an error message appears under the **Sign in** button. Correct the errors and try again.
* Unsuccessful connections are saved as drafts and have a **Status** of **Not Authenticated**. You can return to the connection and authenticate it later.
## Common Queries
The **Data Model** tab, in addition to the QuickBooks Online data model, contains a list of common queries used for QuickBooks Online. Expand **Common Queries** to view the SQL query templates, such as **Customer Outstanding Balances Report**. Click the ellipsis next to the query title and click **Execute Query**.
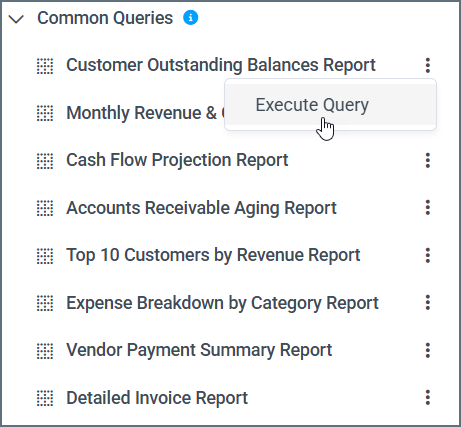 The [Data Explorer](/en/Data-Explorer) screen appears, displaying the SQL query. From there, you can execute, edit, or save the query. You can also save the query as a derived view, so that you can access it from external integrations.
## More Information
For more information about interactions between Connect AI and QuickBooks Online, see [this information page](https://cdn.cdata.com/help/RNM/cloud/default.htm#default).
The [Data Explorer](/en/Data-Explorer) screen appears, displaying the SQL query. From there, you can execute, edit, or save the query. You can also save the query as a derived view, so that you can access it from external integrations.
## More Information
For more information about interactions between Connect AI and QuickBooks Online, see [this information page](https://cdn.cdata.com/help/RNM/cloud/default.htm#default).