> ## Documentation Index
> Fetch the complete documentation index at: https://docs.cloud.cdata.com/llms.txt
> Use this file to discover all available pages before exploring further.
# Context Editor
> Improve query accuracy and reply times, and save tokens by providing business terms, dataset definitions, and column mappings that the MCP server uses to interpret your prompts.
The Context Editor gives AI models the business knowledge they need to translate natural language prompts into accurate data queries. You can import context from an existing resource (add external context), or create context manually using the built-in editor (add new context).
The left pane of the **Context Editor** page (in list view) contains **User Context** and **Global Context**.
## User Context
User context is the information about yourself that is sent to the LLM once at the beginning of each conversation. You can add information such as your role, what kind of answers you prefer, and your time zone. You can add or edit information on this page or in the **User Context** tab of **Settings**.
## Global Context
Global context manages what AI agents know about your data.
### List View
Click **Global Context** and the list view icon to view a list of all the entities in your account and the number of named contexts assigned to them. The named contexts directly under **Global Context** apply to all connections and datasets, and you can have many of them. Use the search bar to find an entity. Expand an entity in the left pane to view the named contexts assigned to it. Click **+ Add Context** to add a new context or a new external context.
### Graph View
Click **Global Context** and the graph view icon to view a context graph of all the context entities and how they relate to each other across the semantic layer. Use the search bar to find an entity in the graph.
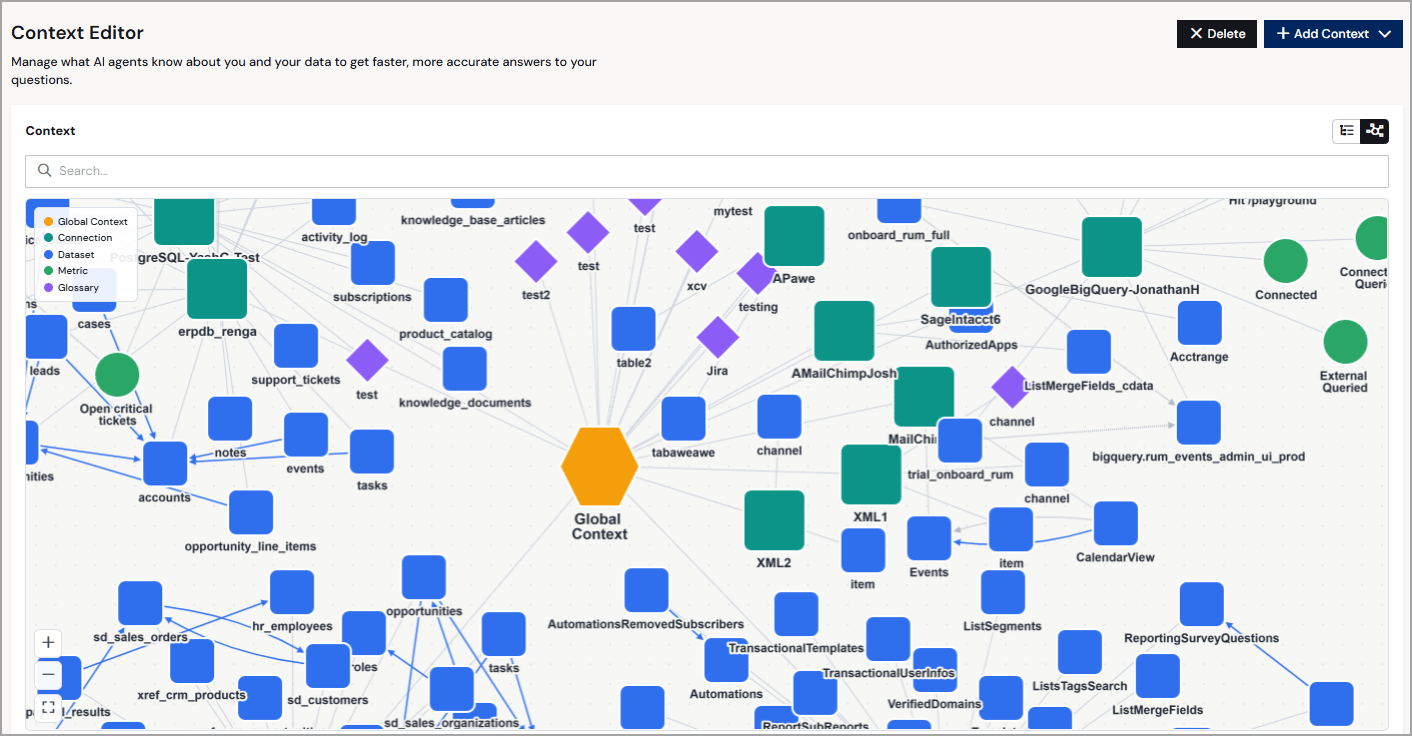 The context graph contains the following entity types:
* **Global Context**: The account-level context that applies to all connections and datasets. Use Global Context to define terms and rules that span your entire data environment.
* **Connection**: A named data source (for example, *MailChimp* or *PostgreSQL*). Context defined at the connection level applies to all datasets within that connection.
* **Dataset**: A table or query within a connection. Dataset-level context provides field-specific details to help the MCP server interpret queries against that dataset.
* **Metric**: A reusable measure defined on one or more fields.
* **Glossary**: A business term linked to one or more columns. Glossary entries let the MCP server recognize business language. For example, map *Revenue* to the `total_sales` column so that prompts return accurate results.
### View Context Details
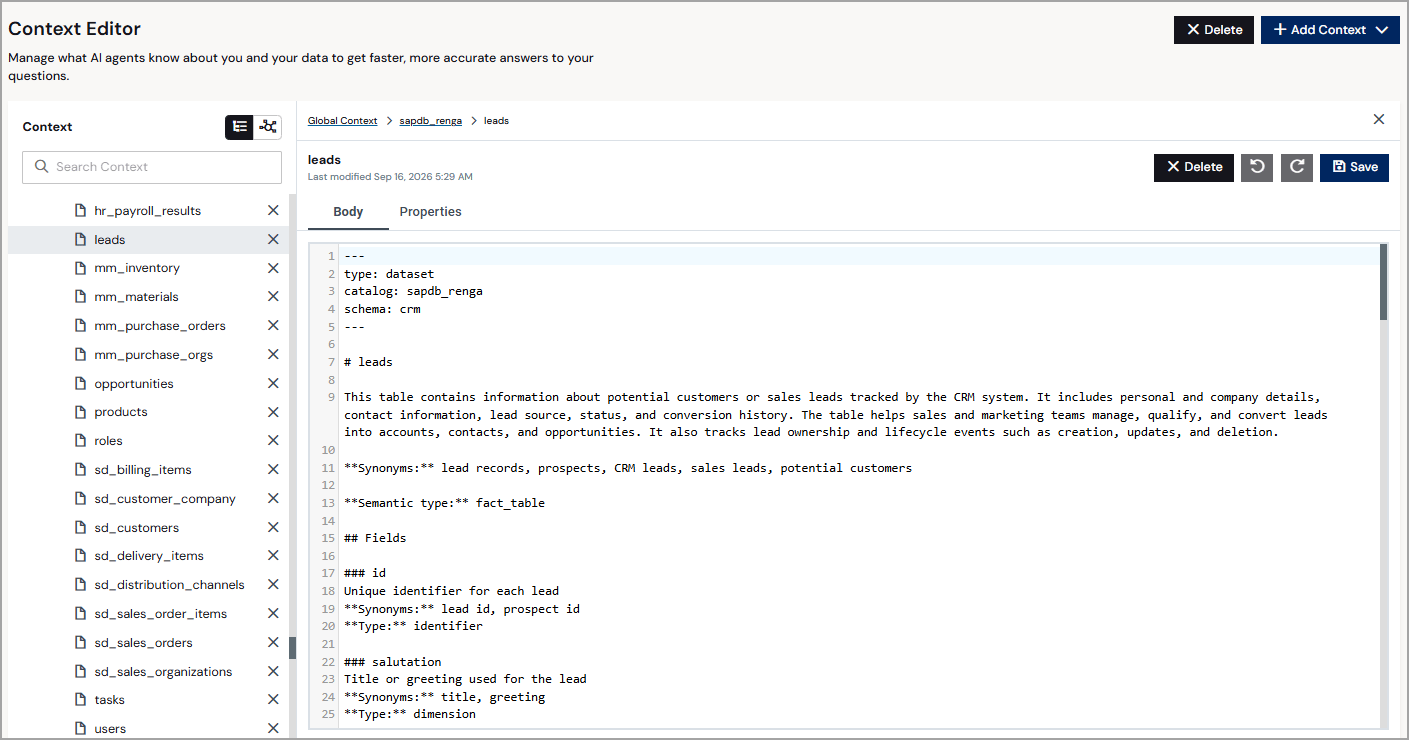
In list view or graph view, click an entity to view details about the entity.
The context graph contains the following entity types:
* **Global Context**: The account-level context that applies to all connections and datasets. Use Global Context to define terms and rules that span your entire data environment.
* **Connection**: A named data source (for example, *MailChimp* or *PostgreSQL*). Context defined at the connection level applies to all datasets within that connection.
* **Dataset**: A table or query within a connection. Dataset-level context provides field-specific details to help the MCP server interpret queries against that dataset.
* **Metric**: A reusable measure defined on one or more fields.
* **Glossary**: A business term linked to one or more columns. Glossary entries let the MCP server recognize business language. For example, map *Revenue* to the `total_sales` column so that prompts return accurate results.
### View Context Details
In list view or graph view, click an entity to view details about the entity.
 ## Add Context
There are two ways to add context:
* **Options menu**: Click the options menu (⋮) to the right of an entity to add context directly to that entity.
* **Add Context button**: Click **Add Context** to add context. You must select the entity type to apply it to: a specific connection or global context that applies to all connections and datasets.
You can import context from a dbt or Power BI file, or generate context using AI. You can also add new context manually by editing a context template.
### Add External Context
Use Add External Context to add semantic context globally or to a connection. The connection appears as the parent, with an expandable list of its datasets below it.
Click **+ Add Context > Add External Context**. A dialog appears.
In **Step 1** of the dialog, select a resource from the list of connections, or select **Global Context** to apply the context to all connections and datasets. Use the search bar to narrow down your search.
Click **Next**.
In **Step 2** of the dialog, select the **Source** of the semantic context: **dbt** or **Power BI**. Alternatively, you can have Connect AI generate context using AI.
* For **dbt**, paste the contents of `manifest.json` in the space below.
* For **Power BI**, choose the Power BI (.pbix) file containing the semantic context.
Snowflake connection context has an additional option: a **Snowflake Semantic View** YAML file.
* For **Generate Context**, toggle **Include Sample Values** on to improve accuracy, then click **Generate**. You can close this dialog and Connect AI will continue to generate context in the background.
Generated context cannot be used on global context, only connection context.
Click **Add** to add the context. The context appears in the **Global Context** list.
### Add New Context
To add a new context document manually to Global Context or to a connection, do the following:
Click **+ Add Context > Add New Context**. A dialog appears.
In **Step 1** of the dialog, select a resource from the list of connections, or select **Global Context** to apply the context to all connections and datasets. Use the search bar to narrow down your search.
Click **Next**.
In **Step 2** of the dialog, enter a name for the new context.
Click **Add**.
Edit the context template to define terms, relationships, or business rules that help the MCP server interpret your prompts accurately. See [Example: Jira Issues Dataset](#example-jira-issues-dataset) for a completed template.
Click **Save**.
### Example: Jira Issues Dataset
The context template uses the following fields:
* **type**: The kind of concept, which can be `dataset` (a table or view), `metric` (a measure), or `glossary` (a business term or rule).
* **title**: The name of the concept as it appears in the context graph.
* **semanticType**: Your own sub-classification, in free text (for example, `fact_table`, `dimension`, or `kpi`). Connect AI uses this to group related concepts.
* **synonyms**: Other names users might type when asking about this concept. Include the words your users actually use.
In the body of the template:
* **Heading and Description**: Tell the MCP server what the concept covers and when it is relevant.
* **Related**: Other concepts this one depends on or explains.
* **Columns** (datasets only): The fields that carry meaning, with descriptions. Remove this section for a glossary term or metric.
The following example shows a completed context file for a Jira Issues dataset.
```text wrap theme={null}
---
type: dataset
title: Jira Issues
semanticType: fact_table
synonyms:
- tickets
- tasks
- bugs
- stories
---
# Jira Issues
Contains all issues tracked in Jira, including bugs, tasks, stories, and epics.
Use this dataset to query issue status, assignments, priorities, and project breakdowns.
## Related
- Jira Projects
- Jira Users
## Columns
- **issue_key**—unique identifier for the issue (for example, PROJ-123)
- **summary**—short description of the issue
- **status**—current workflow state (for example, *To Do*, *In Progress*, *Done*)
- **assignee**—the user assigned to the issue
- **priority**—severity level (for example, *High*, *Medium*, *Low*)
- **project**—the Jira project the issue belongs to
- **issue_type**—category of issue (for example, *Bug*, *Story*, *Epic*, *Task*)
```
## Delete Context
To delete a context document:
Click the delete icon next to the individual concept. To delete all concepts for a connection, click the options menu (⋮) to the right of the connection and click **Delete**.
In the dialog, click **Delete**.
## Add Context
There are two ways to add context:
* **Options menu**: Click the options menu (⋮) to the right of an entity to add context directly to that entity.
* **Add Context button**: Click **Add Context** to add context. You must select the entity type to apply it to: a specific connection or global context that applies to all connections and datasets.
You can import context from a dbt or Power BI file, or generate context using AI. You can also add new context manually by editing a context template.
### Add External Context
Use Add External Context to add semantic context globally or to a connection. The connection appears as the parent, with an expandable list of its datasets below it.
Click **+ Add Context > Add External Context**. A dialog appears.
In **Step 1** of the dialog, select a resource from the list of connections, or select **Global Context** to apply the context to all connections and datasets. Use the search bar to narrow down your search.
Click **Next**.
In **Step 2** of the dialog, select the **Source** of the semantic context: **dbt** or **Power BI**. Alternatively, you can have Connect AI generate context using AI.
* For **dbt**, paste the contents of `manifest.json` in the space below.
* For **Power BI**, choose the Power BI (.pbix) file containing the semantic context.
Snowflake connection context has an additional option: a **Snowflake Semantic View** YAML file.
* For **Generate Context**, toggle **Include Sample Values** on to improve accuracy, then click **Generate**. You can close this dialog and Connect AI will continue to generate context in the background.
Generated context cannot be used on global context, only connection context.
Click **Add** to add the context. The context appears in the **Global Context** list.
### Add New Context
To add a new context document manually to Global Context or to a connection, do the following:
Click **+ Add Context > Add New Context**. A dialog appears.
In **Step 1** of the dialog, select a resource from the list of connections, or select **Global Context** to apply the context to all connections and datasets. Use the search bar to narrow down your search.
Click **Next**.
In **Step 2** of the dialog, enter a name for the new context.
Click **Add**.
Edit the context template to define terms, relationships, or business rules that help the MCP server interpret your prompts accurately. See [Example: Jira Issues Dataset](#example-jira-issues-dataset) for a completed template.
Click **Save**.
### Example: Jira Issues Dataset
The context template uses the following fields:
* **type**: The kind of concept, which can be `dataset` (a table or view), `metric` (a measure), or `glossary` (a business term or rule).
* **title**: The name of the concept as it appears in the context graph.
* **semanticType**: Your own sub-classification, in free text (for example, `fact_table`, `dimension`, or `kpi`). Connect AI uses this to group related concepts.
* **synonyms**: Other names users might type when asking about this concept. Include the words your users actually use.
In the body of the template:
* **Heading and Description**: Tell the MCP server what the concept covers and when it is relevant.
* **Related**: Other concepts this one depends on or explains.
* **Columns** (datasets only): The fields that carry meaning, with descriptions. Remove this section for a glossary term or metric.
The following example shows a completed context file for a Jira Issues dataset.
```text wrap theme={null}
---
type: dataset
title: Jira Issues
semanticType: fact_table
synonyms:
- tickets
- tasks
- bugs
- stories
---
# Jira Issues
Contains all issues tracked in Jira, including bugs, tasks, stories, and epics.
Use this dataset to query issue status, assignments, priorities, and project breakdowns.
## Related
- Jira Projects
- Jira Users
## Columns
- **issue_key**—unique identifier for the issue (for example, PROJ-123)
- **summary**—short description of the issue
- **status**—current workflow state (for example, *To Do*, *In Progress*, *Done*)
- **assignee**—the user assigned to the issue
- **priority**—severity level (for example, *High*, *Medium*, *Low*)
- **project**—the Jira project the issue belongs to
- **issue_type**—category of issue (for example, *Bug*, *Story*, *Epic*, *Task*)
```
## Delete Context
To delete a context document:
Click the delete icon next to the individual concept. To delete all concepts for a connection, click the options menu (⋮) to the right of the connection and click **Delete**.
In the dialog, click **Delete**.