> ## Documentation Index
> Fetch the complete documentation index at: https://docs.cloud.cdata.com/llms.txt
> Use this file to discover all available pages before exploring further.
# Connect Gateway
> The Connect Gateway feature of Connect AI is software you install in an on-premises network. The gateway acts as a bridge between your on-premises data (not in the cloud) and Connect AI.
The Connect Gateway is an on-premises gateway, which you can run as a Docker container or deploy to Kubernetes via Helm. The gateway acts as a secure reverse tunnel between the data behind your company's firewall, private network, or Virtual Private Cloud (VPC) and the Connect AI cloud-based services. It allows Connect AI to access your data without exposing your data directly to the internet.
 You then register each gateway in the Connect AI user interface, within the individual connection setup. You can have gateways in multiple locations. You must register a gateway in Connect AI for each location.
The Connect Gateway provides high availability by supporting multiple gateway instances—either multiple Docker containers, or replicas in a Kubernetes deployment—pointing to the same location and account Id. If one instance goes down, requests are automatically routed to the remaining gateway instances.
The following diagram shows how Connect Gateway supports multiple locations and multiple data sources.
You then register each gateway in the Connect AI user interface, within the individual connection setup. You can have gateways in multiple locations. You must register a gateway in Connect AI for each location.
The Connect Gateway provides high availability by supporting multiple gateway instances—either multiple Docker containers, or replicas in a Kubernetes deployment—pointing to the same location and account Id. If one instance goes down, requests are automatically routed to the remaining gateway instances.
The following diagram shows how Connect Gateway supports multiple locations and multiple data sources.
 Currently, Connect AI supports the following connectors with the Connect Gateway:
* [API](/en/Data-Sources/APIConnector)
* [Confluence](/en/Data-Sources/Confluence)
* [Databricks](/en/Data-Sources/Databricks)
* [GitHub](/en/Data-Sources/GitHub)
* [Jira](/en/Data-Sources/JIRA)
* [MySQL](/en/Data-Sources/MySQL)
* [PostgreSQL](/en/Data-Sources/PostgreSQL)
* [SAP Business One](/en/Data-Sources/SAPBusinessOne)
* [SAP Gateway](/en/Data-Sources/SAPGateway)
* [Snowflake](/en/Data-Sources/Snowflake)
* [Splunk](/en/Data-Sources/Splunk)
* [SQL Server](/en/Data-Sources/SQL)
Contact [CData Support](https://www.cdata.com/support/submit.aspx) if you need a different connector with the Connect Gateway.
Setting up the Connect Gateway involves three main steps:
[Register the Connect Gateway in Connect AI](#register-the-connect-gateway-in-connect-ai).
Install and run the on-premises gateway in each location where your on-premises data is located. You can either [deploy the Connect Gateway with Docker](#deploy-the-connect-gateway-with-docker) or [deploy the Connect Gateway on Kubernetes](#deploy-the-connect-gateway-on-kubernetes).
[Finish the Connect Gateway setup](#finish-connect-gateway-setup) in Connect AI to test the gateway and complete the connection.
## Register the Connect Gateway in Connect AI
To register the Connect Gateway in Connect AI:
Go to **Sources** and click **Add Connection** for a new connection, or edit an existing connection.
Click the **Gateways** tab in the **Add/Edit Connection** page.
In **Gateways**, click **Add**. The **Add Gateway** dialog appears.
Currently, Connect AI supports the following connectors with the Connect Gateway:
* [API](/en/Data-Sources/APIConnector)
* [Confluence](/en/Data-Sources/Confluence)
* [Databricks](/en/Data-Sources/Databricks)
* [GitHub](/en/Data-Sources/GitHub)
* [Jira](/en/Data-Sources/JIRA)
* [MySQL](/en/Data-Sources/MySQL)
* [PostgreSQL](/en/Data-Sources/PostgreSQL)
* [SAP Business One](/en/Data-Sources/SAPBusinessOne)
* [SAP Gateway](/en/Data-Sources/SAPGateway)
* [Snowflake](/en/Data-Sources/Snowflake)
* [Splunk](/en/Data-Sources/Splunk)
* [SQL Server](/en/Data-Sources/SQL)
Contact [CData Support](https://www.cdata.com/support/submit.aspx) if you need a different connector with the Connect Gateway.
Setting up the Connect Gateway involves three main steps:
[Register the Connect Gateway in Connect AI](#register-the-connect-gateway-in-connect-ai).
Install and run the on-premises gateway in each location where your on-premises data is located. You can either [deploy the Connect Gateway with Docker](#deploy-the-connect-gateway-with-docker) or [deploy the Connect Gateway on Kubernetes](#deploy-the-connect-gateway-on-kubernetes).
[Finish the Connect Gateway setup](#finish-connect-gateway-setup) in Connect AI to test the gateway and complete the connection.
## Register the Connect Gateway in Connect AI
To register the Connect Gateway in Connect AI:
Go to **Sources** and click **Add Connection** for a new connection, or edit an existing connection.
Click the **Gateways** tab in the **Add/Edit Connection** page.
In **Gateways**, click **Add**. The **Add Gateway** dialog appears.
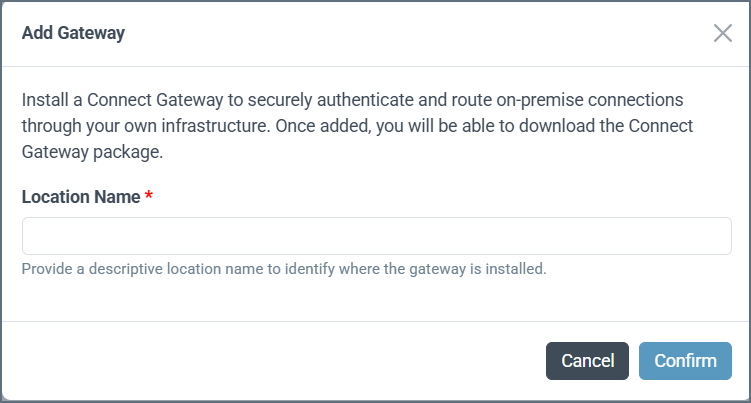 Enter a descriptive location name to identify where the gateway is installed, and click **Confirm**.
Your location appears in the **Gateways** list, along with a key and a **Pending** status. Click the eye icon to view the key.
Enter a descriptive location name to identify where the gateway is installed, and click **Confirm**.
Your location appears in the **Gateways** list, along with a key and a **Pending** status. Click the eye icon to view the key.
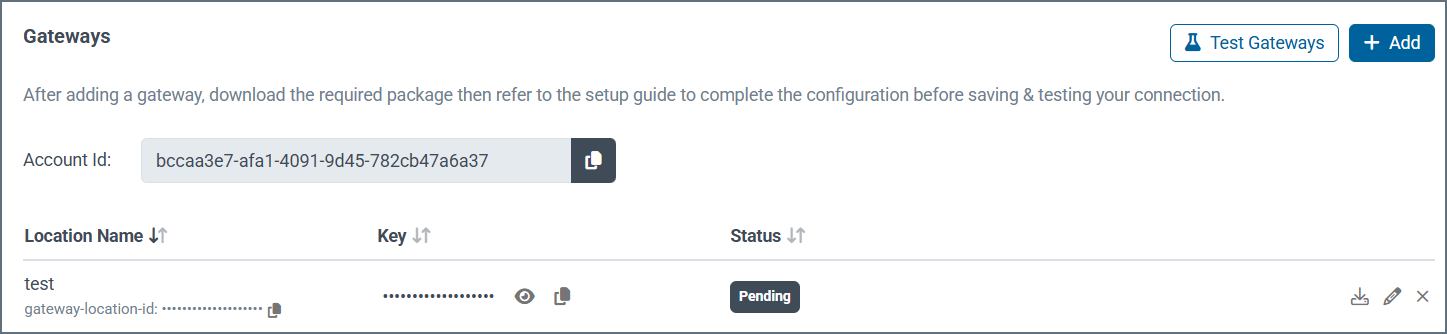 You need to copy the following values for the on-premises gateway (click the copy icons):
* **Account Id**–this is the ACCOUNT\_ID environment variable for the on-premises gateway.
* **Location Id**–this is the GATEWAY\_LOCATION\_ID environment variable for the on-premises gateway.
* **Key**–this is the GATEWAY\_API\_KEY environment variable for the on-premises gateway.
## Deploy the Connect Gateway with Docker
The on-premises gateway is a lightweight service that runs inside your network and acts as a secure reverse tunnel between Connect AI and your local data sources. The gateway registers itself with Connect AI on startup. It then listens for incoming connections, via Azure Relay technology, without ever exposing them to the public internet.
The gateway is protocol-agnostic: it forwards raw bytes without any knowledge of the database protocol (such as MySQL, PostgreSQL, or SQL Server), making it compatible with any TCP-based data source.
### Prerequisites
To run the Connect Gateway as a Docker container, you must have the following:
* Docker installed on the host machine.
* Network access to `cloud.cdata.com`.
* The gateway created in Connect AI.
### Environment Variables
The following environment variables are required to run the gateway:
| **Variable** | **Description** |
| :-------------------- | :------------------------------------------------------------------------------------------------------------------------------------------- |
| GATEWAY\_LOCATION\_ID | The unique identifier for this gateway instance. Copy the value under the user-defined **Location Name** in the Gateways list in Connect AI. |
| GATEWAY\_API\_KEY | The secret API key used to authenticate this gateway with Connect AI. Copy the value under **Key** in the Gateways list in Connect AI. |
| ACCOUNT\_ID | Your CData Connect AI account identifier. This is specific to your organization. Copy **Account Id** in the Gateways list in Connect AI. |
### Run the Gateway in Docker
Run the gateway as follows:
```bash wrap theme={null}
docker run \
--name my-onprem-gateway \
-e GATEWAY_LOCATION_ID= \
-e GATEWAY_API_KEY= \
-e ACCOUNT_ID= \
connectaipublic.azurecr.io/connectgateway:latest
```
`docker run` will pull the Docker image from the registry if it is not already present on the host.
#### View Docker Logs
```bash wrap theme={null}
docker logs -f my-onprem-gateway
```
#### Stop the Gateway
```bash wrap theme={null}
docker stop my-onprem-gateway
docker rm my-onprem-gateway
```
### Docker Compose
Copy the following and save as `docker-compose.yml`:
```yaml theme={null}
version: "3.8"
services:
onprem-gateway:
image: connectaipublic.azurecr.io/connectgateway:latest
container_name: my-onprem-gateway
restart: unless-stopped
environment:
GATEWAY_LOCATION_ID:
GATEWAY_API_KEY:
ACCOUNT_ID:
```
#### Start the Gateway
```bash wrap theme={null}
docker compose up
```
`docker compose up` will pull the Docker image from the registry if it is not already present on the host.
#### View Logs
```bash wrap theme={null}
docker compose logs -f
```
#### Stop the Gateway
```bash wrap theme={null}
docker compose down
```
## Deploy the Connect Gateway on Kubernetes
The Connect Gateway Kubernetes Helm chart is available in a [GitHub repository](https://github.com/CDataSoftware/connect-gateway-helm/).
Kubernetes deployment requires the following:
* Kubernetes 1.25 or later
* Helm 3.10 or later
* Metrics Server installed on your cluster (required for memory-based autoscaling)
* Network egress from the cluster to `cloud.cdata.com`
* Your **Account Id**, **Location Id**, and **Key** from Connect AI. See [Register the Connect Gateway in Connect AI](#register-the-connect-gateway-in-connect-ai) for the location of these values.
### Quick Start
Add the Helm repository:
```bash wrap theme={null}
helm repo add cdata https://cdatasoftware.github.io/connect-gateway-helm
helm repo update
```
Install the chart:
```bash wrap theme={null}
helm install connect-gateway cdata/connect-gateway \
--set gateway.locationId= \
--set gateway.accountId= \
--set gateway.apiKey= \
-n connect-gateway --create-namespace
```
You can also install directly from a [GitHub release](https://github.com/CDataSoftware/connect-gateway-helm/releases). This is useful for air-gapped environments or when you do not want to add a Helm repo. Replace the version in the URL below with the latest release.
```bash wrap theme={null}
helm install connect-gateway \
https://github.com/CDataSoftware/connect-gateway-helm/releases/download/v1.0.0/connect-gateway-1.0.0.tgz \
--set gateway.locationId= \
--set gateway.accountId= \
--set gateway.apiKey= \
-n connect-gateway --create-namespace
```
For production, create a Kubernetes Secret containing your gateway credentials and pass `--set existingSecret=` instead of `--set gateway.apiKey=…`. Passing the API key with `--set` writes it to shell history and to the Helm release's stored values. See the Helm chart [Readme file](https://github.com/CDataSoftware/connect-gateway-helm/blob/main/charts/connect-gateway/README.md) for secret-management patterns.
### Verify the Gateway is Running
Check that the gateway pods are ready and view their logs:
```bash wrap theme={null}
kubectl get pods -n connect-gateway
kubectl logs -n connect-gateway -l app.kubernetes.io/name=connect-gateway -f
```
### Upgrade the Gateway
```bash wrap theme={null}
helm repo update
helm upgrade connect-gateway cdata/connect-gateway -n connect-gateway
```
### Uninstall the Gateway
```bash wrap theme={null}
helm uninstall connect-gateway -n connect-gateway
```
Refer to the Helm chart [Readme file](https://github.com/CDataSoftware/connect-gateway-helm/blob/main/charts/connect-gateway/README.md) for the full list of installation options, configuration values, and secret-management patterns.
## Finish Connect Gateway Setup
Return to Connect AI and finish the Connect Gateway setup.
After you complete the steps to [deploy the Connect Gateway with Docker](#deploy-the-connect-gateway-with-docker) or [deploy the Connect Gateway on Kubernetes](#deploy-the-connect-gateway-on-kubernetes), you can test the gateways you added to **Gateways**. Click the **Connect Gateway** tab of the **Add/Edit Connection** page. Click **Test Gateways**. The **Status** turns to **Success** if all gateway setup is complete.
You still need to click **Save & Test** to test the entire connection.
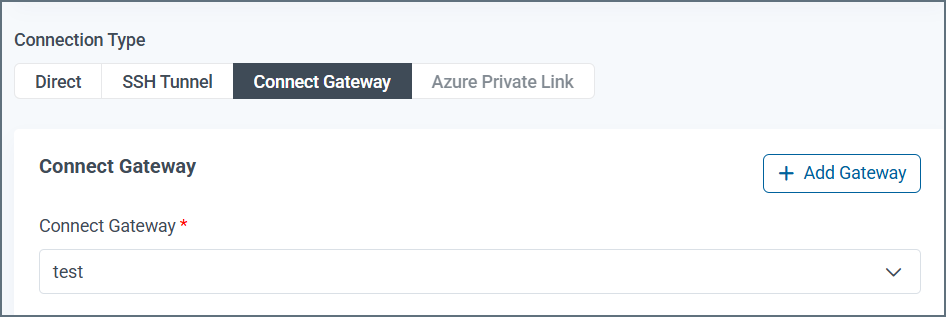
Return to the **Basic Settings** tab of your connection. Under **Connection Type**, select **Connect Gateway**.
Select the **Connect Gateway** location to use from the drop-down list.
You need to copy the following values for the on-premises gateway (click the copy icons):
* **Account Id**–this is the ACCOUNT\_ID environment variable for the on-premises gateway.
* **Location Id**–this is the GATEWAY\_LOCATION\_ID environment variable for the on-premises gateway.
* **Key**–this is the GATEWAY\_API\_KEY environment variable for the on-premises gateway.
## Deploy the Connect Gateway with Docker
The on-premises gateway is a lightweight service that runs inside your network and acts as a secure reverse tunnel between Connect AI and your local data sources. The gateway registers itself with Connect AI on startup. It then listens for incoming connections, via Azure Relay technology, without ever exposing them to the public internet.
The gateway is protocol-agnostic: it forwards raw bytes without any knowledge of the database protocol (such as MySQL, PostgreSQL, or SQL Server), making it compatible with any TCP-based data source.
### Prerequisites
To run the Connect Gateway as a Docker container, you must have the following:
* Docker installed on the host machine.
* Network access to `cloud.cdata.com`.
* The gateway created in Connect AI.
### Environment Variables
The following environment variables are required to run the gateway:
| **Variable** | **Description** |
| :-------------------- | :------------------------------------------------------------------------------------------------------------------------------------------- |
| GATEWAY\_LOCATION\_ID | The unique identifier for this gateway instance. Copy the value under the user-defined **Location Name** in the Gateways list in Connect AI. |
| GATEWAY\_API\_KEY | The secret API key used to authenticate this gateway with Connect AI. Copy the value under **Key** in the Gateways list in Connect AI. |
| ACCOUNT\_ID | Your CData Connect AI account identifier. This is specific to your organization. Copy **Account Id** in the Gateways list in Connect AI. |
### Run the Gateway in Docker
Run the gateway as follows:
```bash wrap theme={null}
docker run \
--name my-onprem-gateway \
-e GATEWAY_LOCATION_ID= \
-e GATEWAY_API_KEY= \
-e ACCOUNT_ID= \
connectaipublic.azurecr.io/connectgateway:latest
```
`docker run` will pull the Docker image from the registry if it is not already present on the host.
#### View Docker Logs
```bash wrap theme={null}
docker logs -f my-onprem-gateway
```
#### Stop the Gateway
```bash wrap theme={null}
docker stop my-onprem-gateway
docker rm my-onprem-gateway
```
### Docker Compose
Copy the following and save as `docker-compose.yml`:
```yaml theme={null}
version: "3.8"
services:
onprem-gateway:
image: connectaipublic.azurecr.io/connectgateway:latest
container_name: my-onprem-gateway
restart: unless-stopped
environment:
GATEWAY_LOCATION_ID:
GATEWAY_API_KEY:
ACCOUNT_ID:
```
#### Start the Gateway
```bash wrap theme={null}
docker compose up
```
`docker compose up` will pull the Docker image from the registry if it is not already present on the host.
#### View Logs
```bash wrap theme={null}
docker compose logs -f
```
#### Stop the Gateway
```bash wrap theme={null}
docker compose down
```
## Deploy the Connect Gateway on Kubernetes
The Connect Gateway Kubernetes Helm chart is available in a [GitHub repository](https://github.com/CDataSoftware/connect-gateway-helm/).
Kubernetes deployment requires the following:
* Kubernetes 1.25 or later
* Helm 3.10 or later
* Metrics Server installed on your cluster (required for memory-based autoscaling)
* Network egress from the cluster to `cloud.cdata.com`
* Your **Account Id**, **Location Id**, and **Key** from Connect AI. See [Register the Connect Gateway in Connect AI](#register-the-connect-gateway-in-connect-ai) for the location of these values.
### Quick Start
Add the Helm repository:
```bash wrap theme={null}
helm repo add cdata https://cdatasoftware.github.io/connect-gateway-helm
helm repo update
```
Install the chart:
```bash wrap theme={null}
helm install connect-gateway cdata/connect-gateway \
--set gateway.locationId= \
--set gateway.accountId= \
--set gateway.apiKey= \
-n connect-gateway --create-namespace
```
You can also install directly from a [GitHub release](https://github.com/CDataSoftware/connect-gateway-helm/releases). This is useful for air-gapped environments or when you do not want to add a Helm repo. Replace the version in the URL below with the latest release.
```bash wrap theme={null}
helm install connect-gateway \
https://github.com/CDataSoftware/connect-gateway-helm/releases/download/v1.0.0/connect-gateway-1.0.0.tgz \
--set gateway.locationId= \
--set gateway.accountId= \
--set gateway.apiKey= \
-n connect-gateway --create-namespace
```
For production, create a Kubernetes Secret containing your gateway credentials and pass `--set existingSecret=` instead of `--set gateway.apiKey=…`. Passing the API key with `--set` writes it to shell history and to the Helm release's stored values. See the Helm chart [Readme file](https://github.com/CDataSoftware/connect-gateway-helm/blob/main/charts/connect-gateway/README.md) for secret-management patterns.
### Verify the Gateway is Running
Check that the gateway pods are ready and view their logs:
```bash wrap theme={null}
kubectl get pods -n connect-gateway
kubectl logs -n connect-gateway -l app.kubernetes.io/name=connect-gateway -f
```
### Upgrade the Gateway
```bash wrap theme={null}
helm repo update
helm upgrade connect-gateway cdata/connect-gateway -n connect-gateway
```
### Uninstall the Gateway
```bash wrap theme={null}
helm uninstall connect-gateway -n connect-gateway
```
Refer to the Helm chart [Readme file](https://github.com/CDataSoftware/connect-gateway-helm/blob/main/charts/connect-gateway/README.md) for the full list of installation options, configuration values, and secret-management patterns.
## Finish Connect Gateway Setup
Return to Connect AI and finish the Connect Gateway setup.
After you complete the steps to [deploy the Connect Gateway with Docker](#deploy-the-connect-gateway-with-docker) or [deploy the Connect Gateway on Kubernetes](#deploy-the-connect-gateway-on-kubernetes), you can test the gateways you added to **Gateways**. Click the **Connect Gateway** tab of the **Add/Edit Connection** page. Click **Test Gateways**. The **Status** turns to **Success** if all gateway setup is complete.
You still need to click **Save & Test** to test the entire connection.
Return to the **Basic Settings** tab of your connection. Under **Connection Type**, select **Connect Gateway**.
Select the **Connect Gateway** location to use from the drop-down list.
 Enter the **Authentication** instructions for the connector according to the connector's **Documentation** pane.
Click **Save & Test** to authenticate your connector.
Enter the **Authentication** instructions for the connector according to the connector's **Documentation** pane.
Click **Save & Test** to authenticate your connector.