> ## Documentation Index
> Fetch the complete documentation index at: https://docs.cloud.cdata.com/llms.txt
> Use this file to discover all available pages before exploring further.
# CData Sync
> This page outlines the steps to connect CData Sync to your Connect AI Embed account.
## Prerequisites
Before you connect, you must first generate an [OAuth JWT bearer token](/en/API/Authentication-Embedded). Copy this down, as it acts as your password during authentication.
## Connect to Connect AI Embed
To establish a connection from CData Sync to Connect AI Embed, follow these steps.
Log in to CData Sync.
In the navigation menu, select **Connections**. Click **Add Connection**.
On the **Select Connectors** page, select the **Sources** tab, and enter *CData Connect* in the search field.
Click the download icon to download the connector if it is not already installed.
Click **CData Connect** to configure the connection. A **New Connection** page appears.
Enter the following settings for your connection for your source data.
* **Connection name**—enter the name of your connection for display purposes.
* **Auth Scheme**—use **Basic**.
* **User**—enter your Connect AI username. This is displayed in the top-right corner of the Connect AI interface. For example, *[test@cdata.com](mailto:test@cdata.com)*.
* **Password**—enter the password you created in the prerequisites.
* **URL**—Enter *`https://cloud.cdata.com/api`*.
* **Default Catalog**—(optional) enter the name of your default catalog.
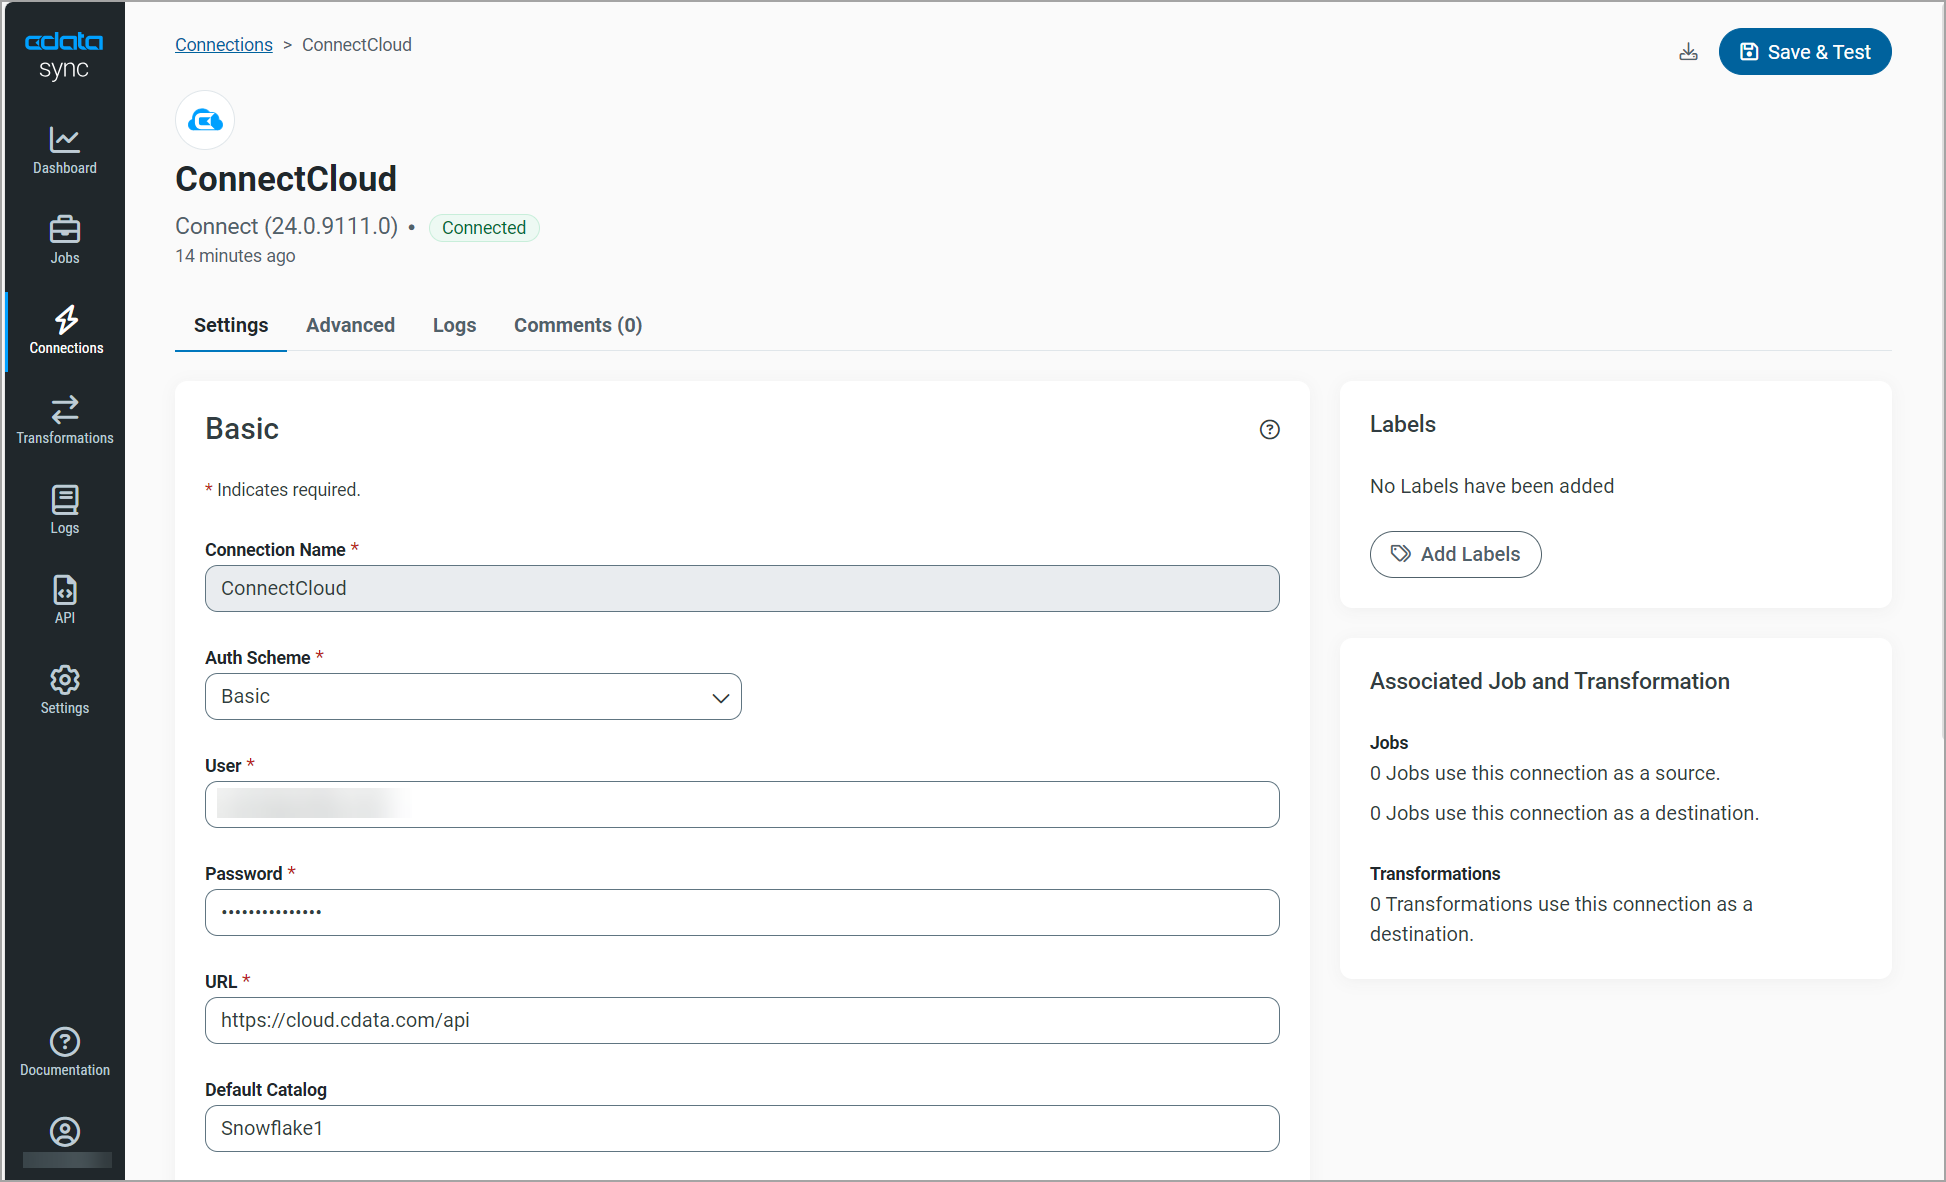 Click **Create & Test**. If the connection is successful, the connection appears on the **Connections** page.
Now you need to configure your connection for your destination data. For this example, the destination data is a SQL Server database.
In the navigation menu, select **Connections**. Click **Add Connection**.
On the **Select Connectors** page, select the **Destinations** tab, and enter *SQL Server* in the search field.
Click the download icon to download the destination connector if it is not already installed.
Click **SQL Server** to configure the connection. A **New Connection** page appears.
Enter the following settings for your connection for your destination data.
For other destination connection configurations, see the [CData Sync documentation](https://cdn.cdata.com/help/ASM/sync/index.html).
* **Connection name**—enter the name of your connection for display purposes.
* **Server**—enter the host name or IP address of the server that hosts the SQL Server database. The default server is localhost.
* **Port**—enter the port number for SQL Server. The default port value is 1433.
* **Database**— enter the default database to which you want to connect when you connect to SQL Server.
* **User**—enter the username that you use to authenticate to SQL Server.
* **Password**—enter the password that you use to authenticate to SQL Server.
Click **Create & Test**. If the connection is successful, the connection appears on the **Connections** page.
Now you need to configure your connection for your destination data. For this example, the destination data is a SQL Server database.
In the navigation menu, select **Connections**. Click **Add Connection**.
On the **Select Connectors** page, select the **Destinations** tab, and enter *SQL Server* in the search field.
Click the download icon to download the destination connector if it is not already installed.
Click **SQL Server** to configure the connection. A **New Connection** page appears.
Enter the following settings for your connection for your destination data.
For other destination connection configurations, see the [CData Sync documentation](https://cdn.cdata.com/help/ASM/sync/index.html).
* **Connection name**—enter the name of your connection for display purposes.
* **Server**—enter the host name or IP address of the server that hosts the SQL Server database. The default server is localhost.
* **Port**—enter the port number for SQL Server. The default port value is 1433.
* **Database**— enter the default database to which you want to connect when you connect to SQL Server.
* **User**—enter the username that you use to authenticate to SQL Server.
* **Password**—enter the password that you use to authenticate to SQL Server.
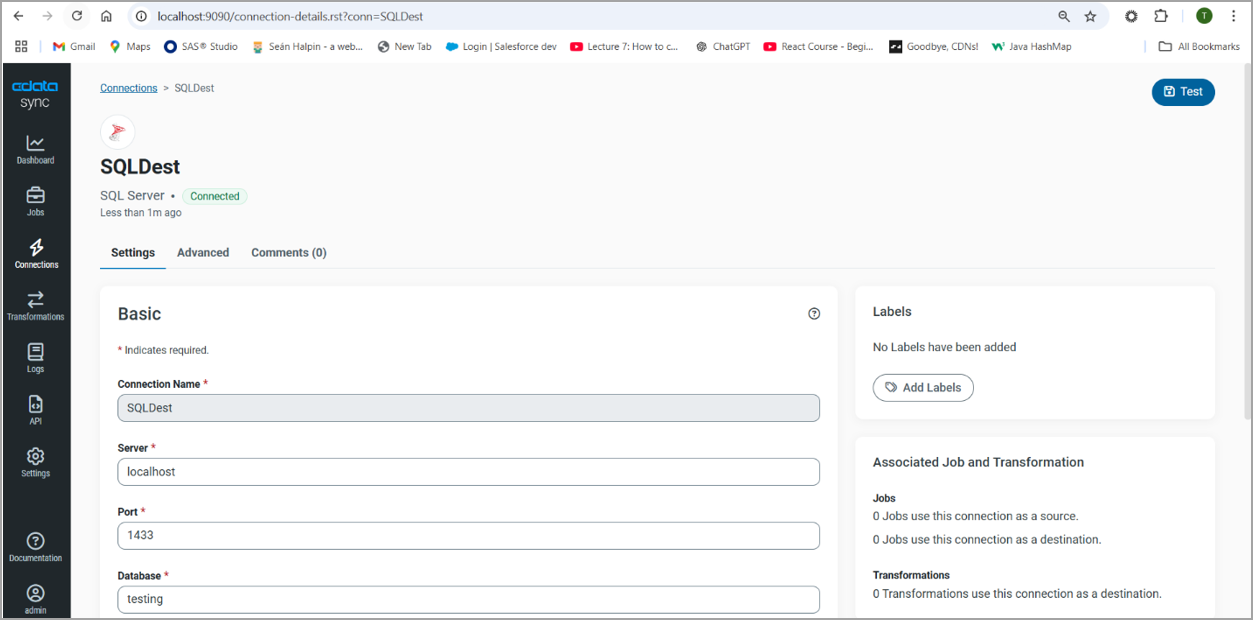 Click **Create & Test**. If the connection is successful, the connection appears on the **Connections** page.
To add a job to CData Sync and run the job, follow these steps.
In the navigation menu, select **Jobs**. Click **Add Job** > **Add New Job**.
In the **Add Job** dialog, enter the following information.
* **Name**—enter the name of the job for display purposes.
* **Source**—select the connection you created.
* **Destination**—select the destination connection you created.
* **Type**—select either **Standard** or **Sync All**.
Click **Add Job**.
In **Jobs**, click the new job you just created. In the **Task** tab, click **Add Tasks**.
Click **Create & Test**. If the connection is successful, the connection appears on the **Connections** page.
To add a job to CData Sync and run the job, follow these steps.
In the navigation menu, select **Jobs**. Click **Add Job** > **Add New Job**.
In the **Add Job** dialog, enter the following information.
* **Name**—enter the name of the job for display purposes.
* **Source**—select the connection you created.
* **Destination**—select the destination connection you created.
* **Type**—select either **Standard** or **Sync All**.
Click **Add Job**.
In **Jobs**, click the new job you just created. In the **Task** tab, click **Add Tasks**.
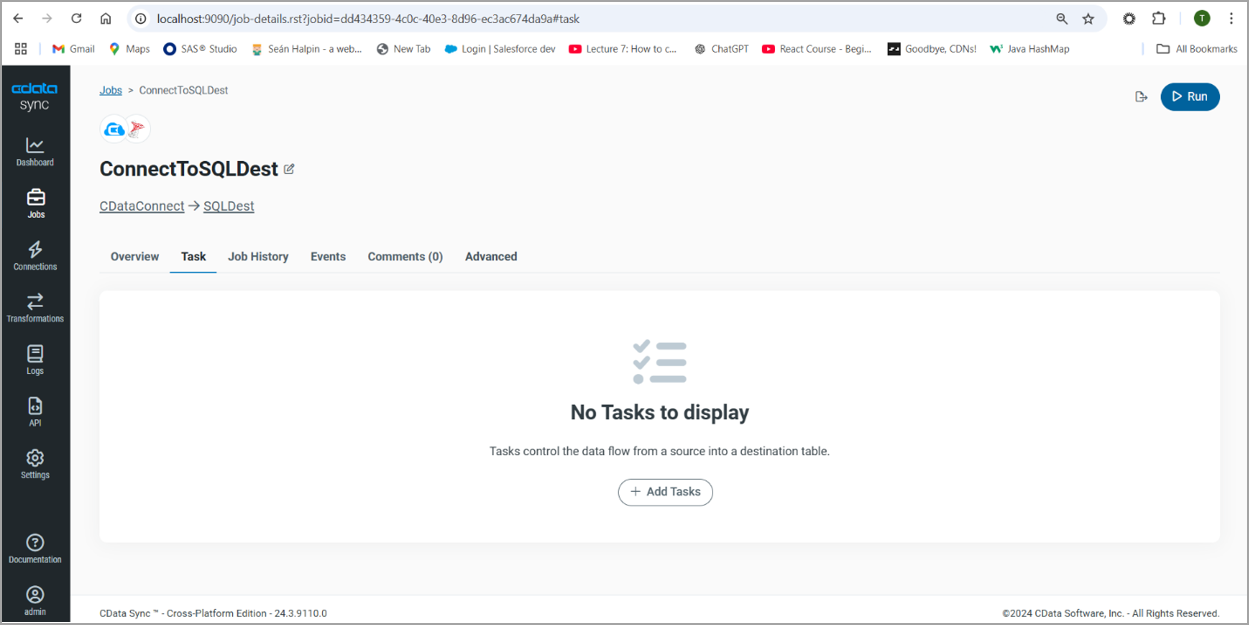 In the **Select Schema** dialog, select the schema and table you want to replicate.
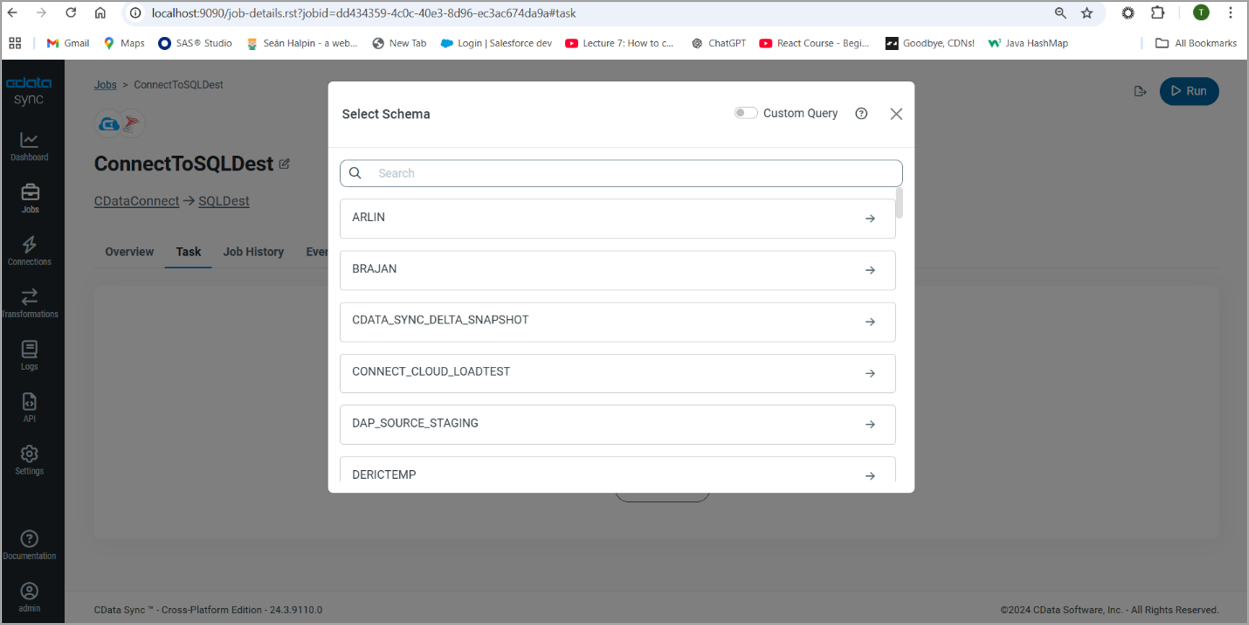 The table is added as a task. Click **Run** to run the task.
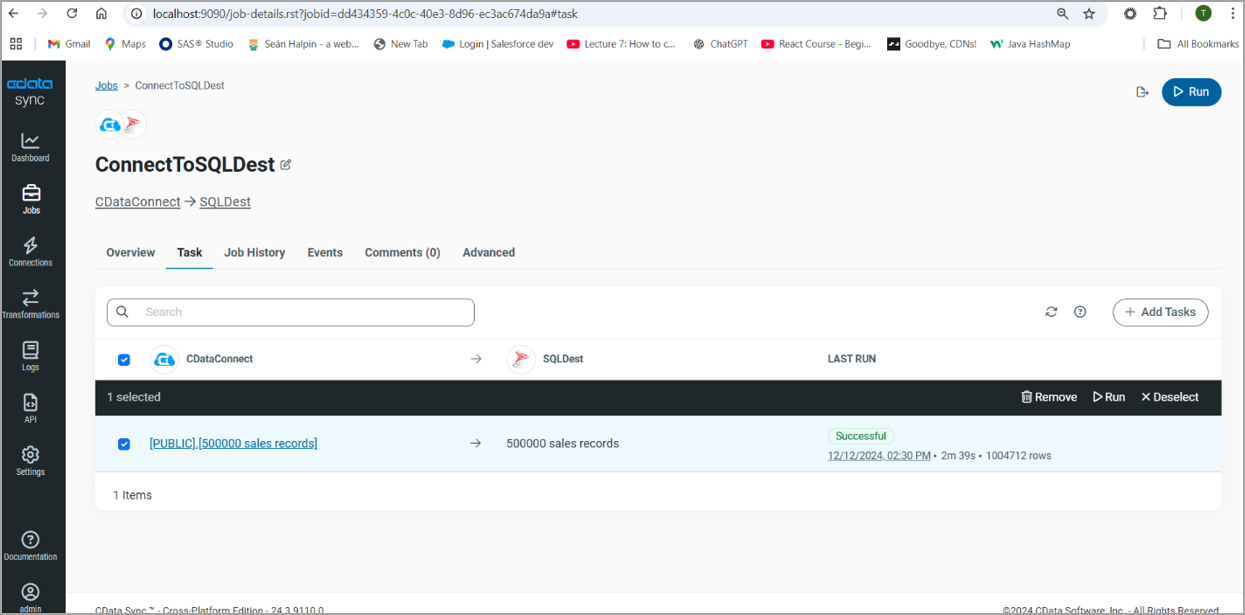 The table is replicated to your destination.